How to install Visual Basic 6.0 in Windows 11

How to install Visual Basic 6.0 in Windows 11

Visual Basic 6 (VB6), introduced in 1998, was a major step forward in programming, particularly for Windows applications. While it has since been succeeded by Visual Basic for Applications (VBA) and the broader Visual Studio .NET framework, VB6 still holds a special place for programmers. It’s a favorite due to its user-friendly interface and rapid application development capabilities.

Microsoft’s confirmation that the VB6 runtime will be supported in Windows 11 for its lifetime still keeps this legacy language relevant. While modern programmers with the best laptops might not care about it much, some developers will find solace in the fact that their legacy applications and development skills remain applicable in a modern environment. In this guide, we will learn how to install and run the software with compatibility mode in Windows 11.

What is Visual Basic 6.0?

Visual Basic 6.0 is a user-friendly programming language by Microsoft notable for its simplicity and effectiveness in developing Windows applications. Designed with an easy-to-learn approach, VB6 allows programmers to create simple and complex applications, and it’s quite strong at building graphical user interfaces in particular.

It stands out for both its ability to integrate user-designed components and its compatibility with Windows operating systems. VB6 supports creating various software types, including desktop applications and system utilities. Despite being replaced by newer technologies, VB6 is still relevant for maintaining legacy systems, and it is supported by Microsoft on modern Windows versions, ensuring its continued usability in certain programming scenarios.

Why install Visual Basic 6.0 on Windows 11

Installing Visual Basic 6.0 on Windows 11 is driven by the need to support and maintain existing applications that were originally developed using VB6. This is especially important in sectors where legacy systems are integral and cannot be easily replaced or upgraded. This support allows organizations and individual developers to transition to Windows 11 without losing the functionality of essential VB6-based software. The continued viability of VB6 on Windows 11 is crucial for those who rely on its straightforward, efficient programming capabilities for specific projects and applications.

How to install Visual Basic 6 on Windows 11

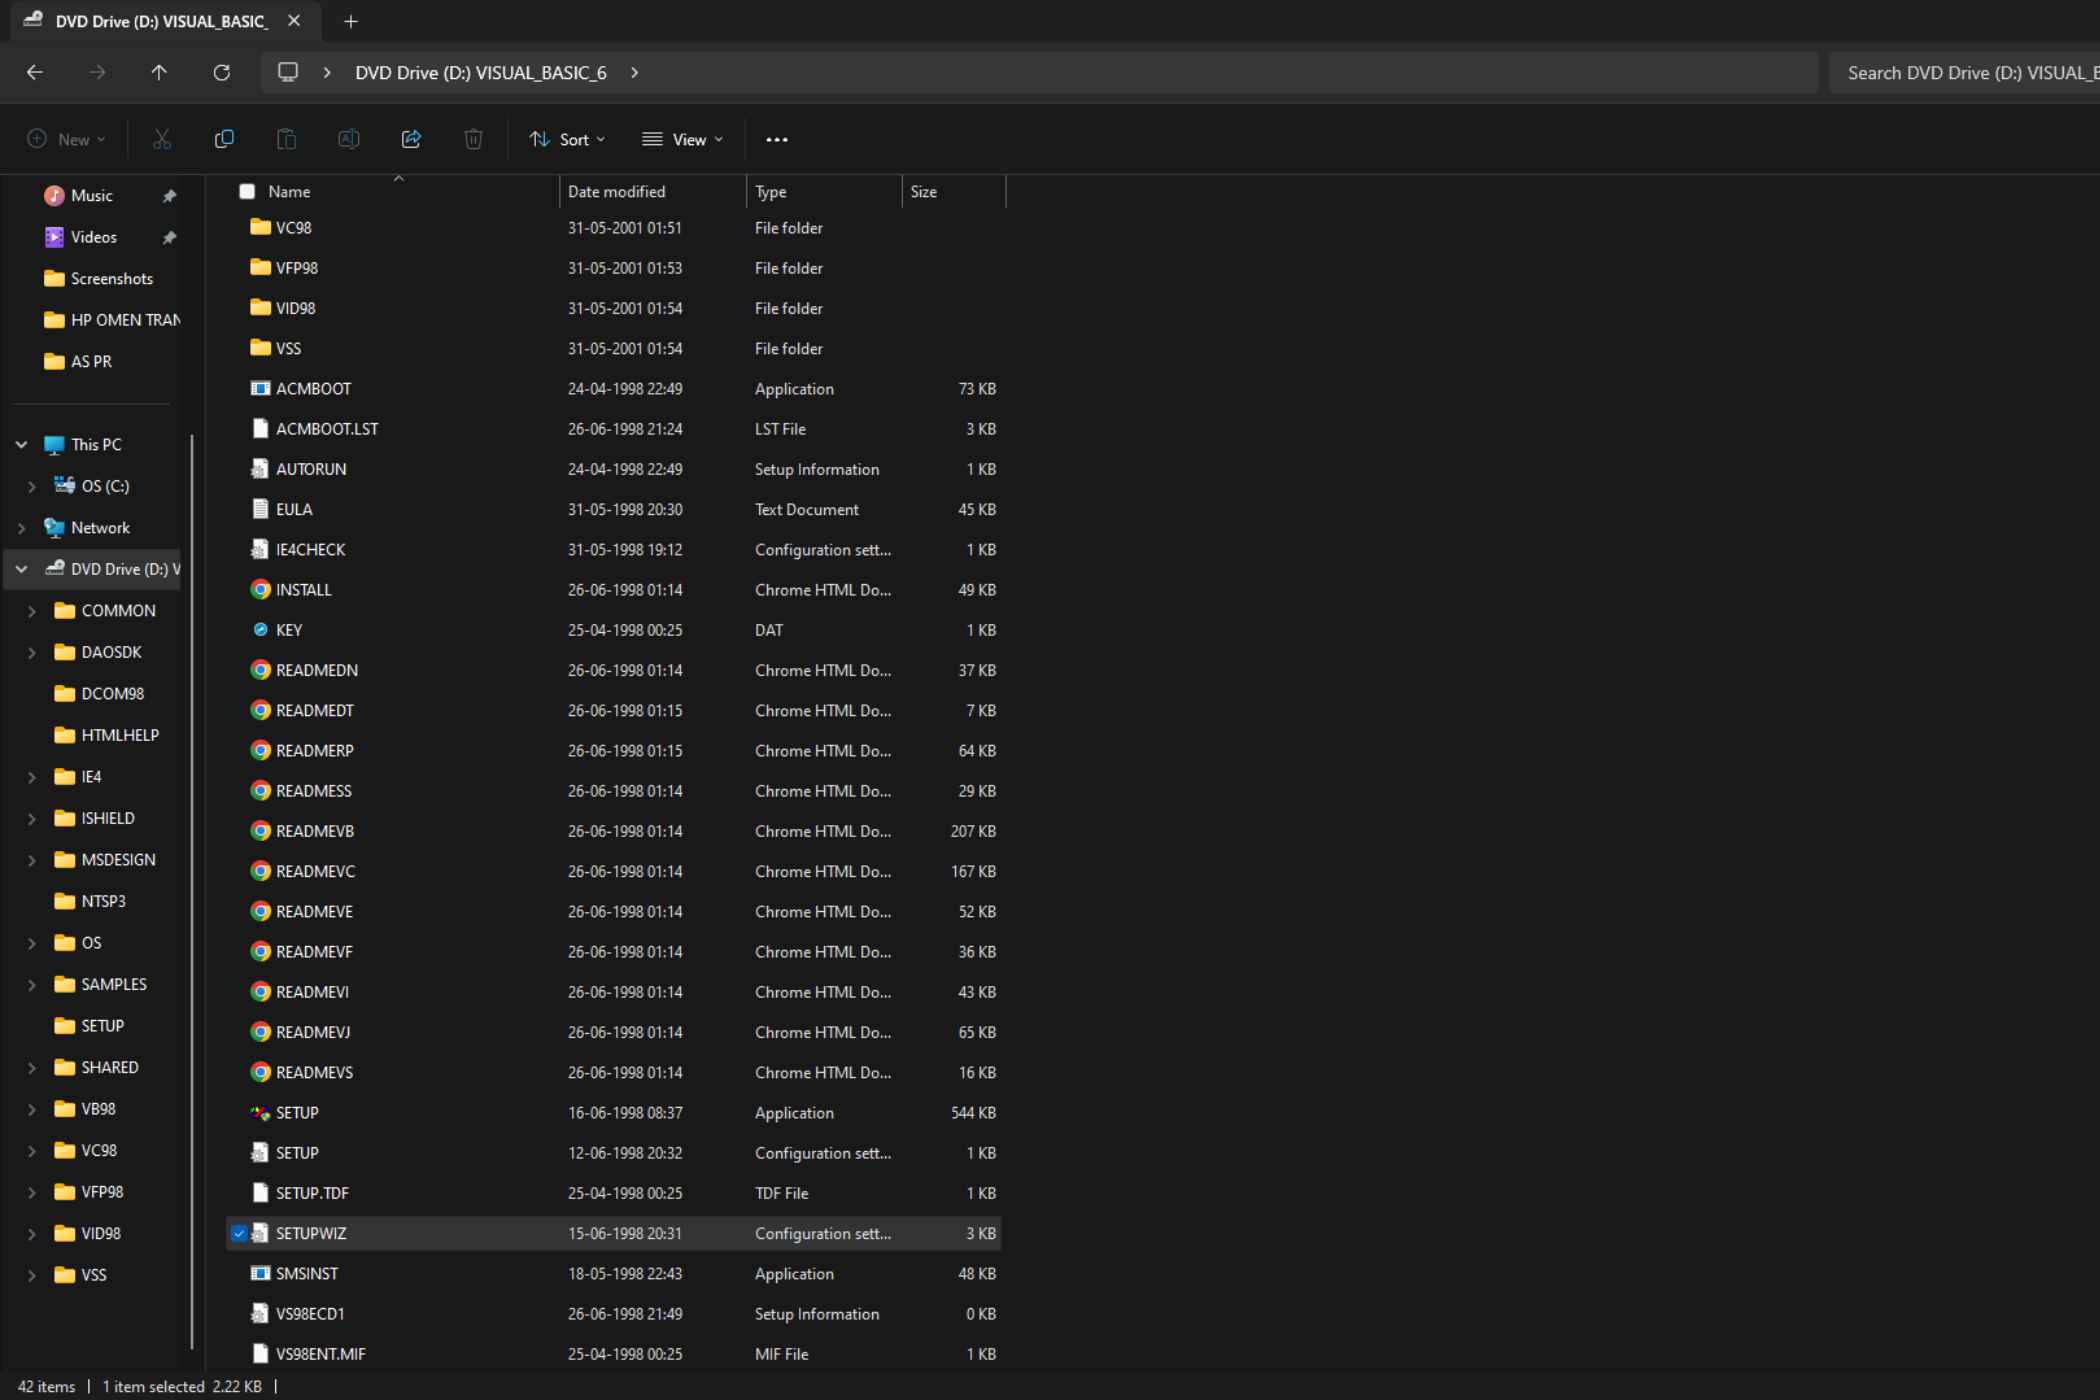
  1. Open the installation folder and look for the configuration file named SETUPWIZ.

     Image showing the contents of a Visual Basic 6 installation directory in a DVD drive, with folders and files listed in Windows File Explorer.

  2. Locate the line VmPath=ie4msjavx86.exe and erase the section after the = symbol.
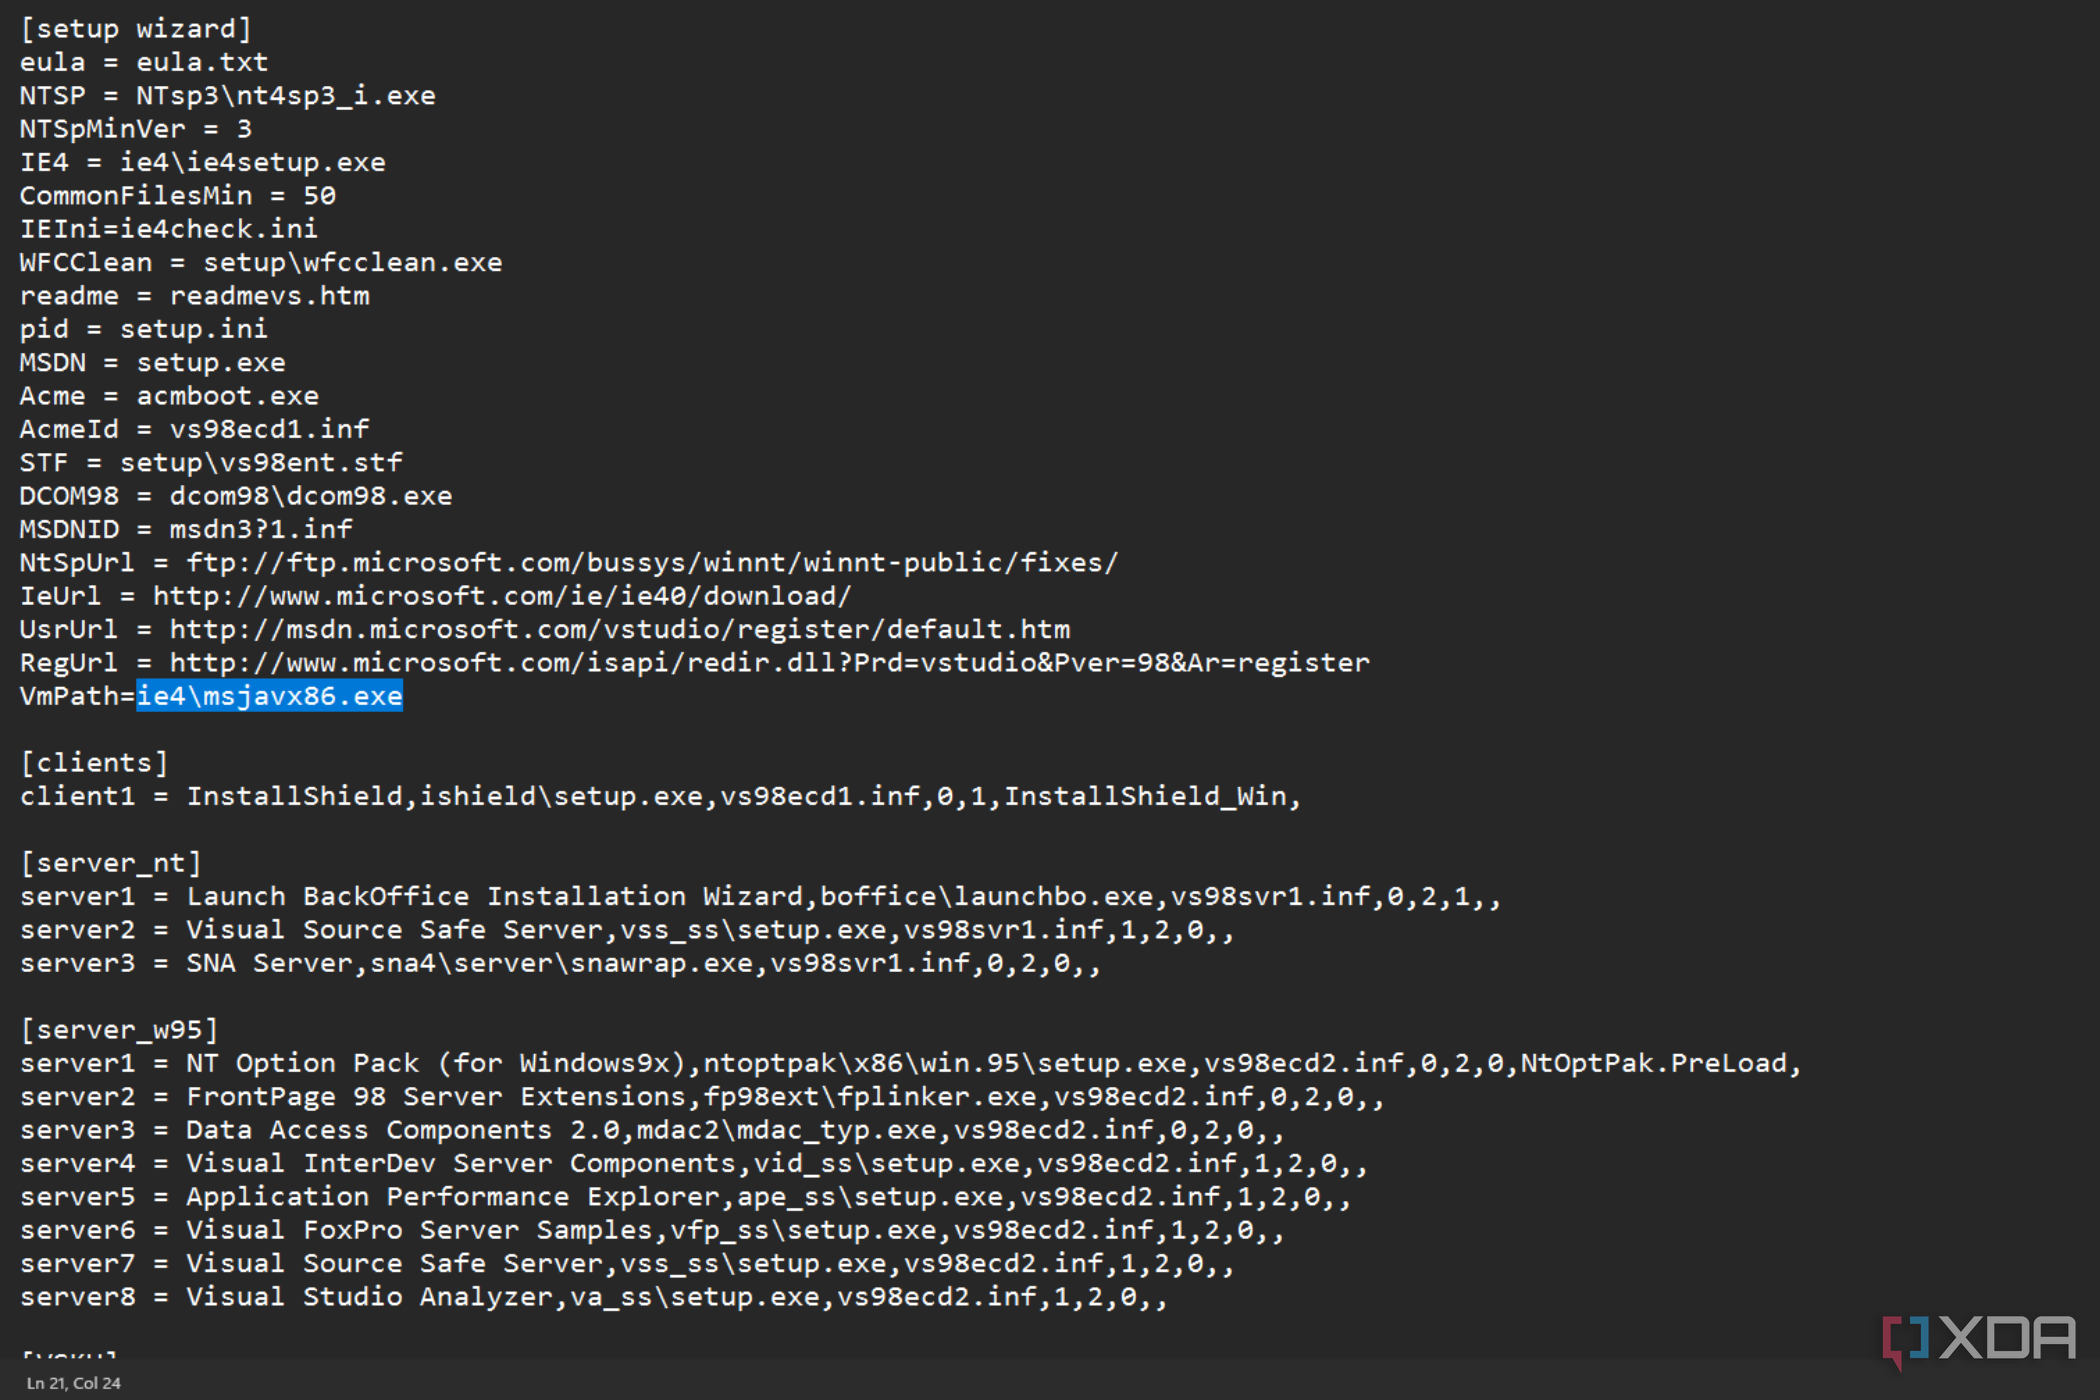
    Image displaying the text from a Visual Basic 6 setup configuration file, showing various setup parameters and paths, including a line highlighted for the Java Virtual Machine.
    Source: XDA

  3. Save and close the file.
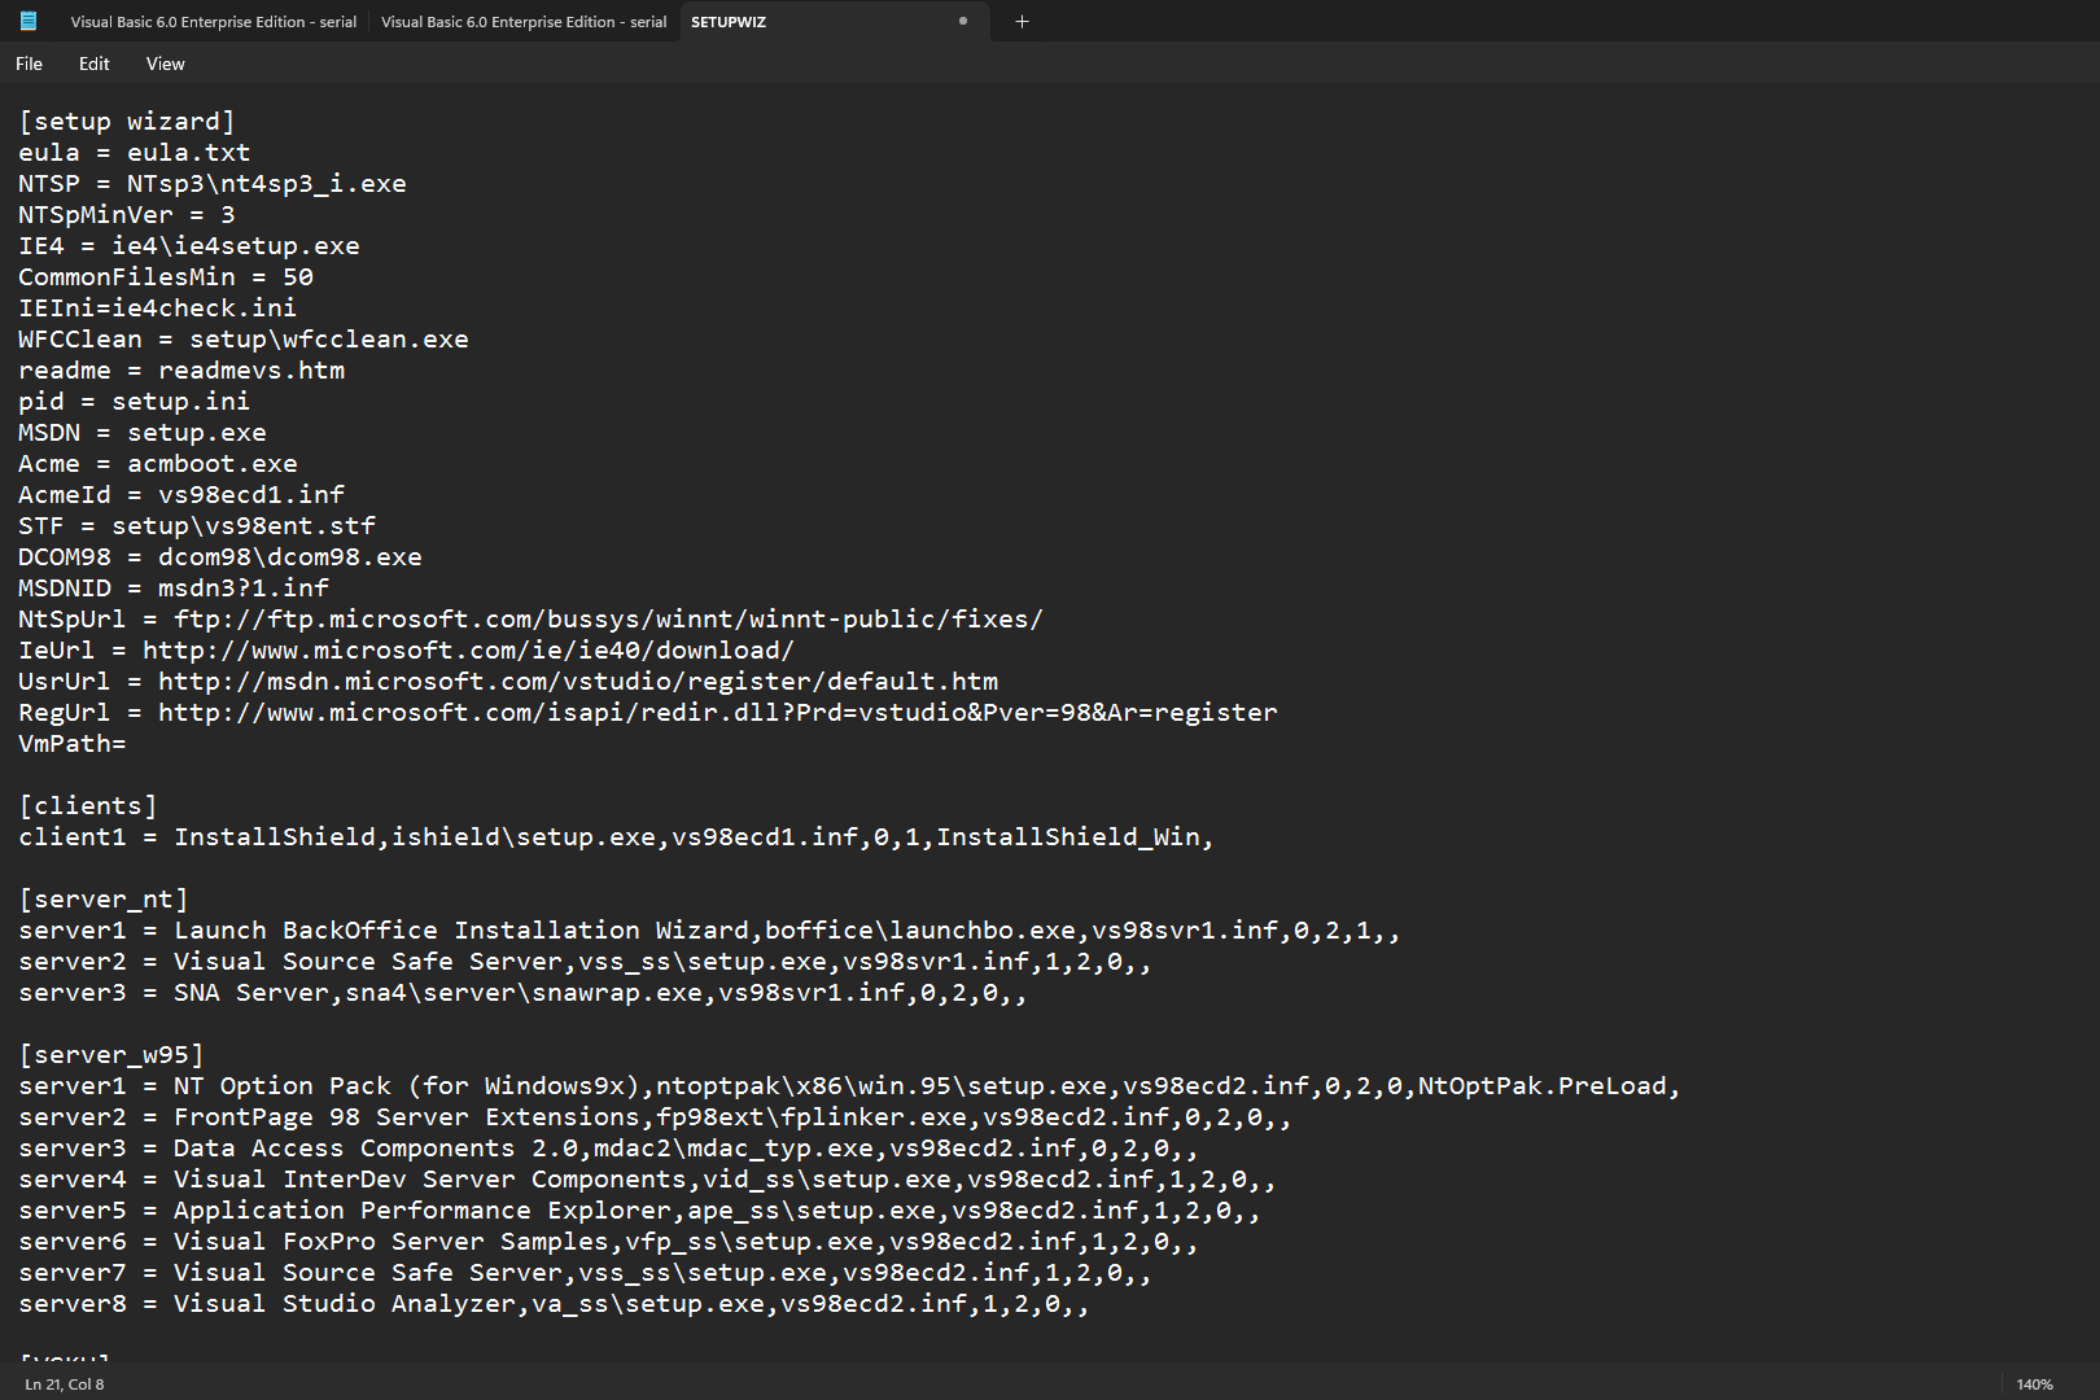
    Image showing an open configuration file in a text editor with settings for the Visual Basic 6.0 setup wizard
    Source: XDA

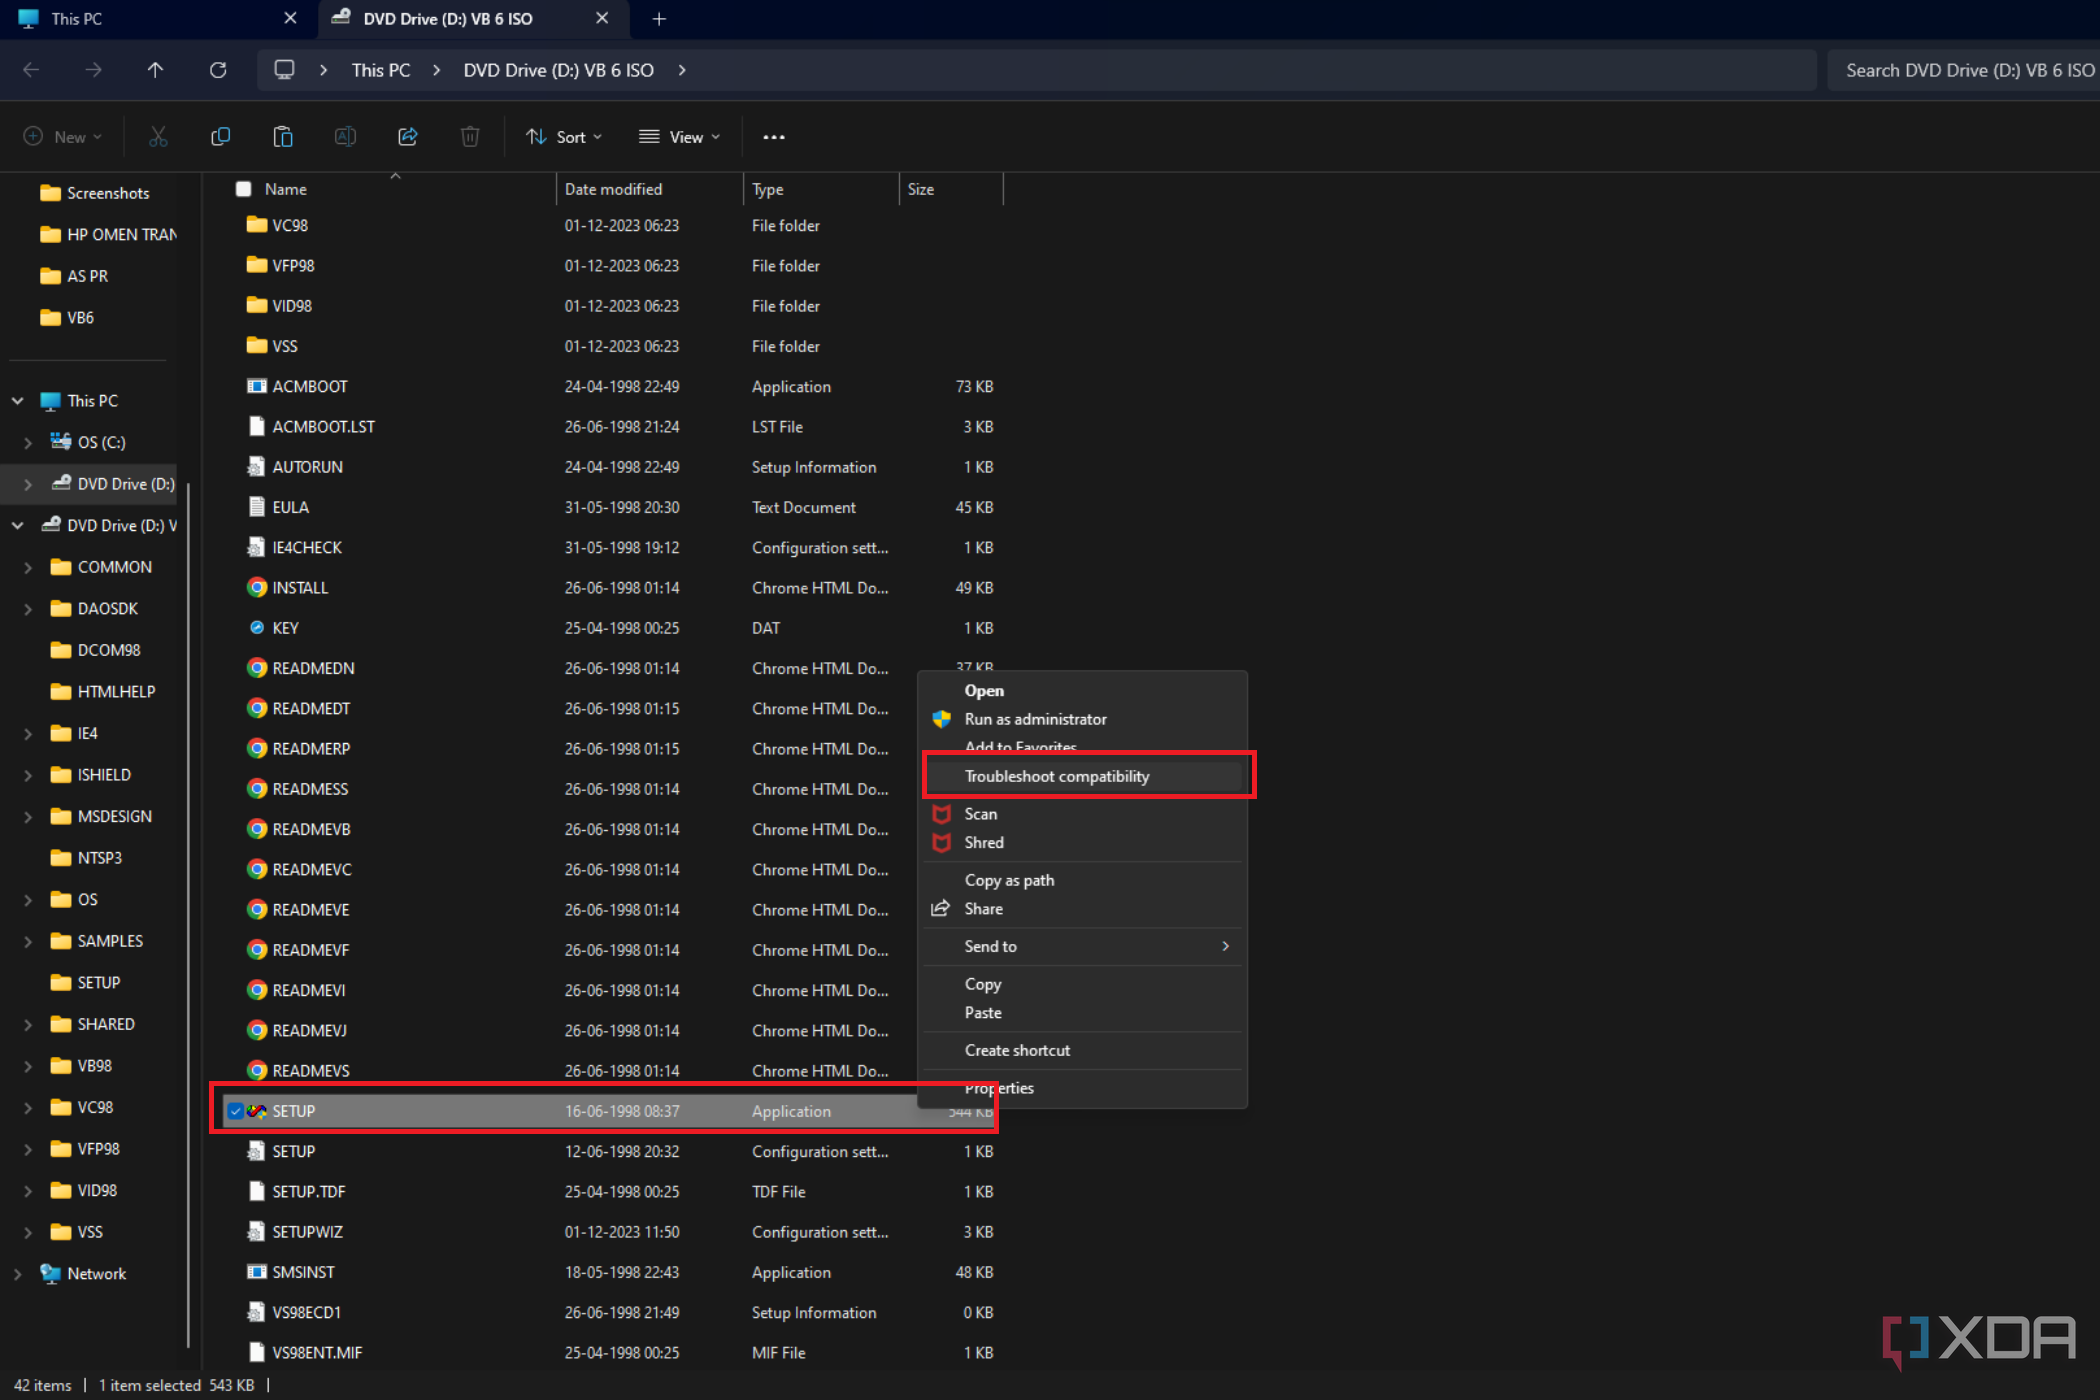
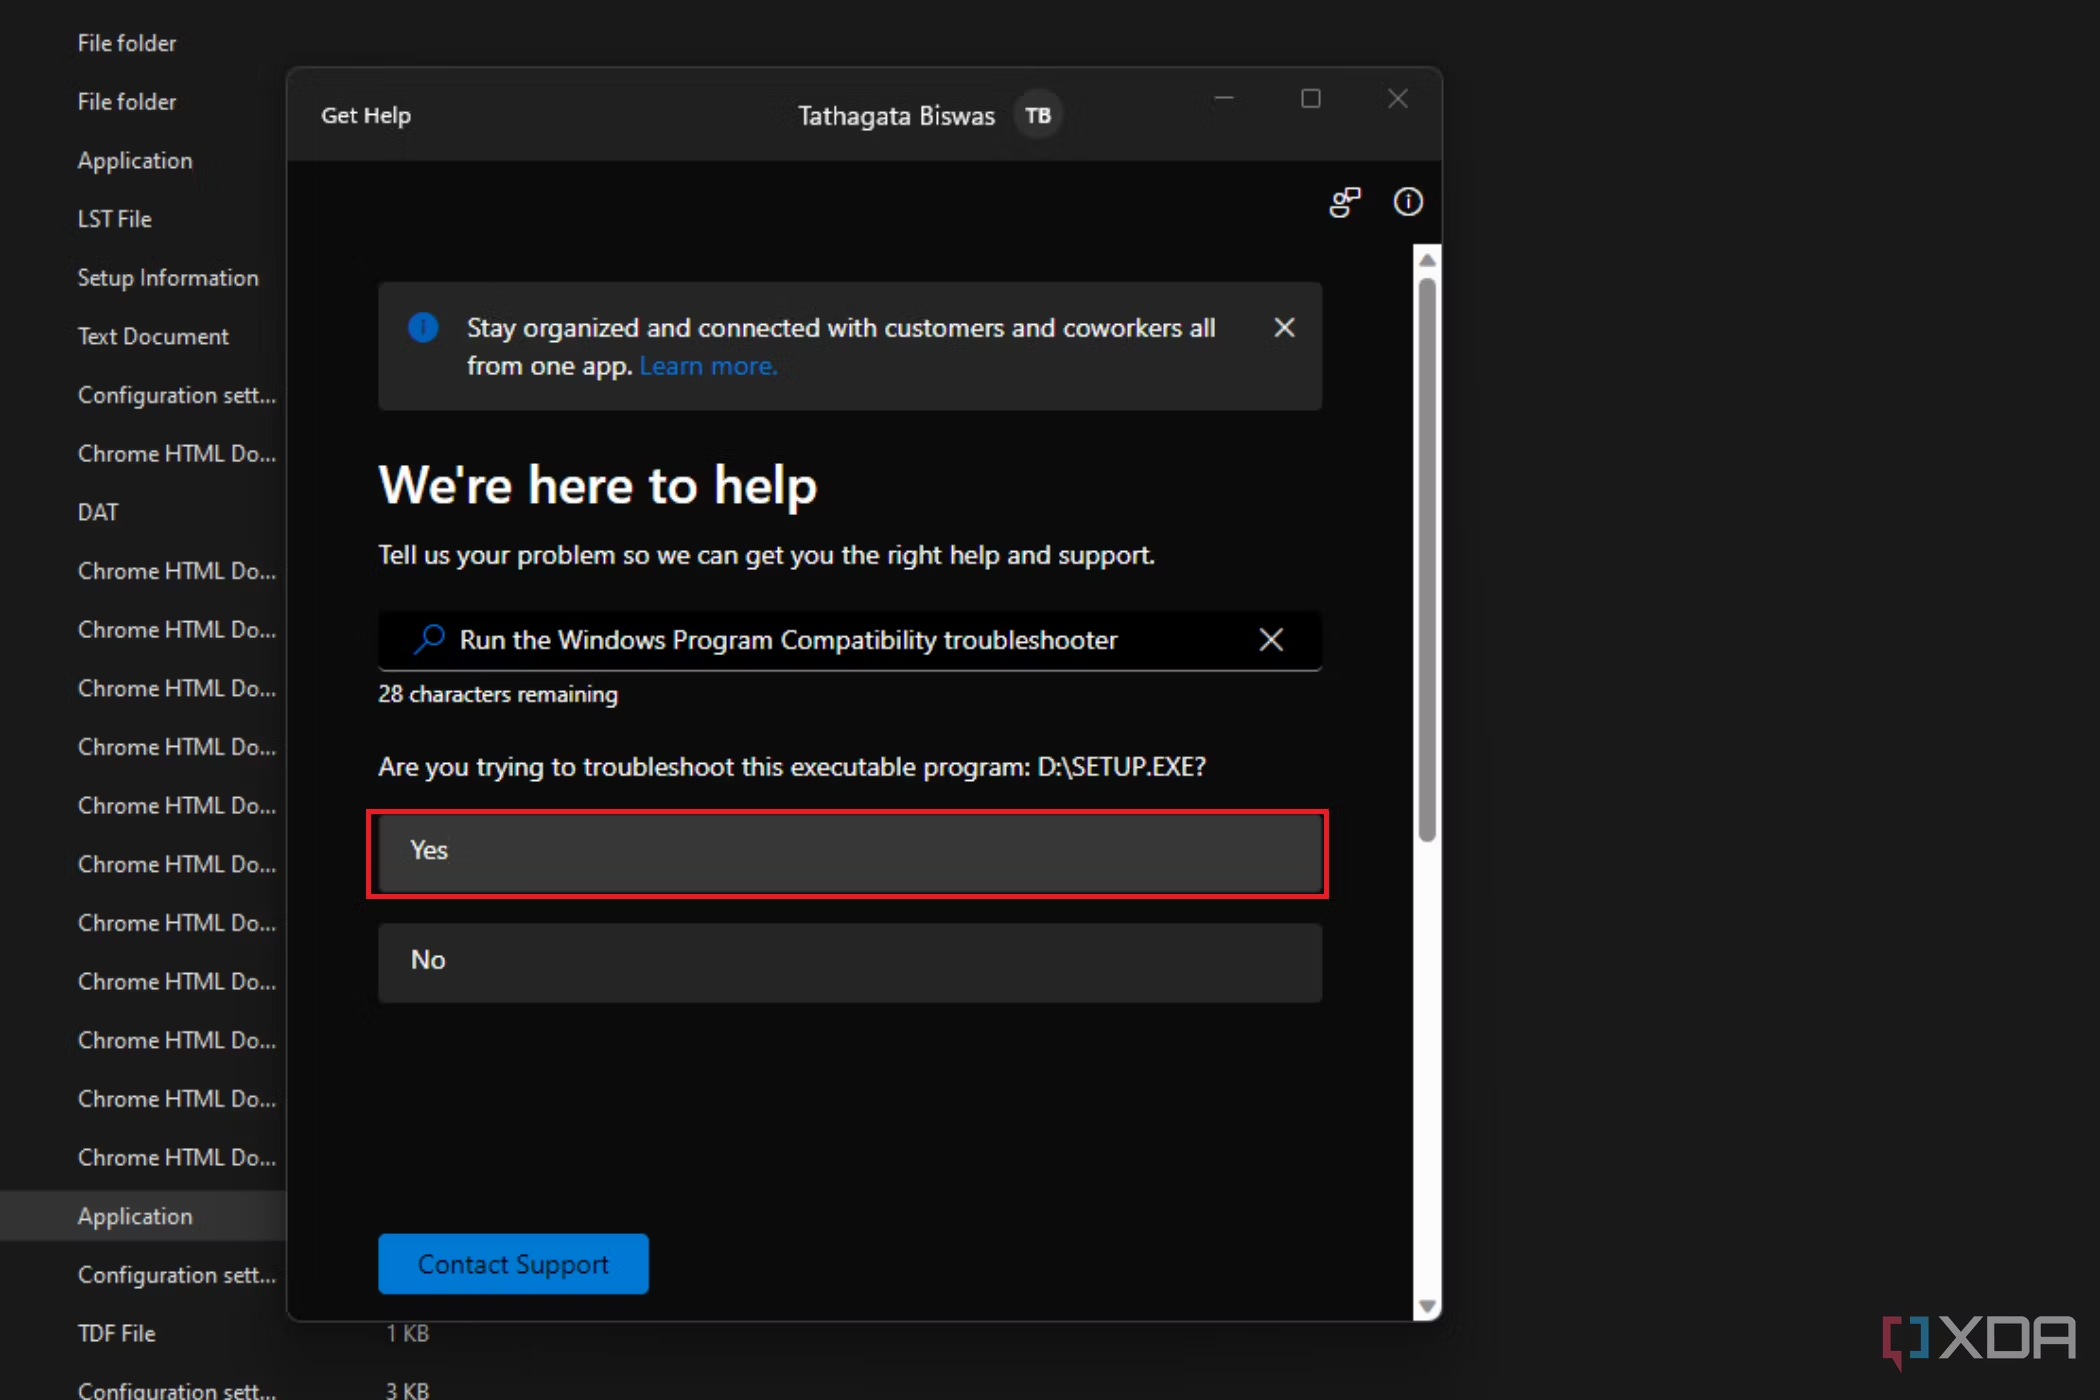
  4. Locate the application named, SETUP within the installation folder and right-click on it, then click Troubleshoot compatibility.

     Image showing a file explorer window with the contents of the Visual Basic 6 installation directory on a DVD drive, highlighting folders and setup files, with a context menu open for one of the files.

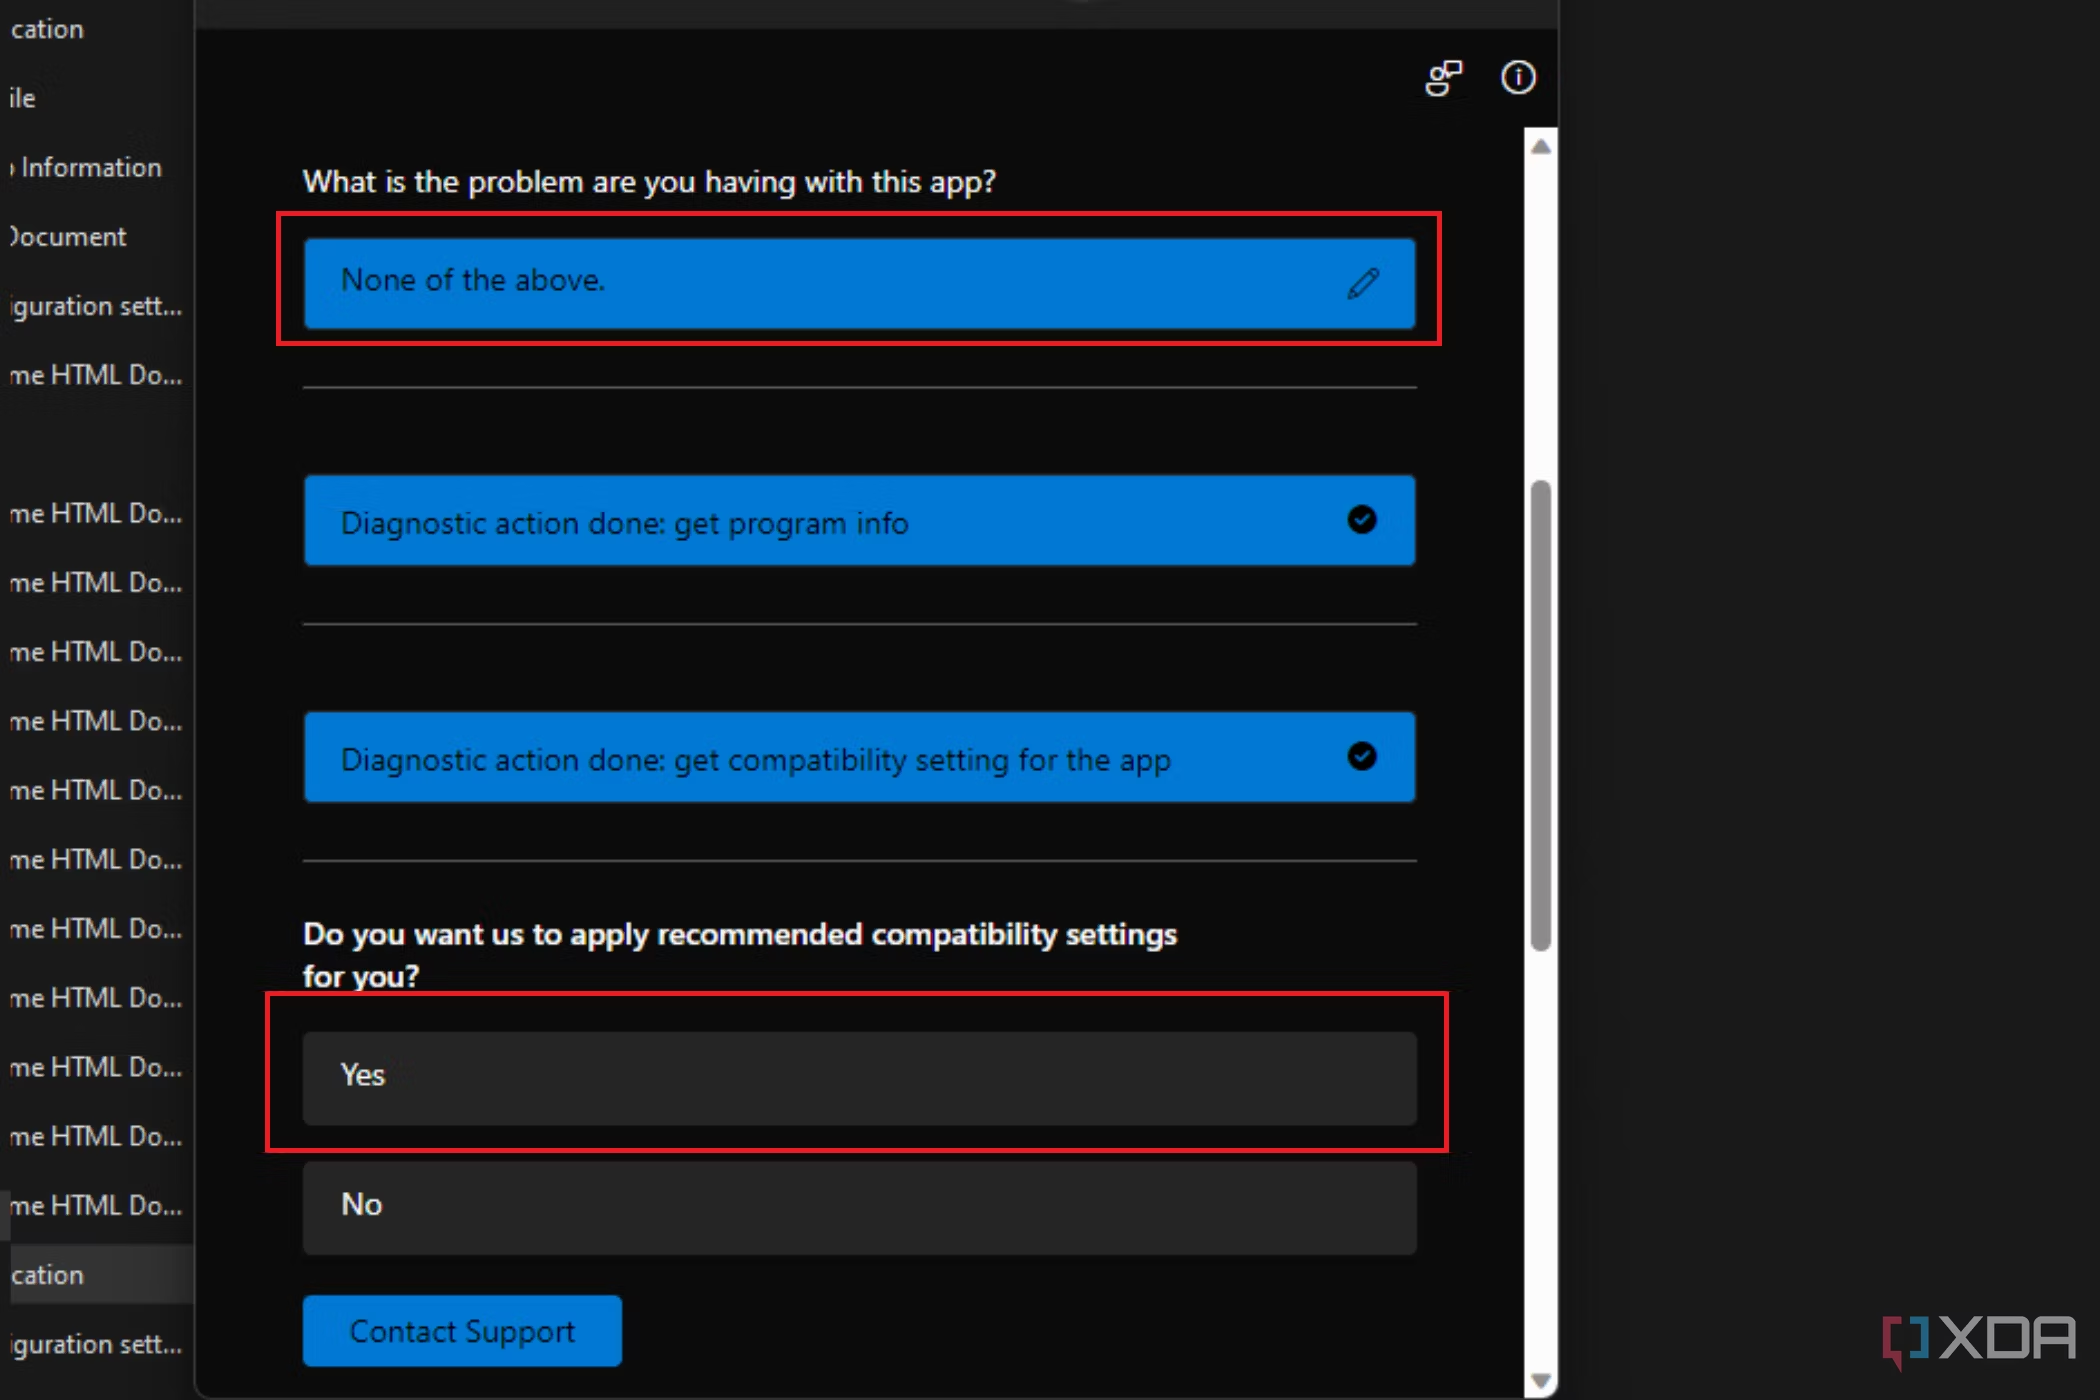
  5. Click on Yes in the popup and select None of the above from the next list.

    Image showing the Windows Program Compatibility Troubleshooter window with an option selected to troubleshoot the executable program "D:SETUP.EXE" for Visual Basic 6.0 installation issues.

  6. After Windows is done with the required troubleshooting, you will be presented with the option to apply the recommended settings or not. Click on Yes.

    Image displaying the Windows compatibility troubleshooter asking whether to apply recommended compatibility settings for an application, with the option "Yes" highlighted.

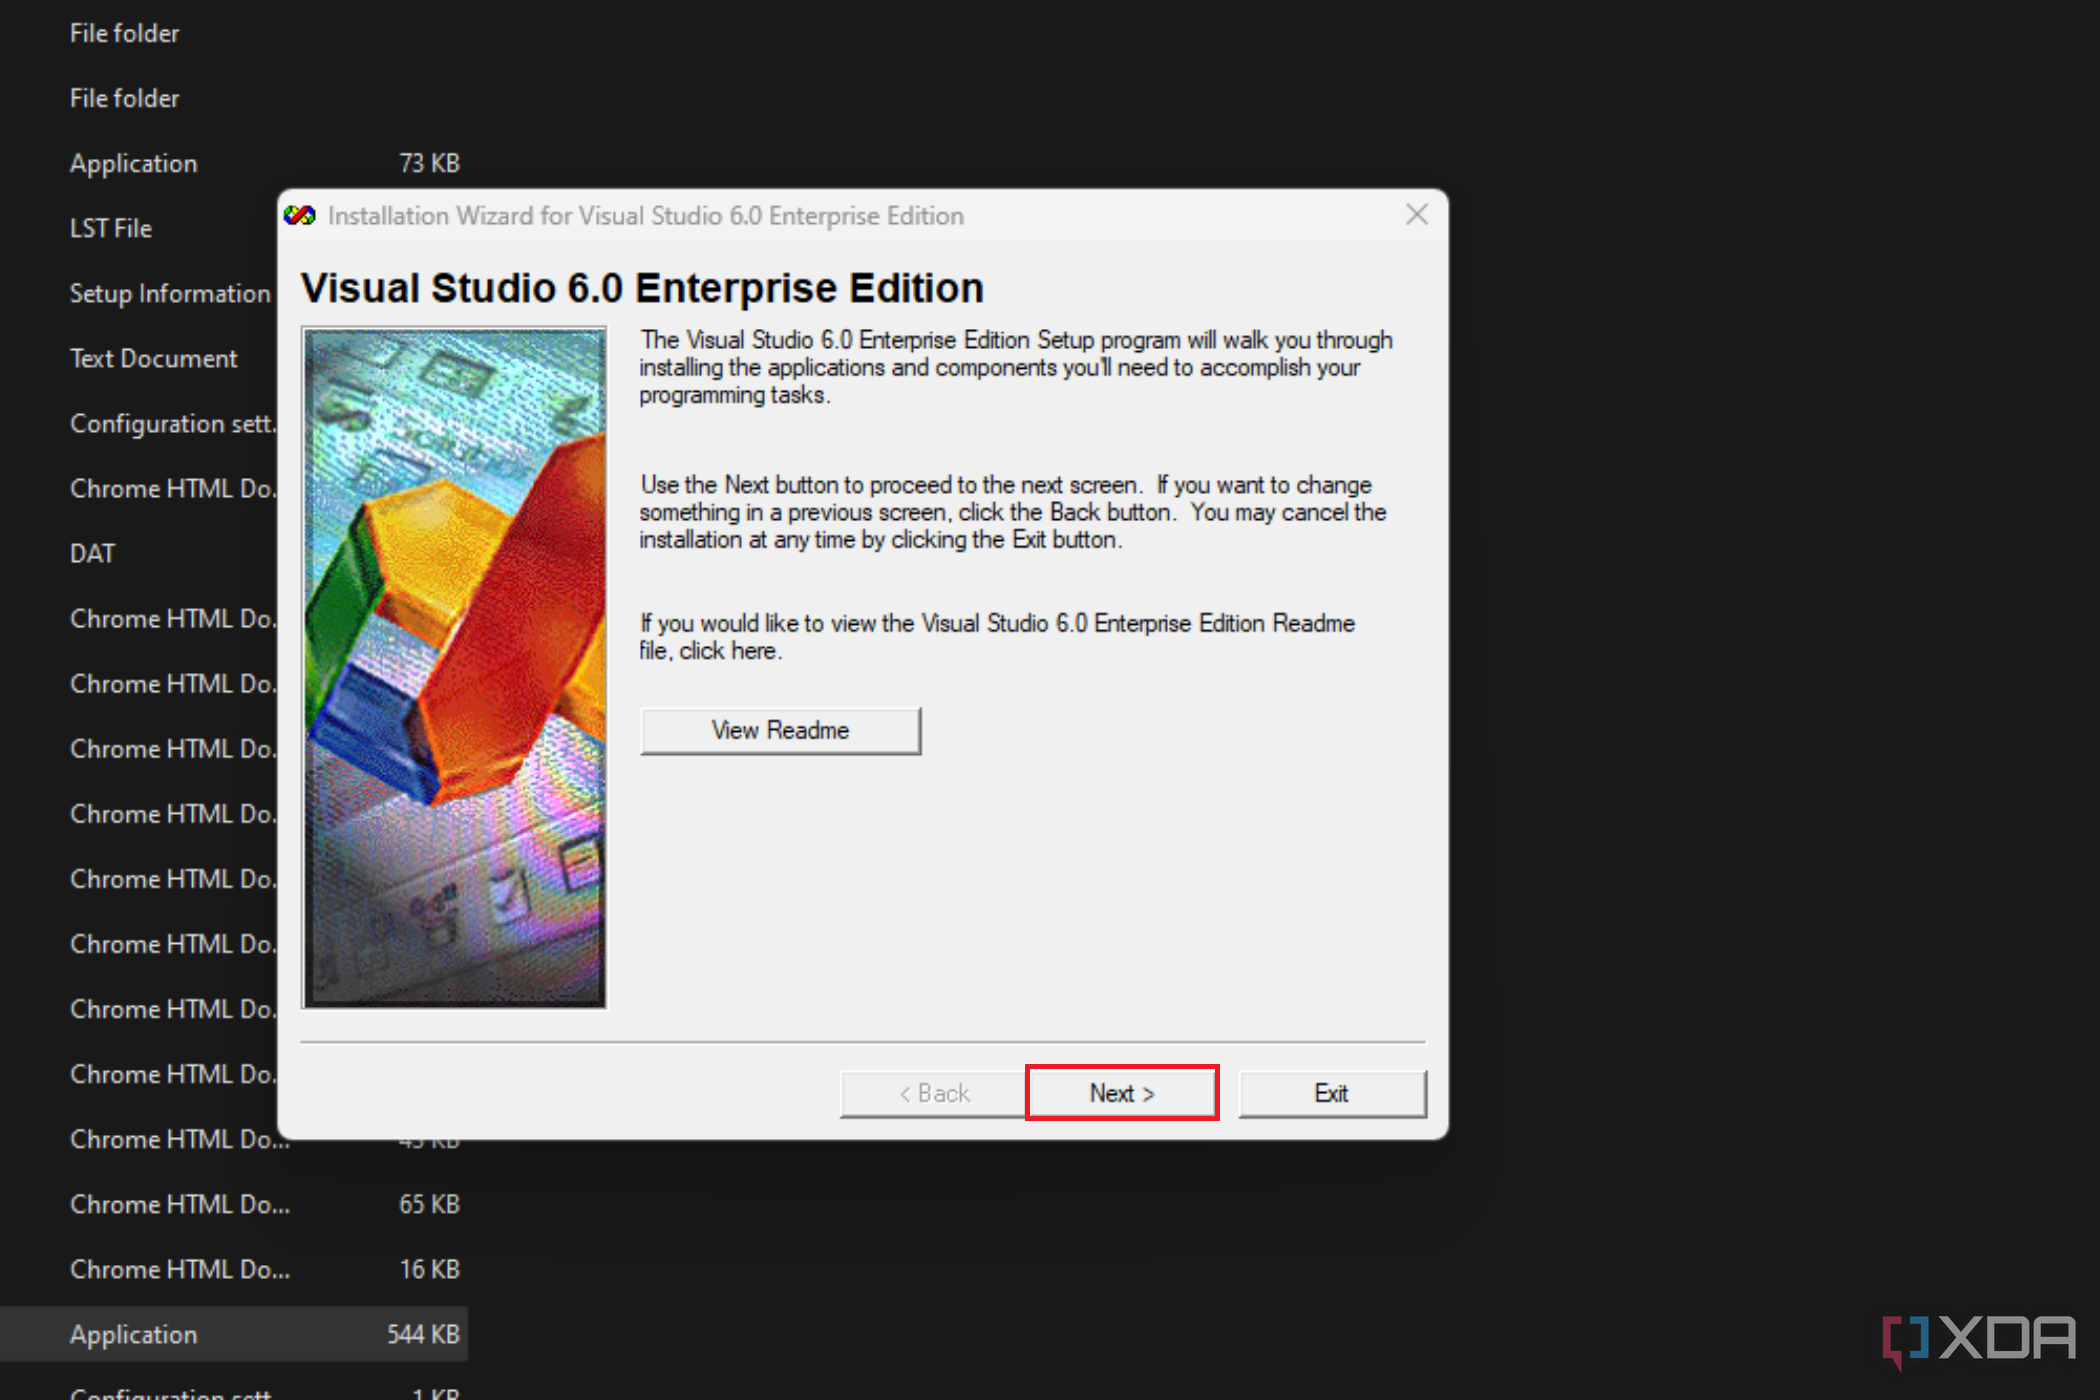
  7. Click on Next in the following pop-up.

     Image of the Visual Studio 6.0 Enterprise Edition setup window, displaying an introductory message and options to view the readme file, go back, proceed to the next step, or exit the installation.

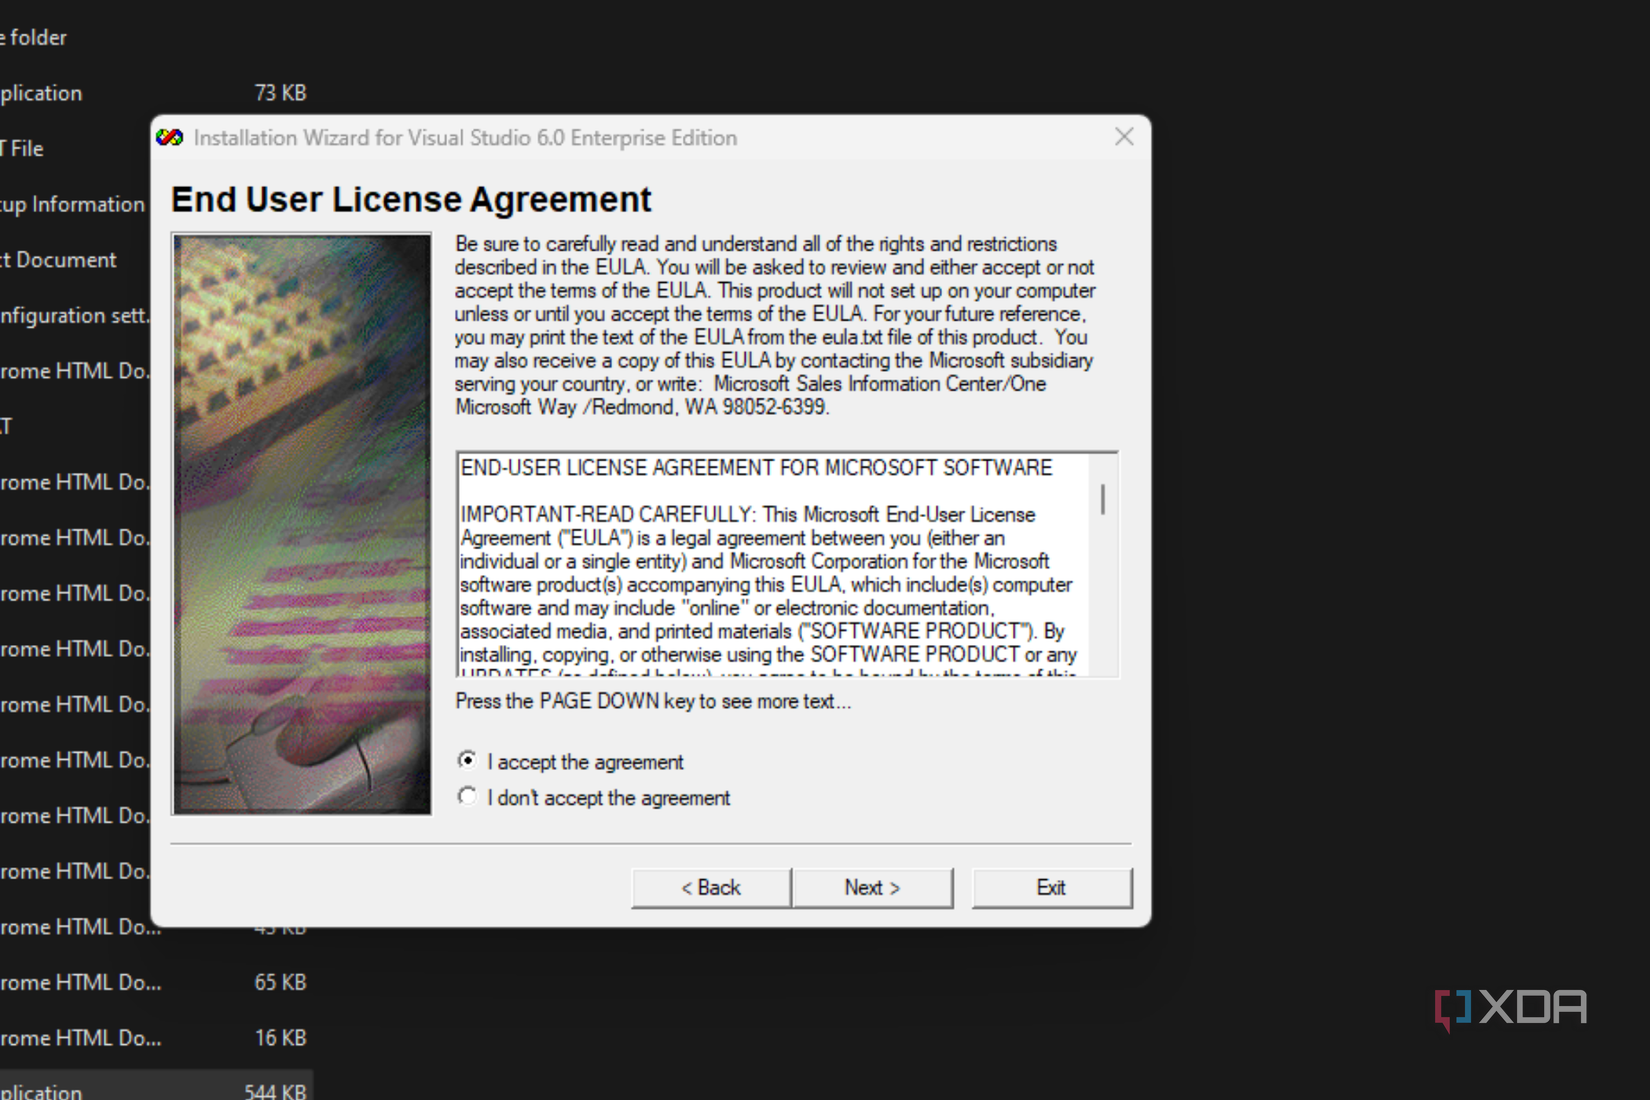
  8. Accept the agreement in this step.

    Image of the End User License Agreement (EULA) window during the Visual Studio 6.0 Enterprise Edition installation process, with options to accept or not accept the terms.

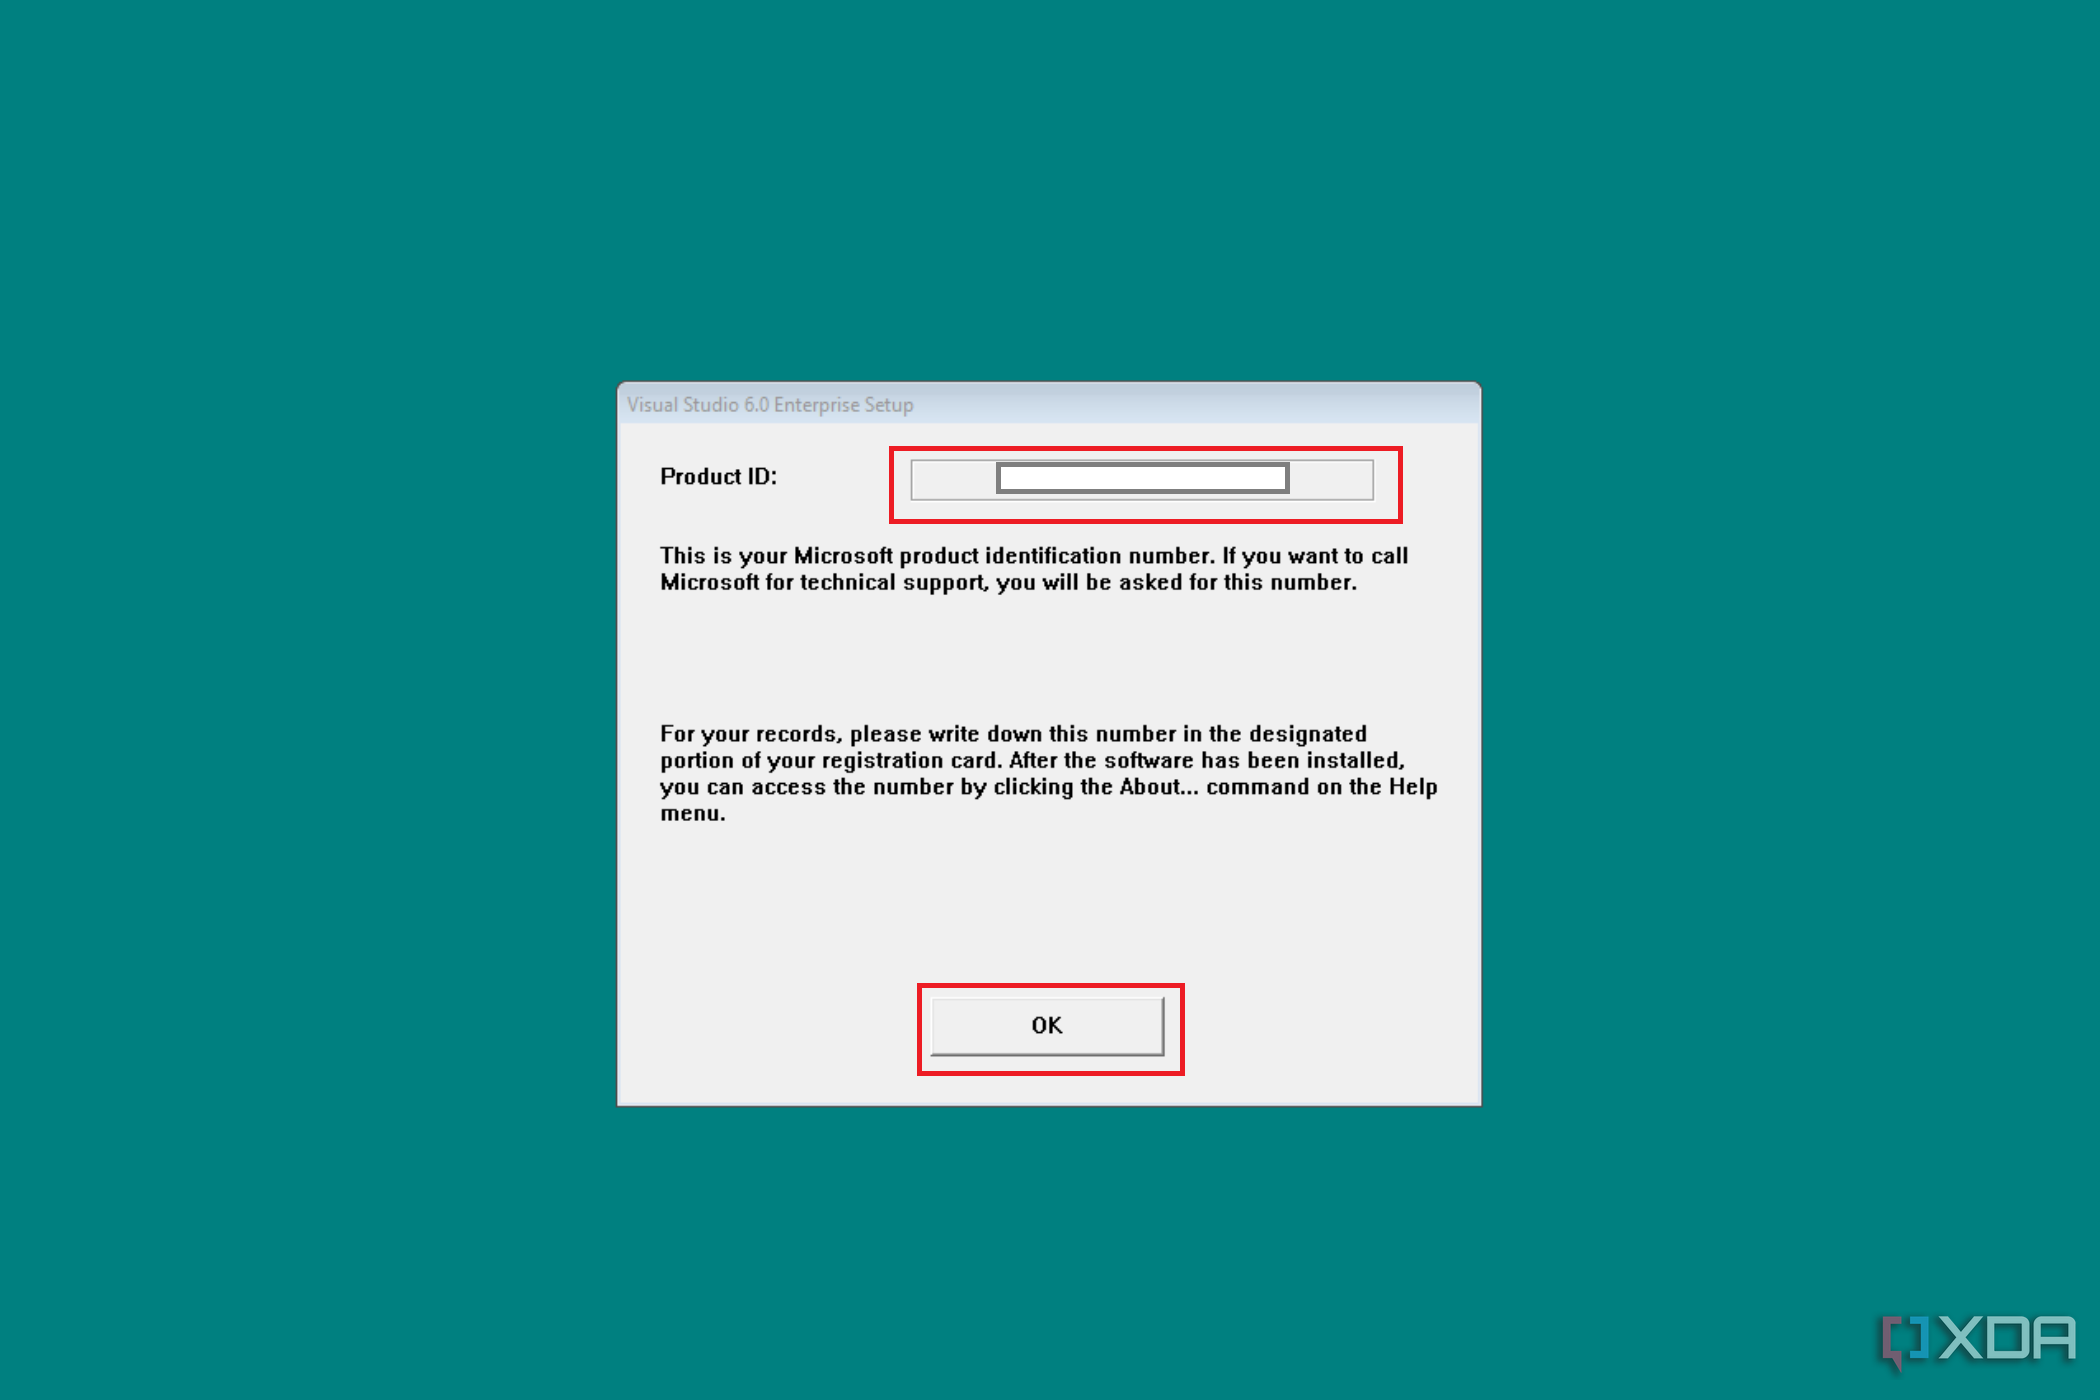
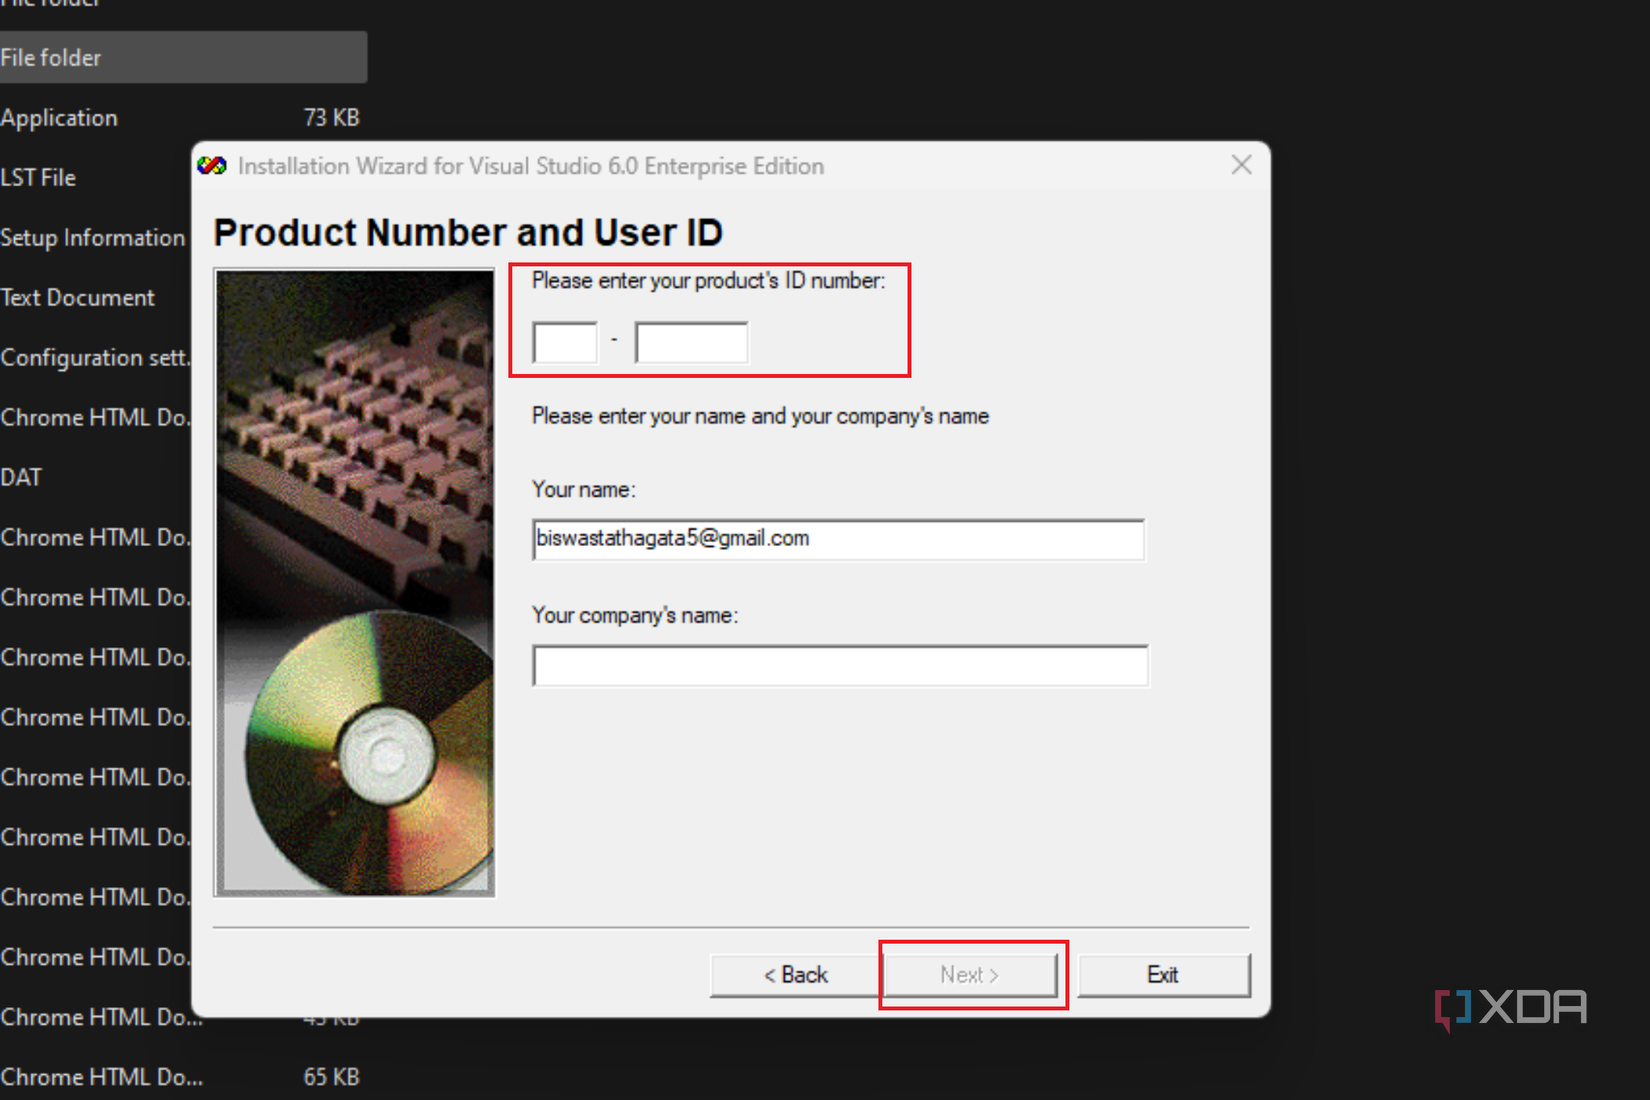
  9. Put in the product ID number, which you will find with your installation media, then click on Next.

    Image of the product number and user ID input window during the Visual Studio 6.0 Enterprise Edition installation, prompting the user to enter their name and company's name.

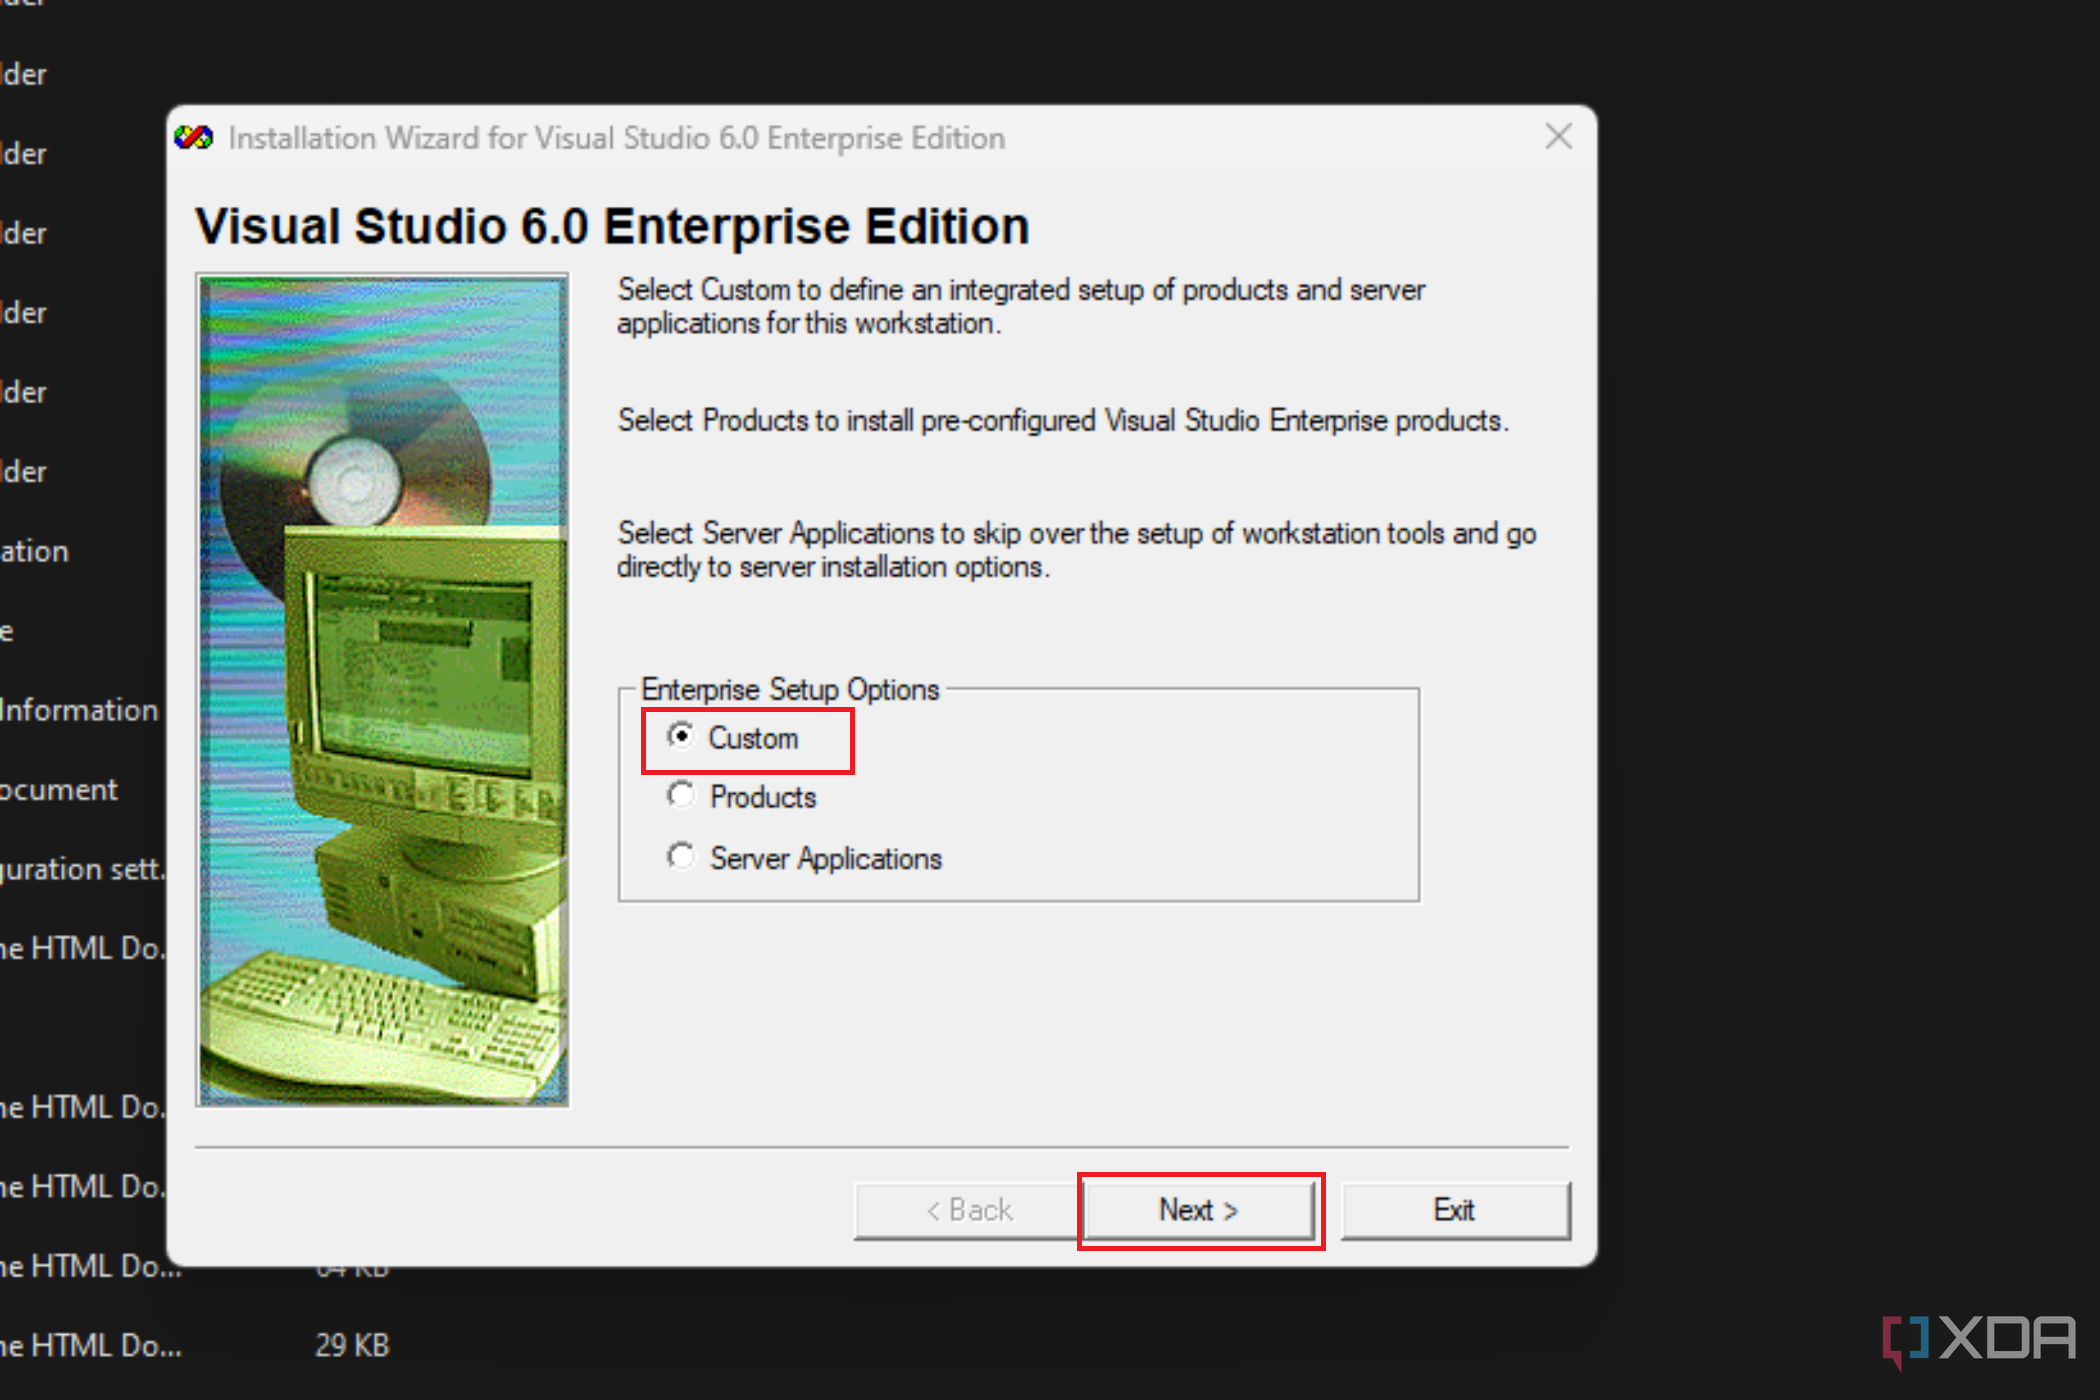
  10. Choose Custom from the Setup Options and click on Next.

     Image of the Visual Studio 6.0 Enterprise Edition setup window with the 'Custom' option selected, indicating the user can choose an integrated setup of products and server applications.

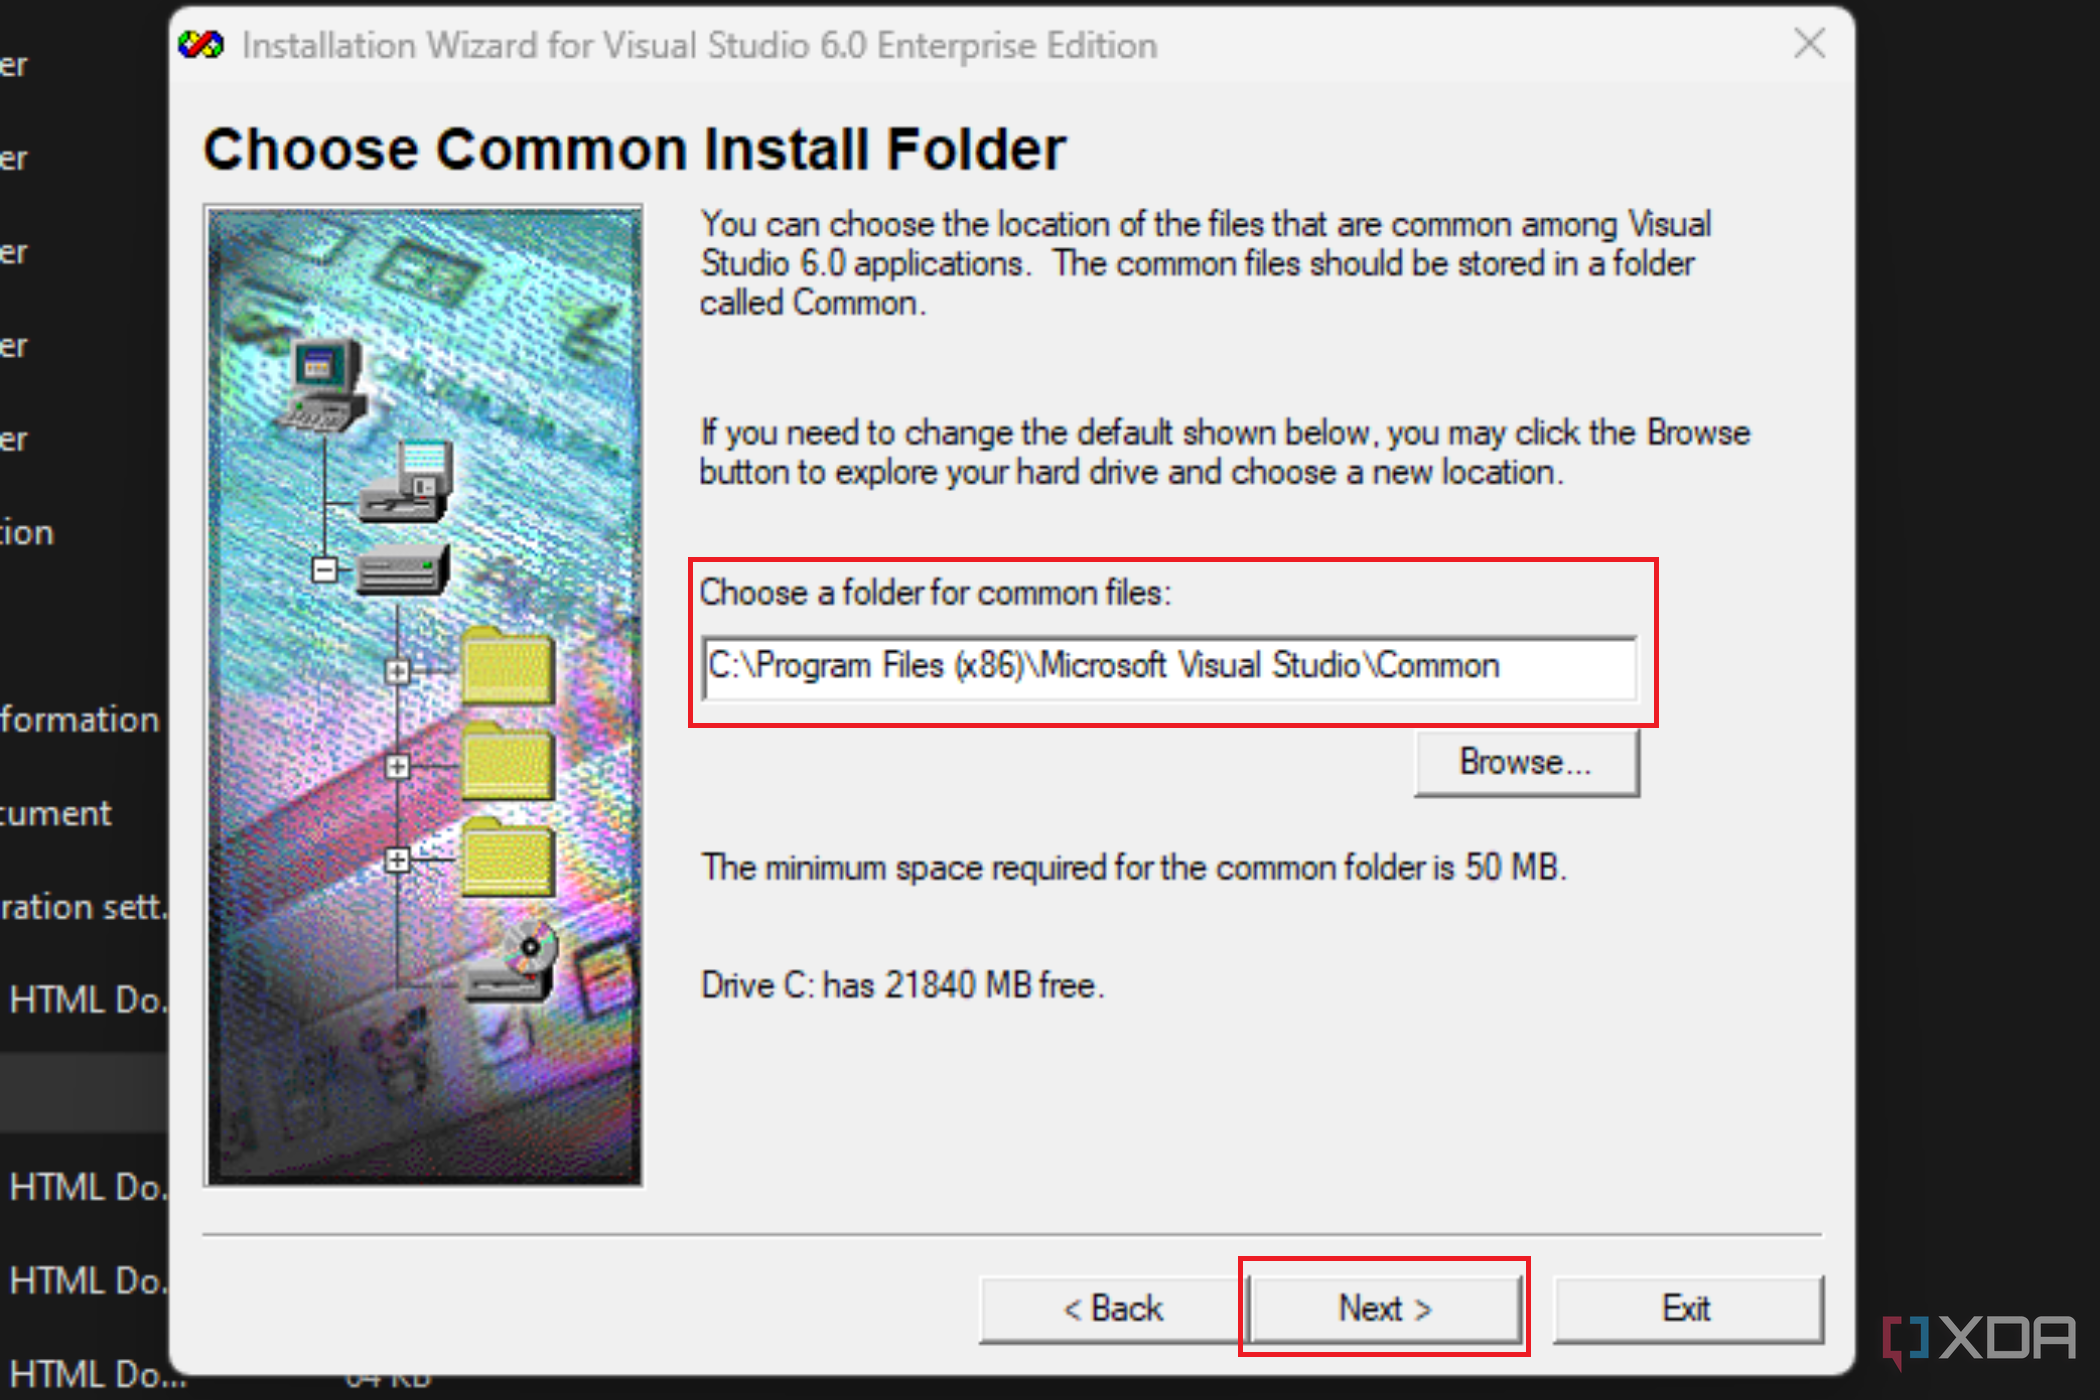
  11. Choose your desired file path in this section, then click on Next.

     Image showing the 'Choose Common Install Folder' window in the Visual Studio 6.0 Enterprise Edition setup, with the default path selected and an option to browse for a new location.

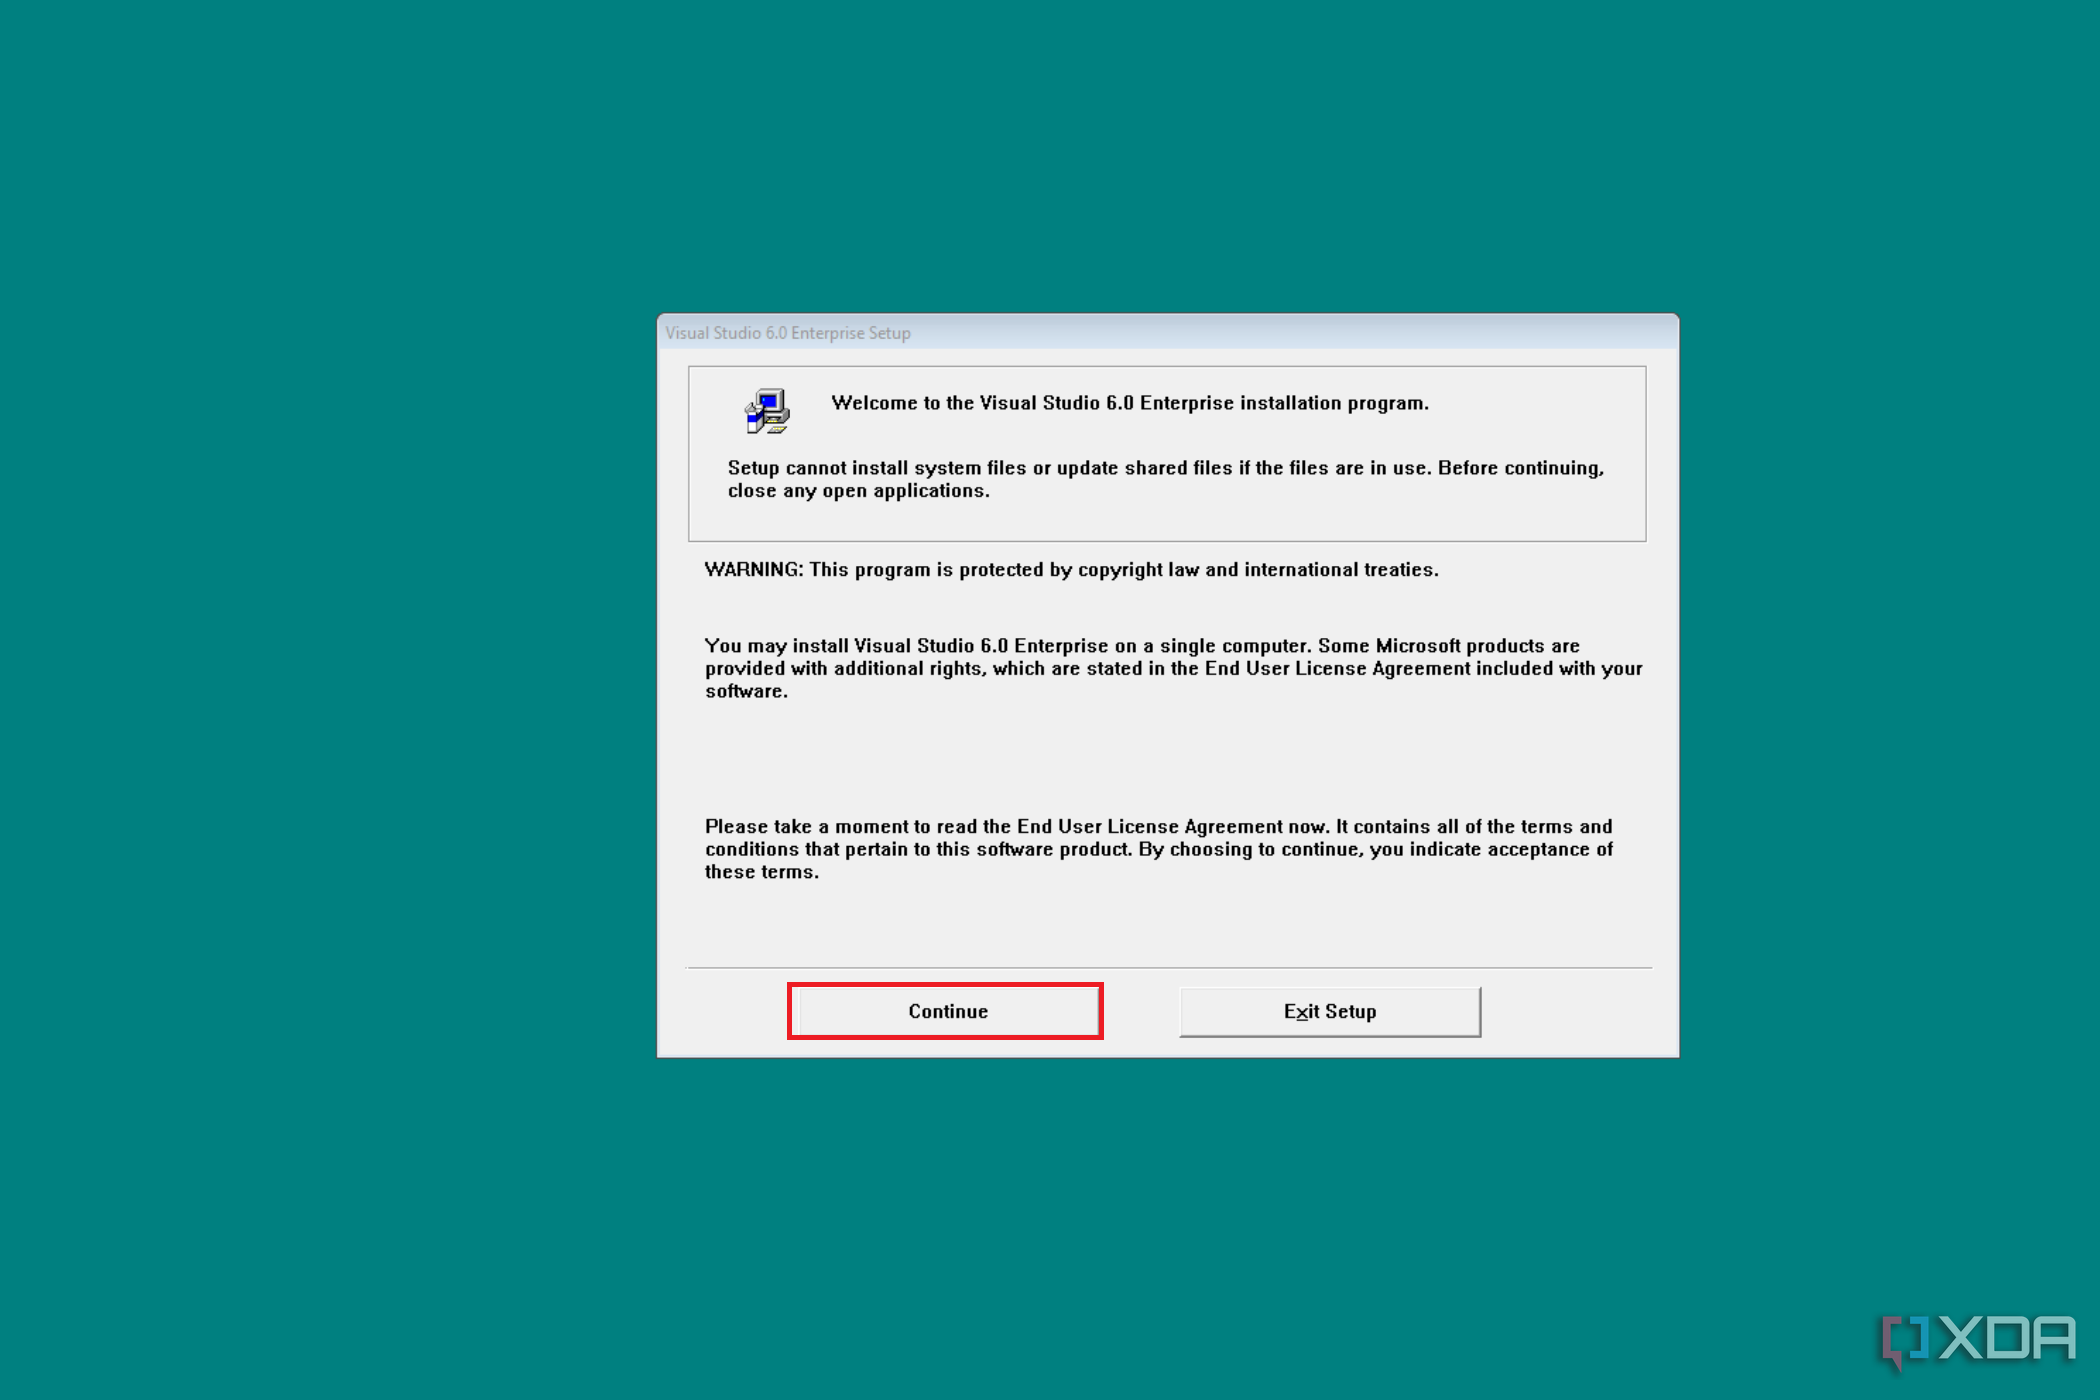
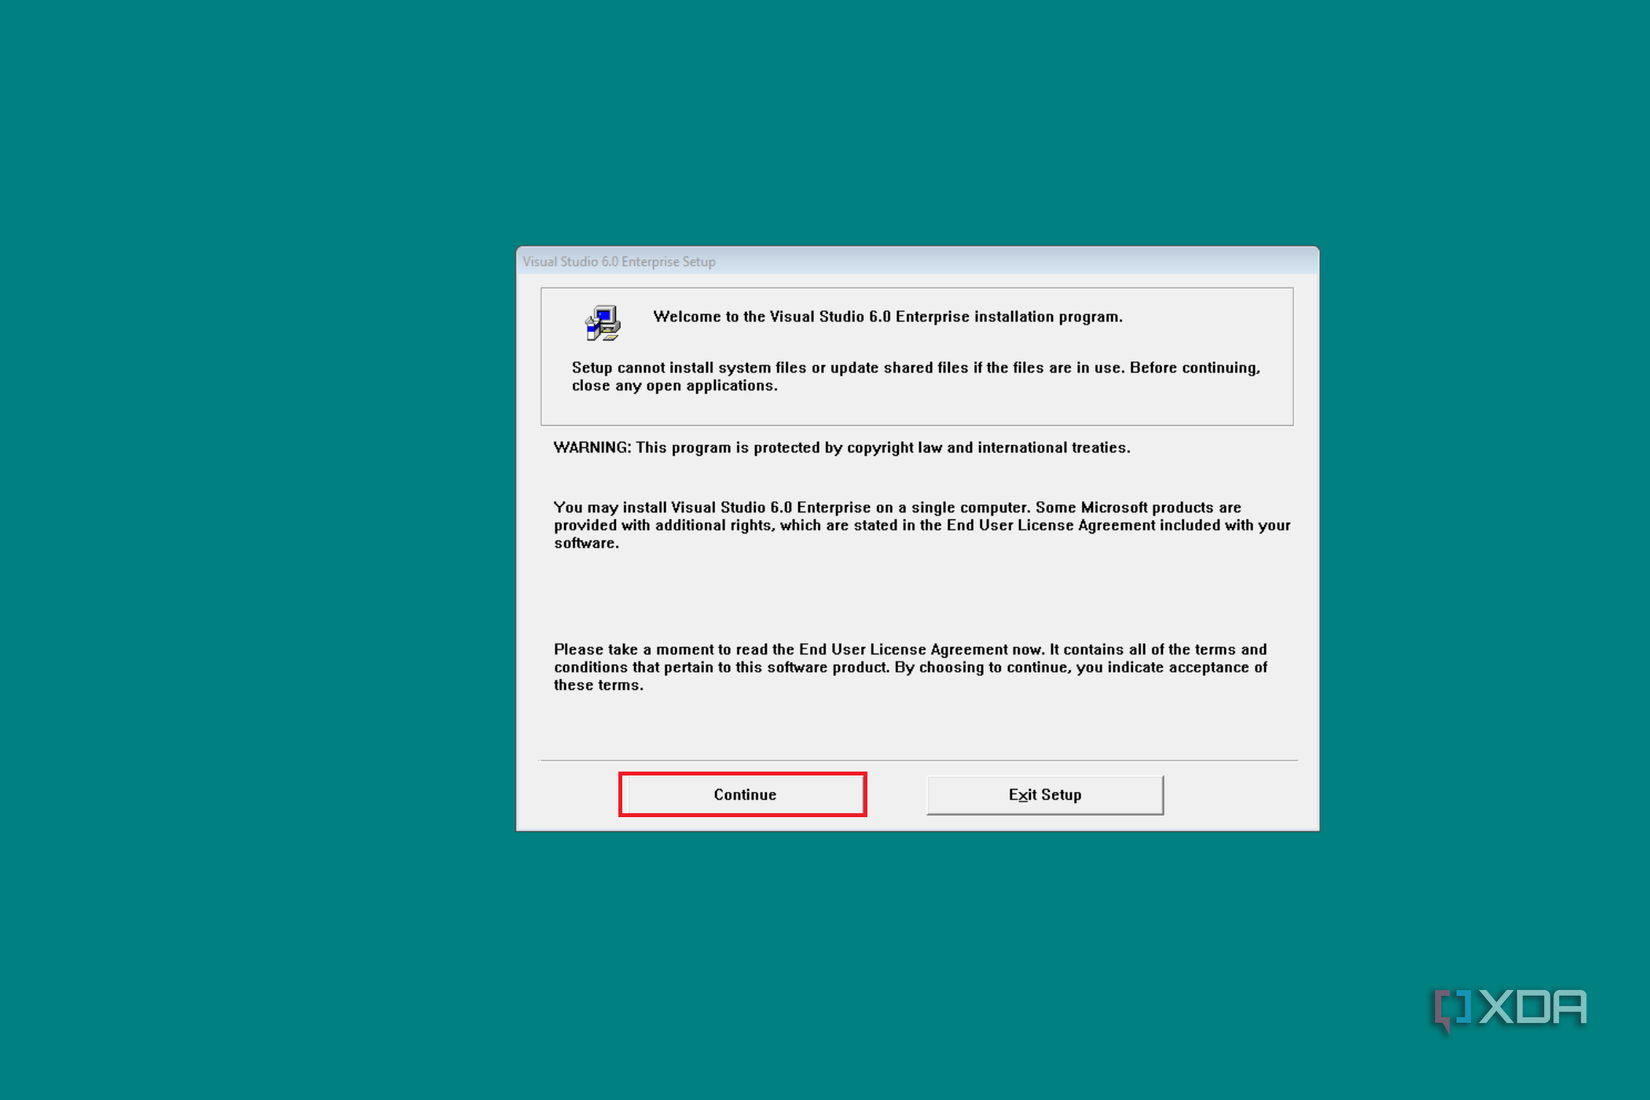
  12. Click on Continue on this popup.

    Image displaying the initial setup screen of Visual Studio 6.0 Enterprise Edition with a welcome message, a warning about system files, and an invitation to read the End User License Agreement, with options to continue or exit the setup.

  13. Click on OK.

    Image showing the product ID confirmation screen in the Visual Studio 6.0 Enterprise Edition setup, with a Microsoft product identification number provided and a note for technical support reference.

  14. If you had a previous installation of VB6, you will get this popup, then click on Yes.

    Image showing a dialog box alerting to a previous installation of Visual SourceSafe and asking whether to replace it with Visual Studio 6.0 or install VSS 6.0 to its default location.

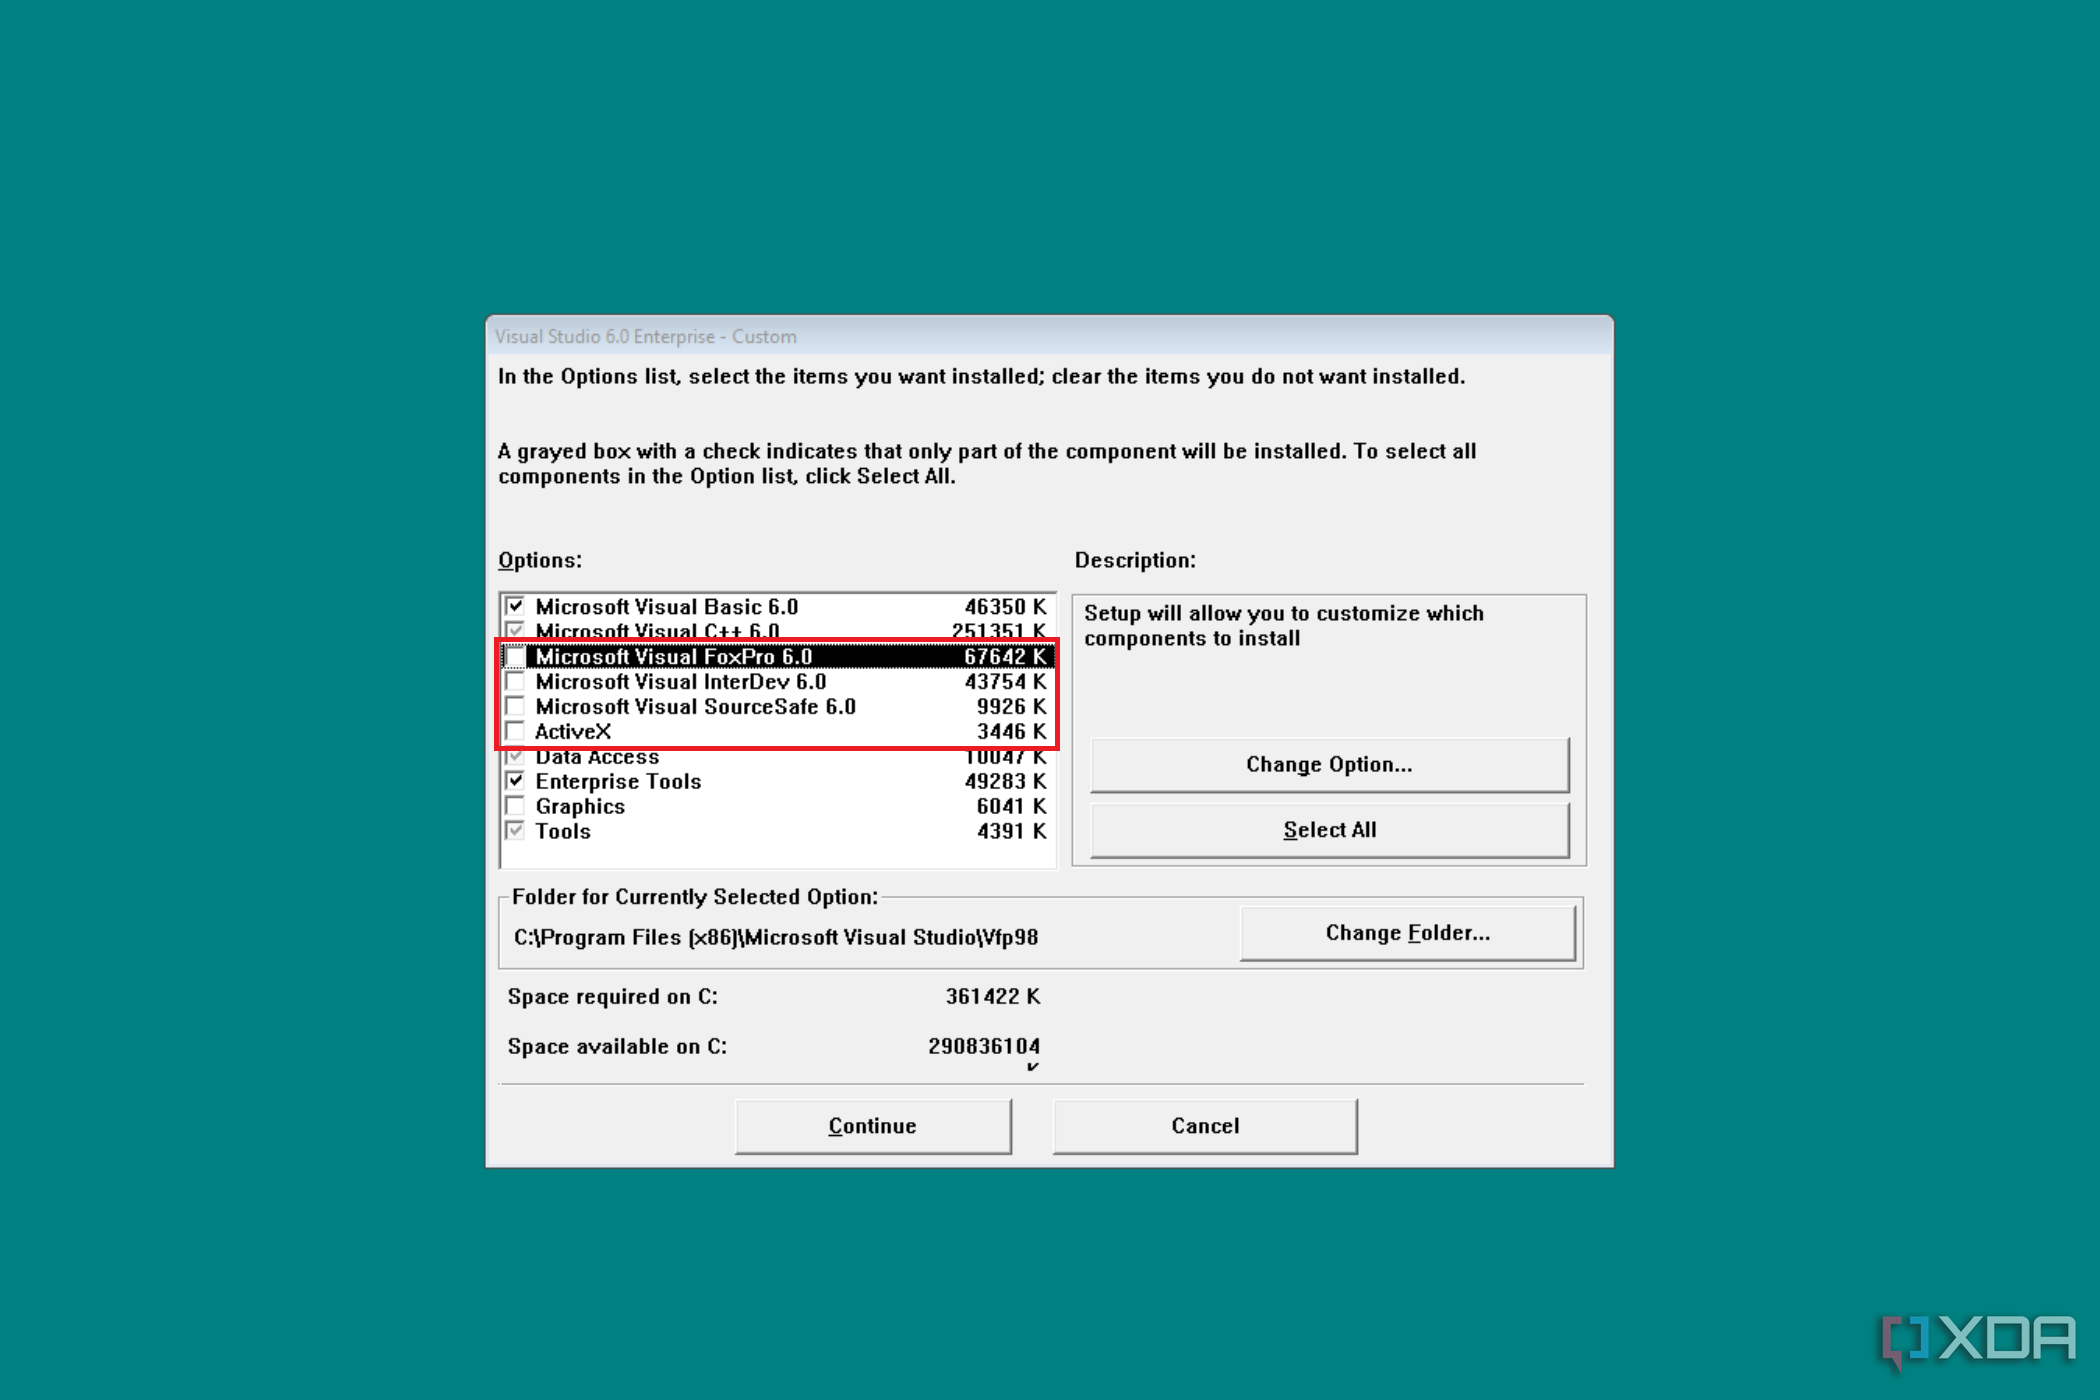
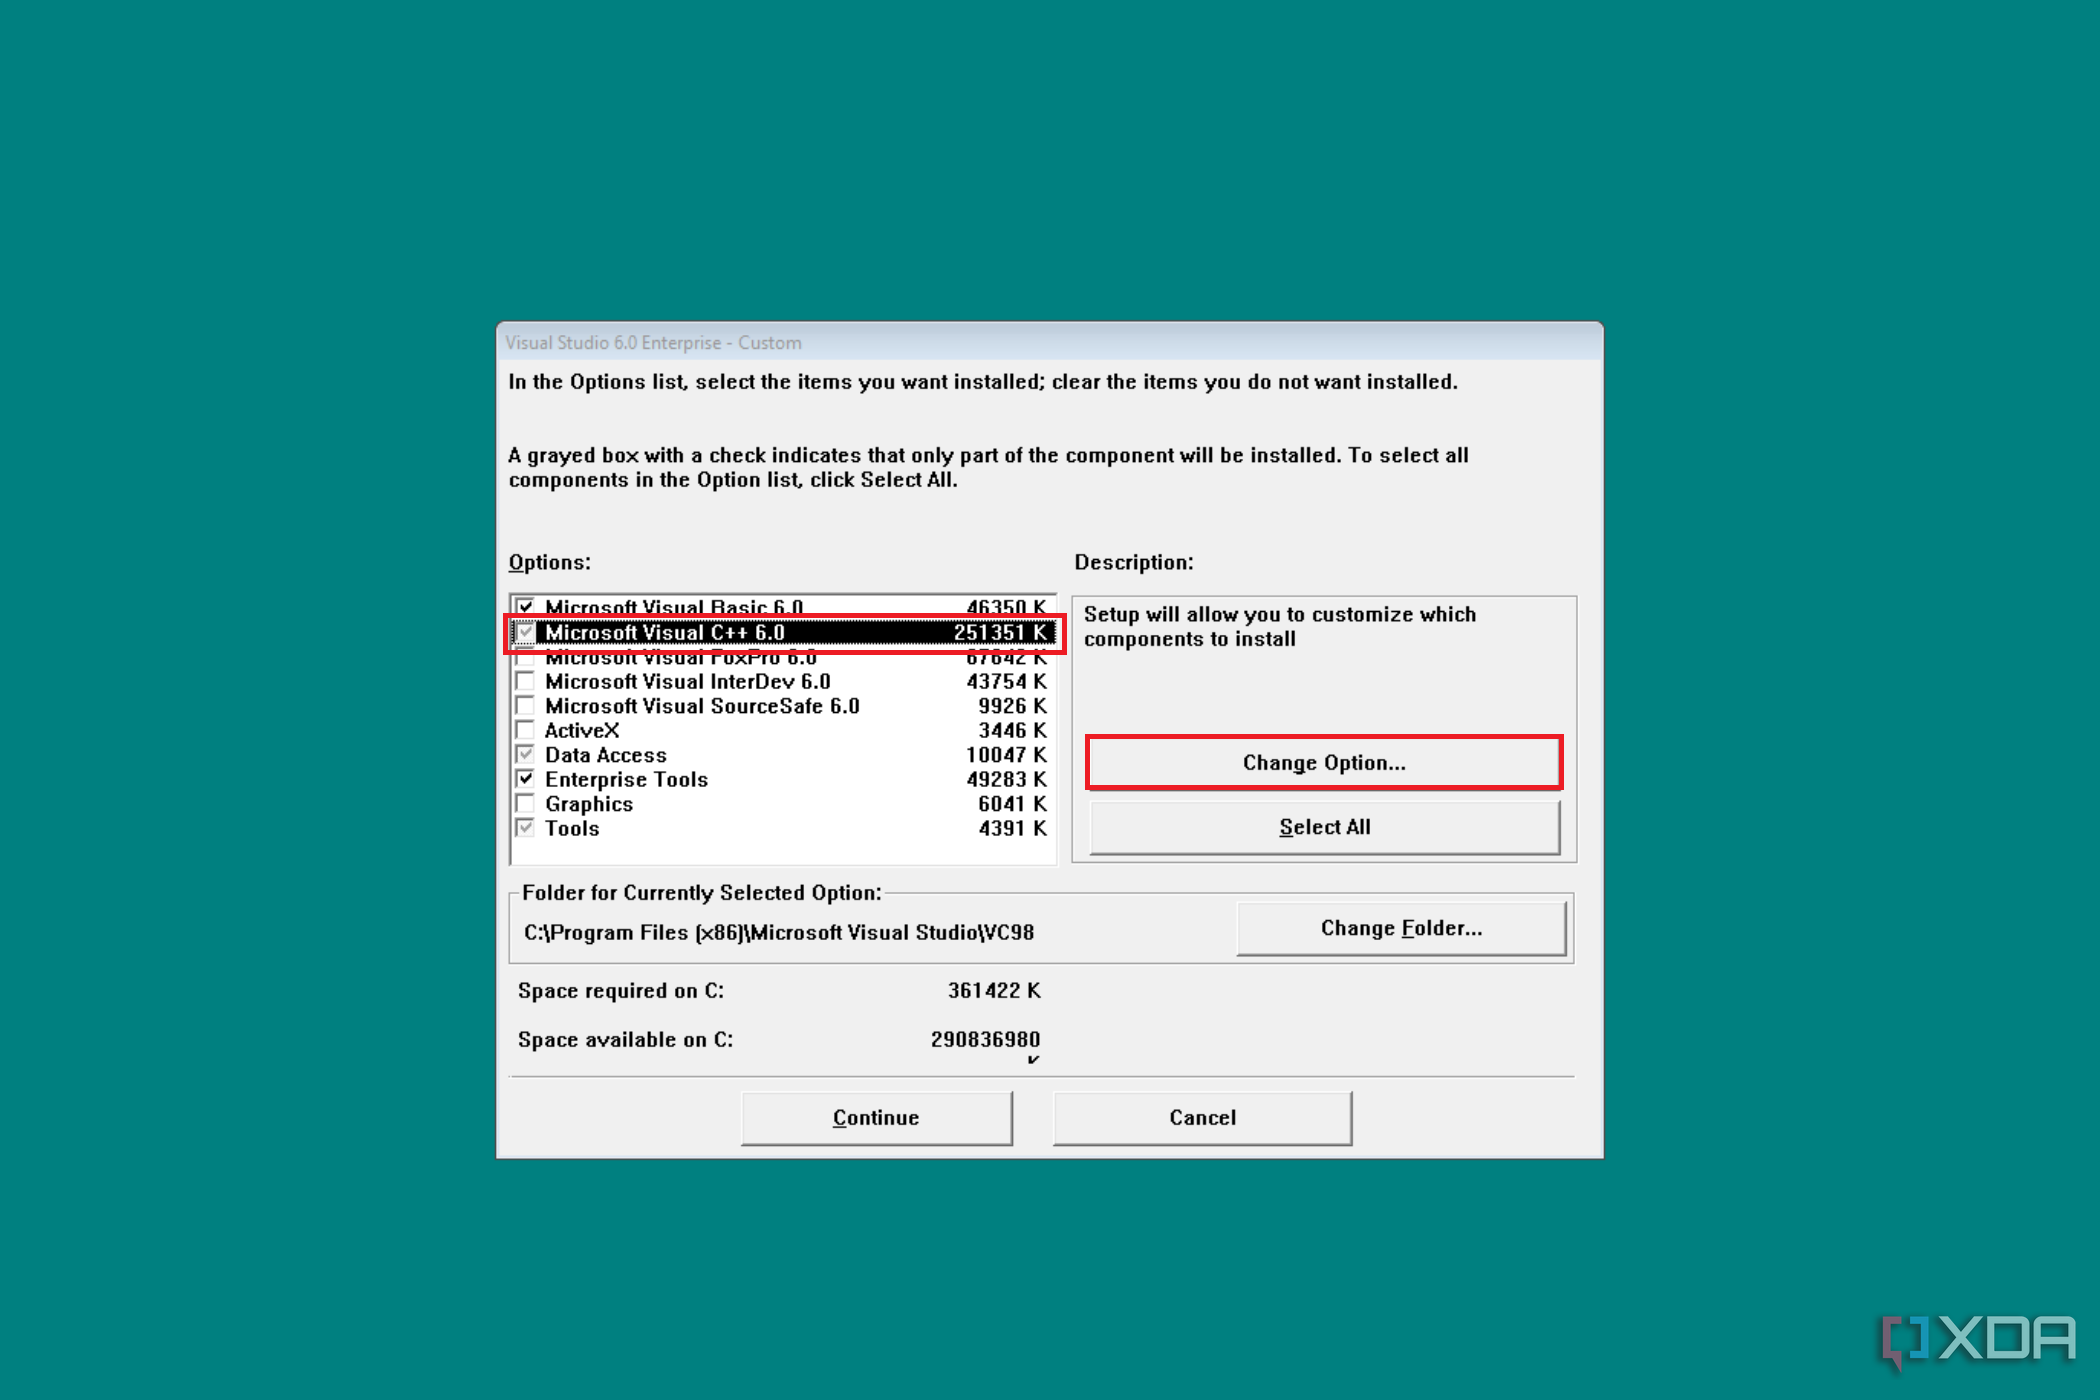
  15. Make sure all the items highlighted in this section are unchecked.

     Image showing the component selection screen of the Visual Studio 6.0 Enterprise Edition setup, with options like Microsoft Visual Basic 6.0 and others available to select for installation.

  16. Select Microsoft Visual C++ 6.0 and click on Change Option.

     Installation window for Microsoft Visual Studio 6.0 with component options like Visual Basic and Visual C++. It allows users to select components, shows the installation path, and space required on the C: drive, with 'Continue' and 'Cancel' buttons.

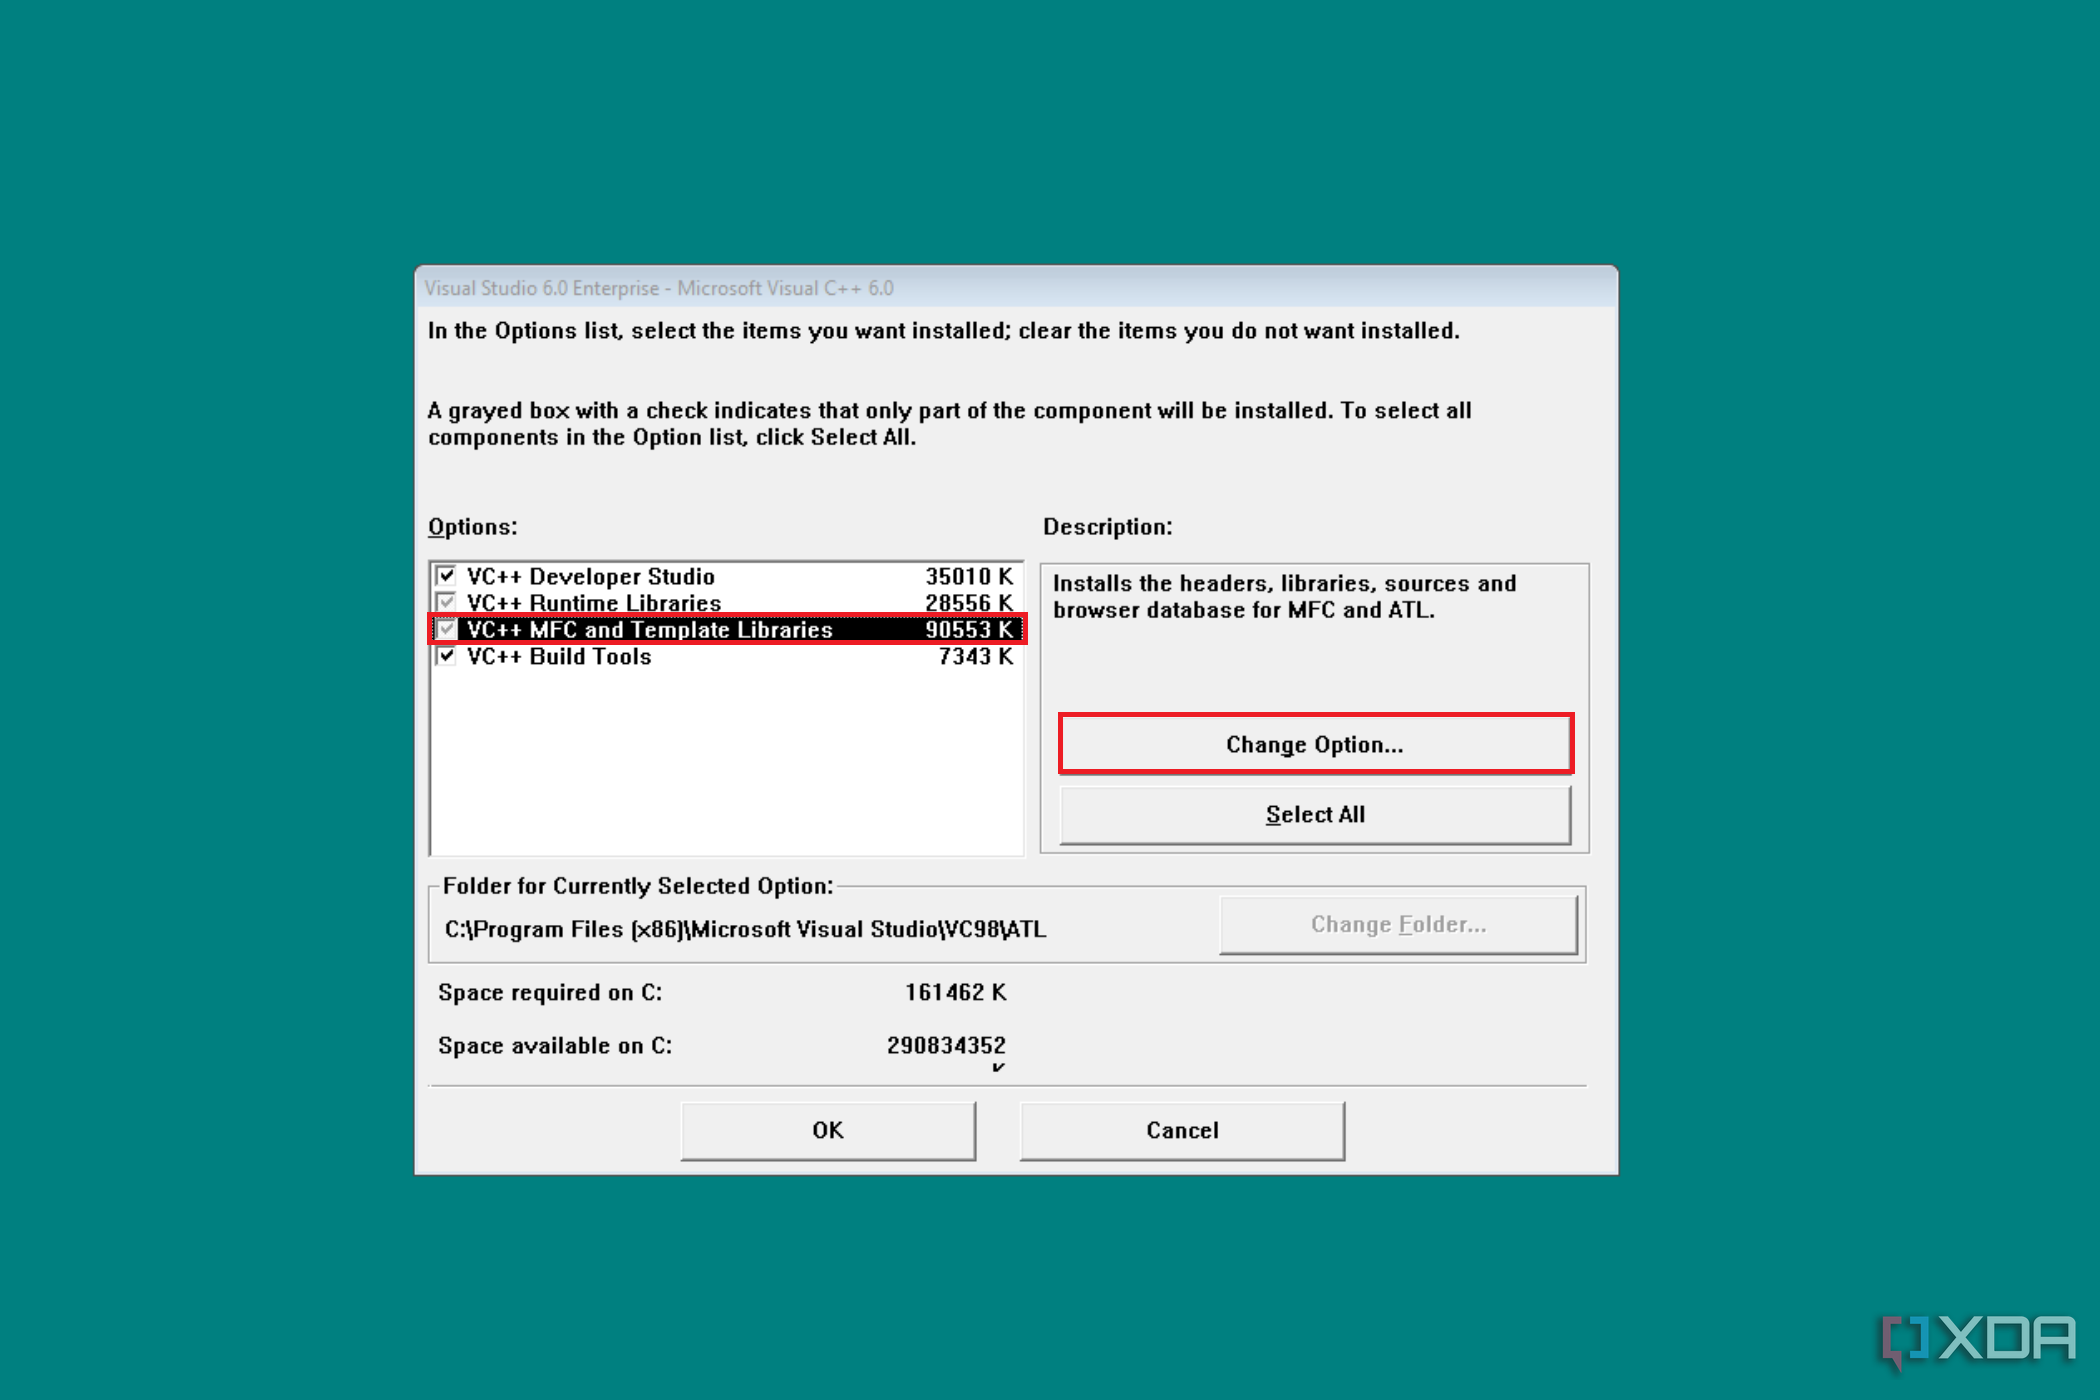
  17. Select VC++ MFC and Template Libraries and click on Change Option.

     Image of Visual Studio 6.0 Enterprise - Microsoft Visual C++ 6.0 setup window. It lists components like VC++ Developer Studio and Runtime Libraries to be installed, with descriptions and file sizes. The installation path and the space required and available on drive C: are shown, with 'OK' and 'Cancel' buttons at the bottom.

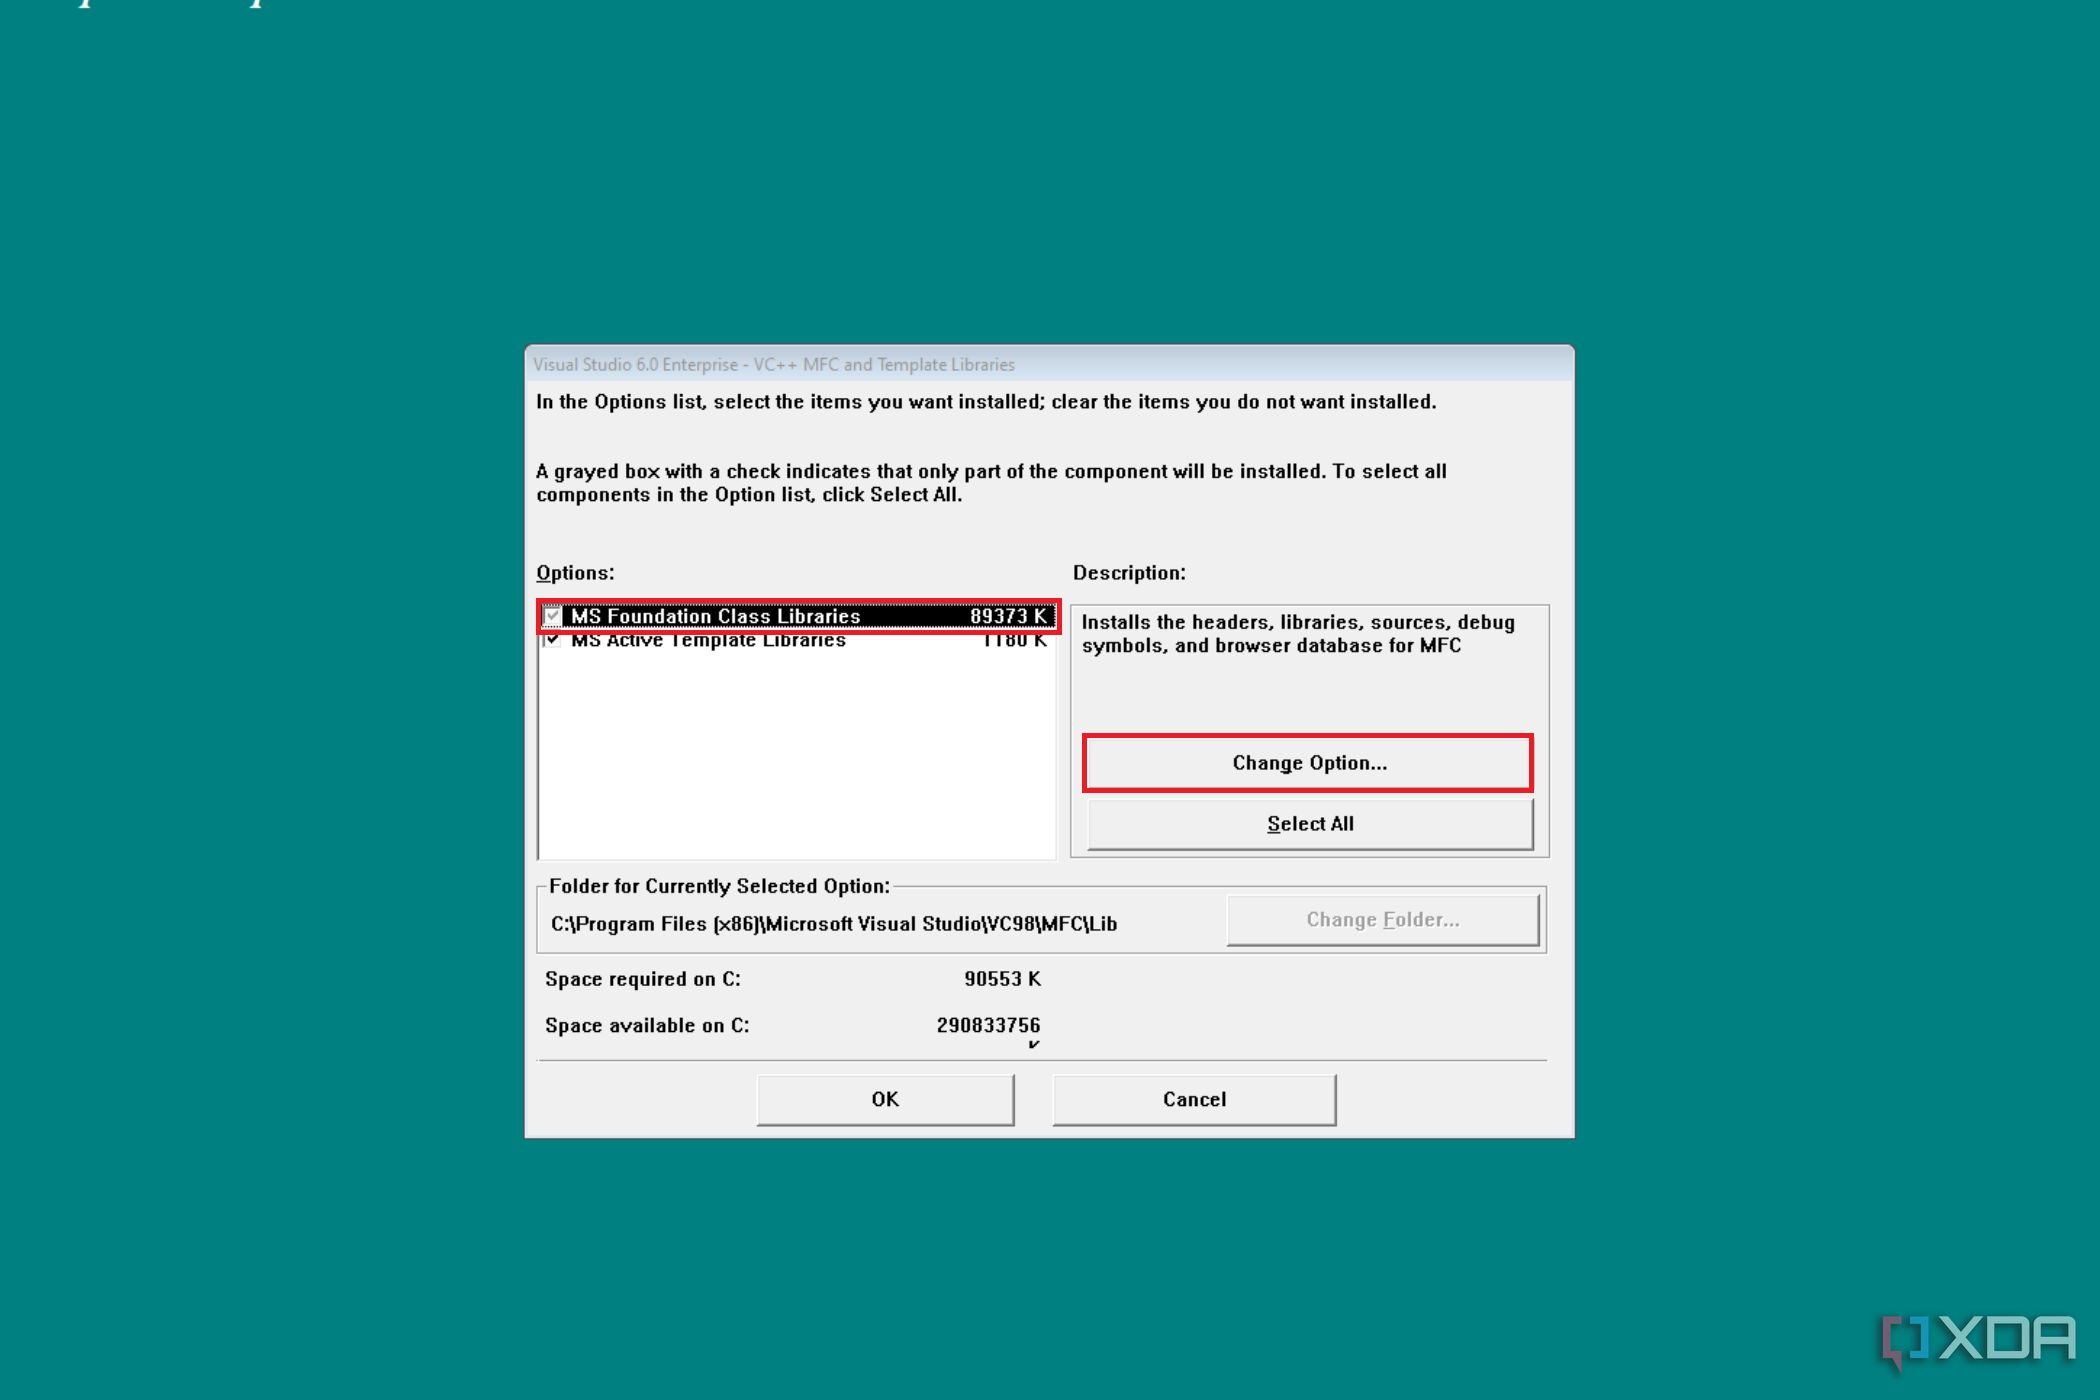
  18. Select MS Foundation Class Libraries and click on Change Option.

     Screenshot of Visual Studio 6.0 setup for MFC and Template Libraries, showing options to install with file sizes and disk space details, and 'OK' or 'Cancel' buttons at the bottom.

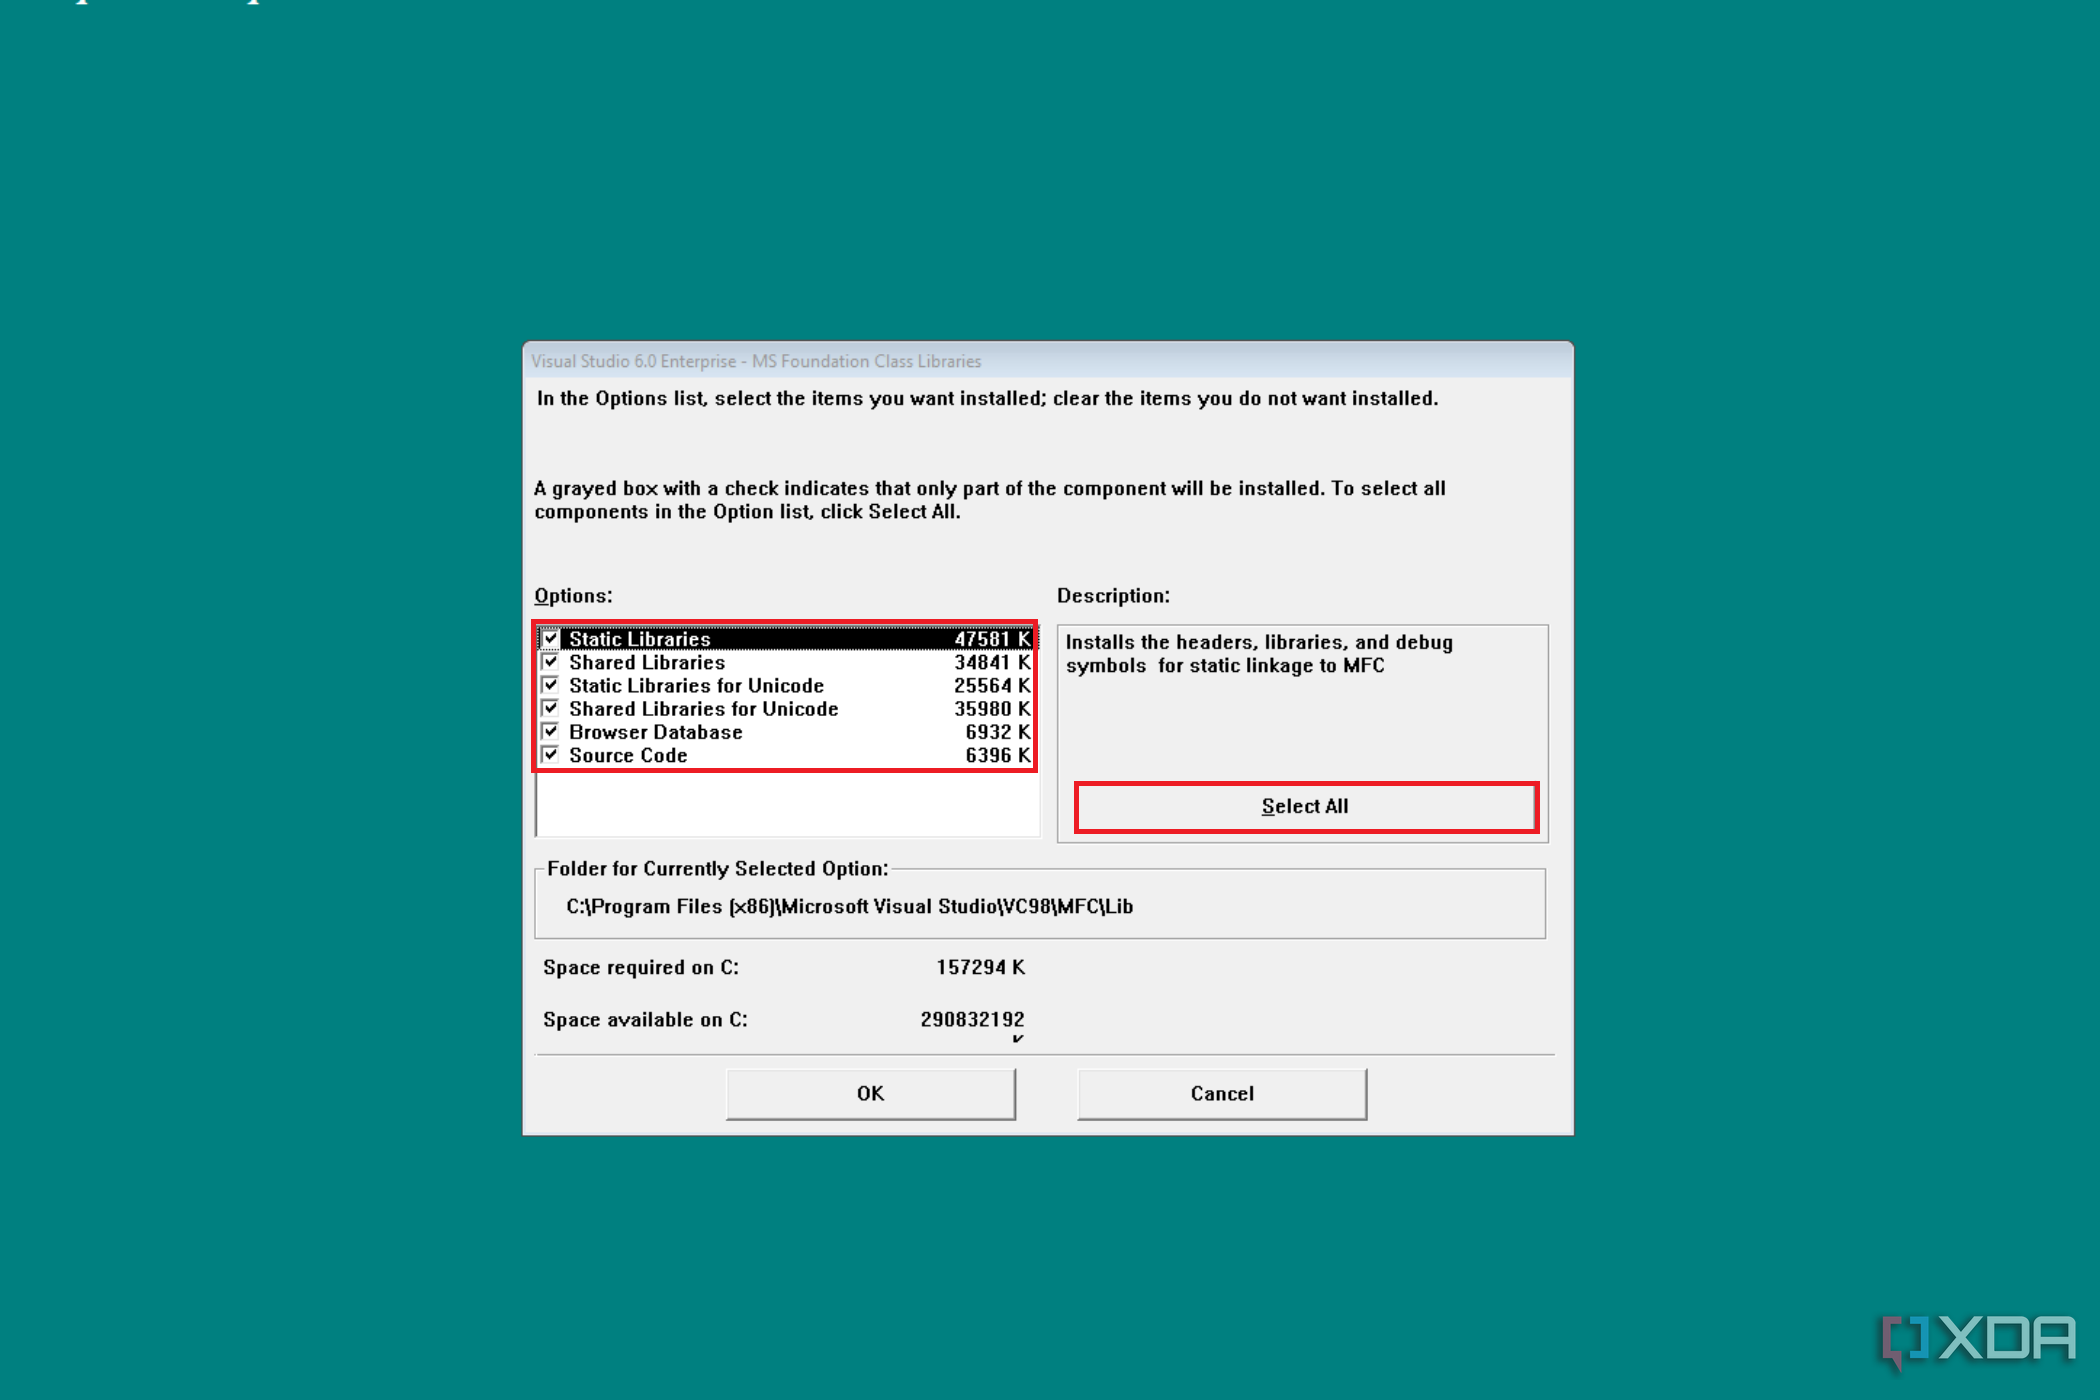
  19. Make sure all the items here are checked by clicking on the Select All option.

    Screenshot of Visual Studio 6.0 installation options for MS Foundation Class Libraries, detailing Static and Shared Libraries, with file sizes, directory path, space requirements, and 'OK' or 'Cancel' buttons.

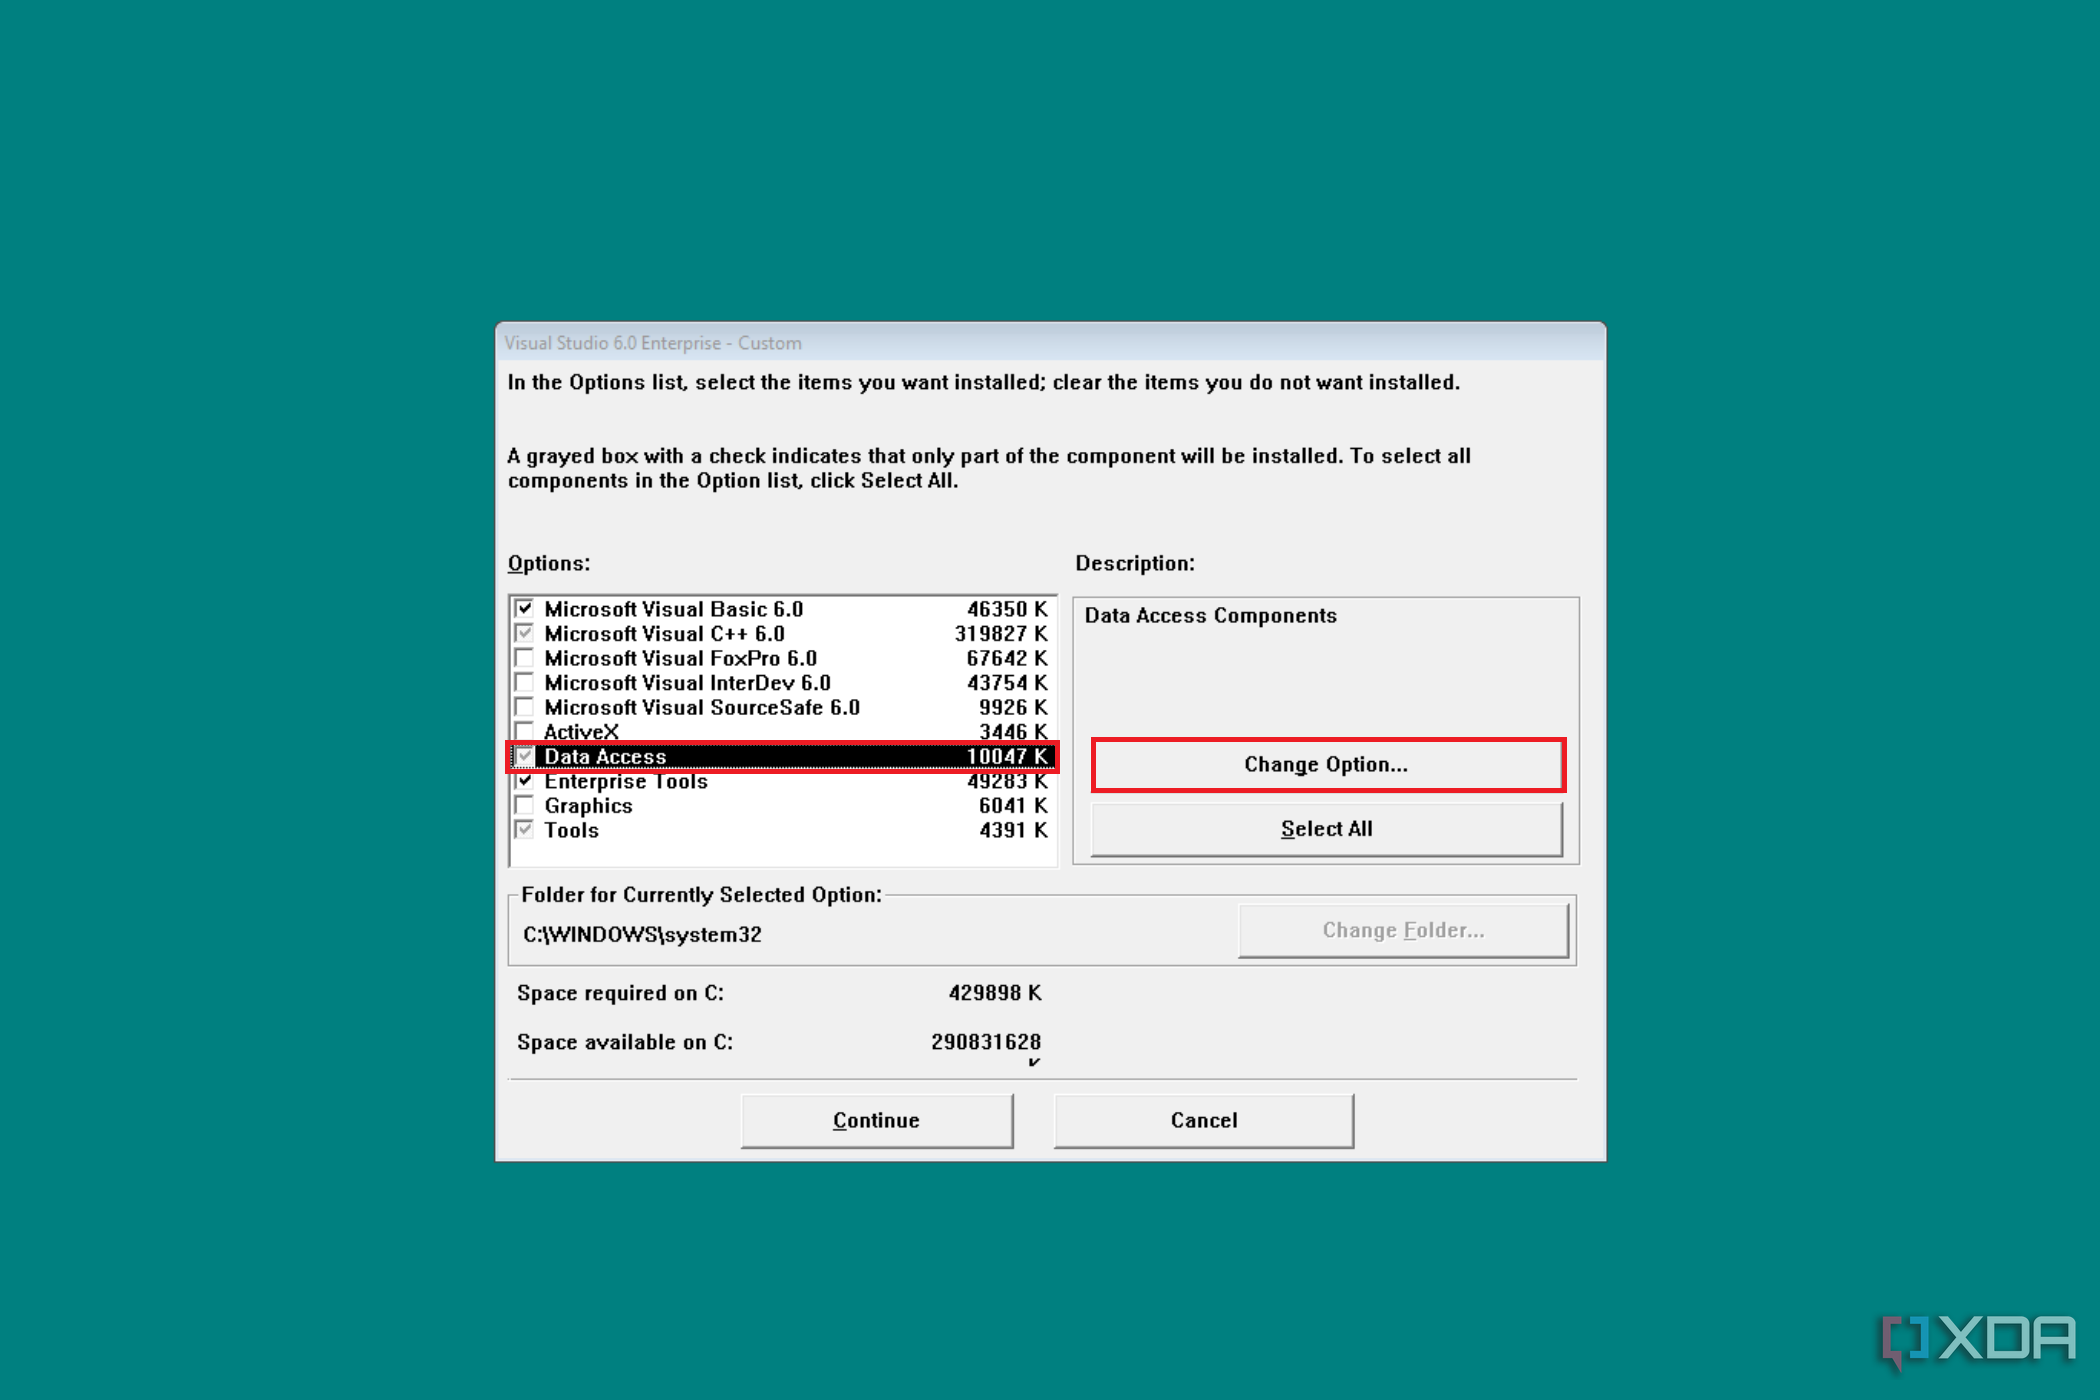
  20. Go back to the first screen, select Data Access, and click on Change Option.

     Image of Visual Studio 6.0 Enterprise installation window, displaying selectable component options like Visual Basic 6.0 and Visual C++, with 'Data Access' highlighted, and 'Continue' and 'Cancel' buttons at the bottom

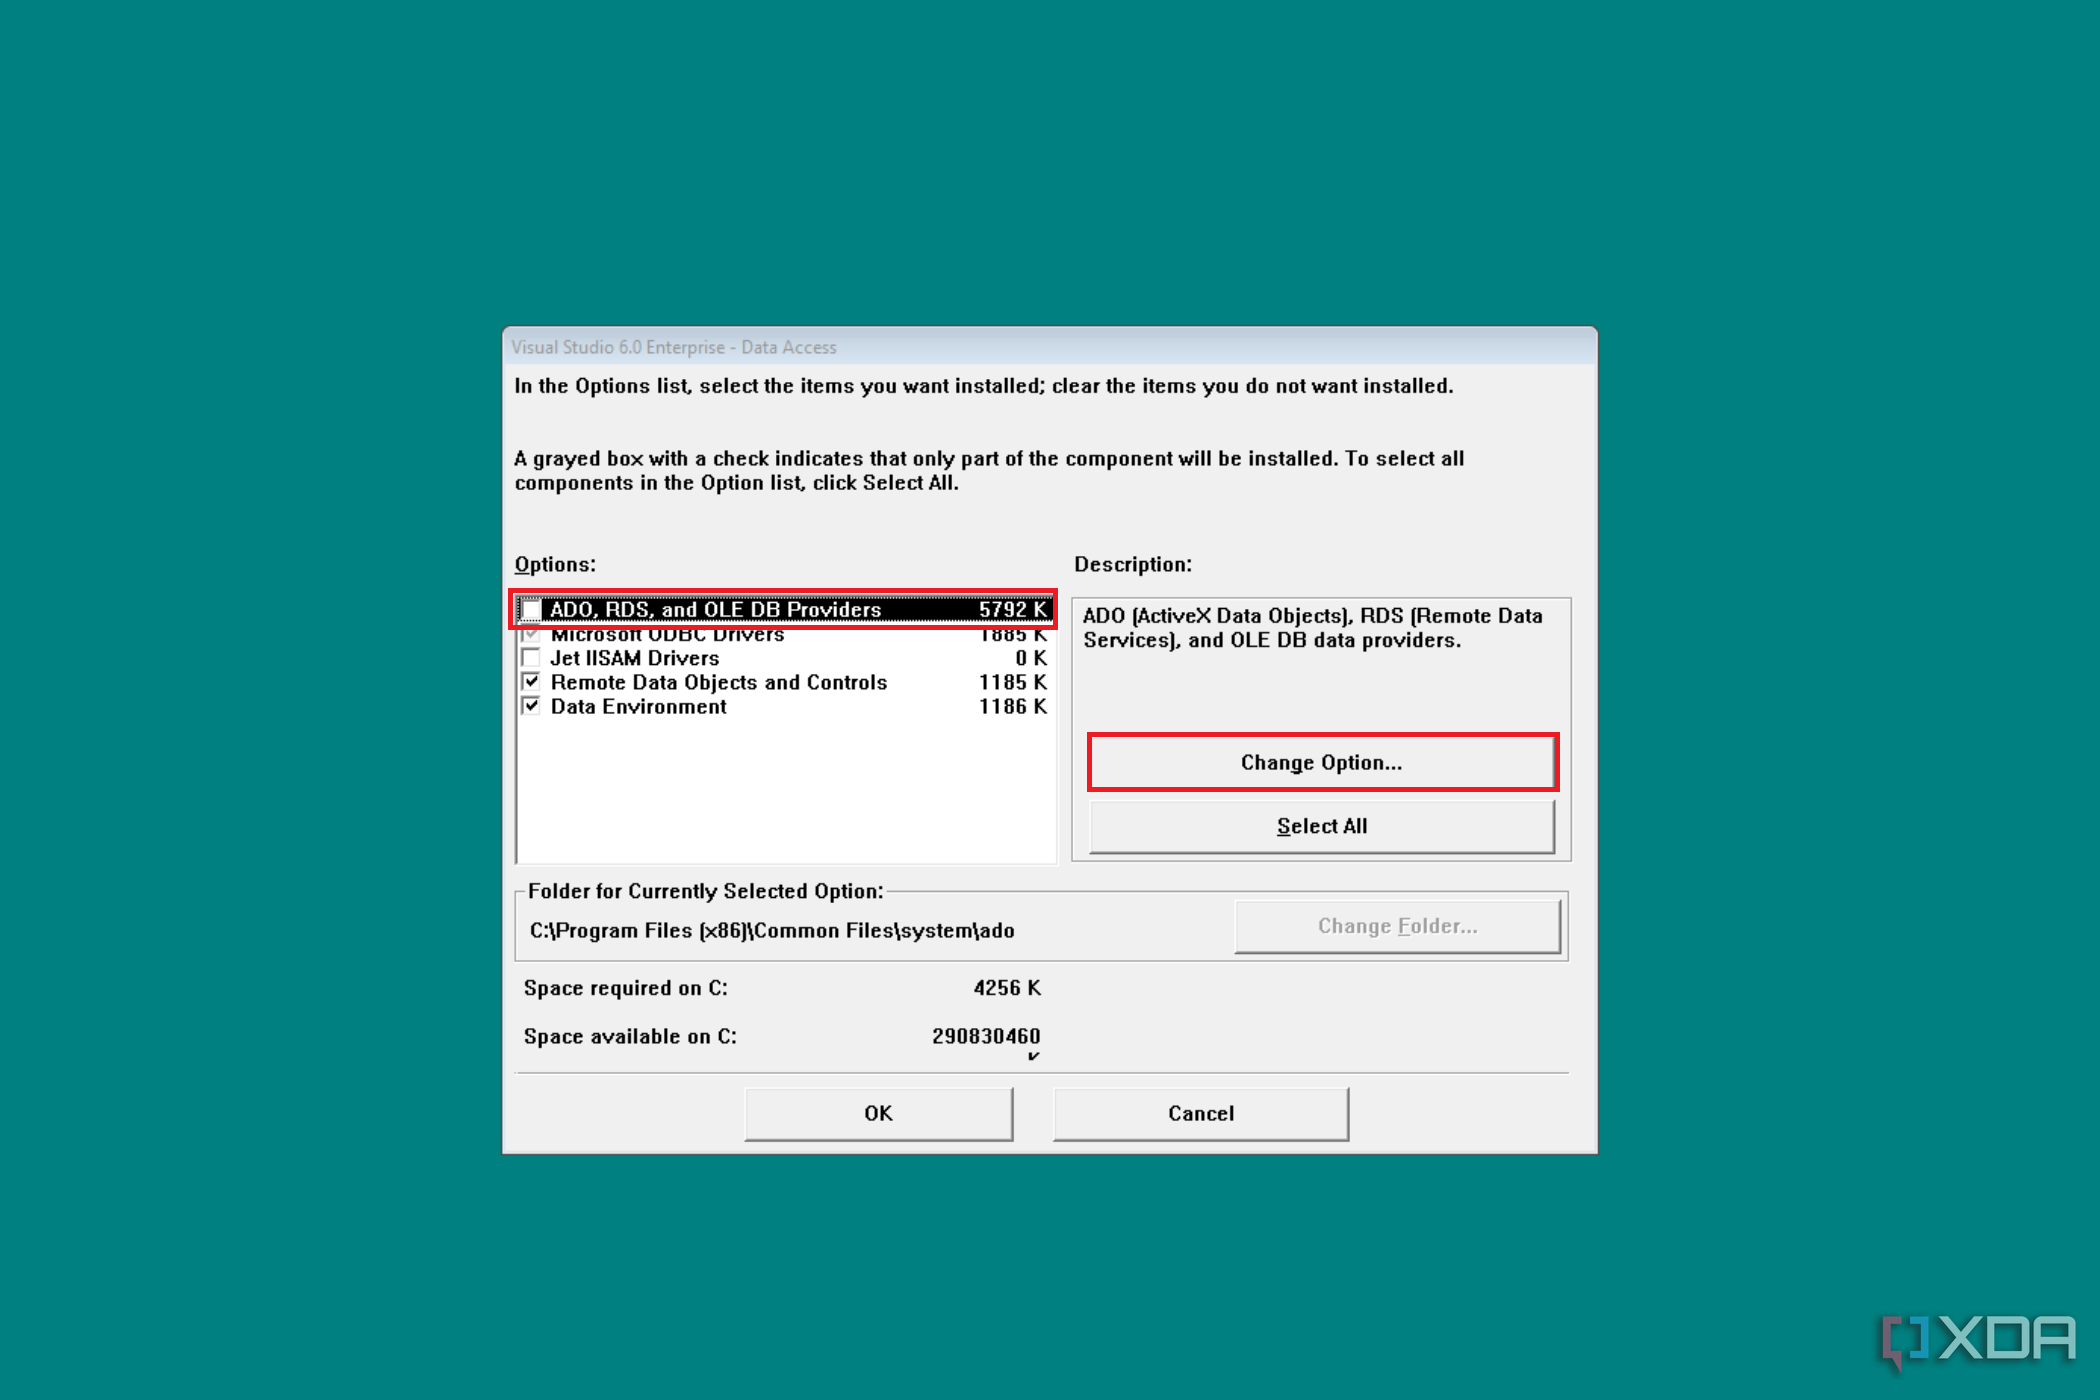
  21. Uncheck ADO, RDS, and OLE DB Providers and leave the rest of the settings unchanged.

    Screenshot of a Visual Studio 6.0 installation window with options to select components like 'ADO, RDS, and OLE DB Providers', showing checkboxes, highlighted selections, and buttons for changing options and confirming the installation.

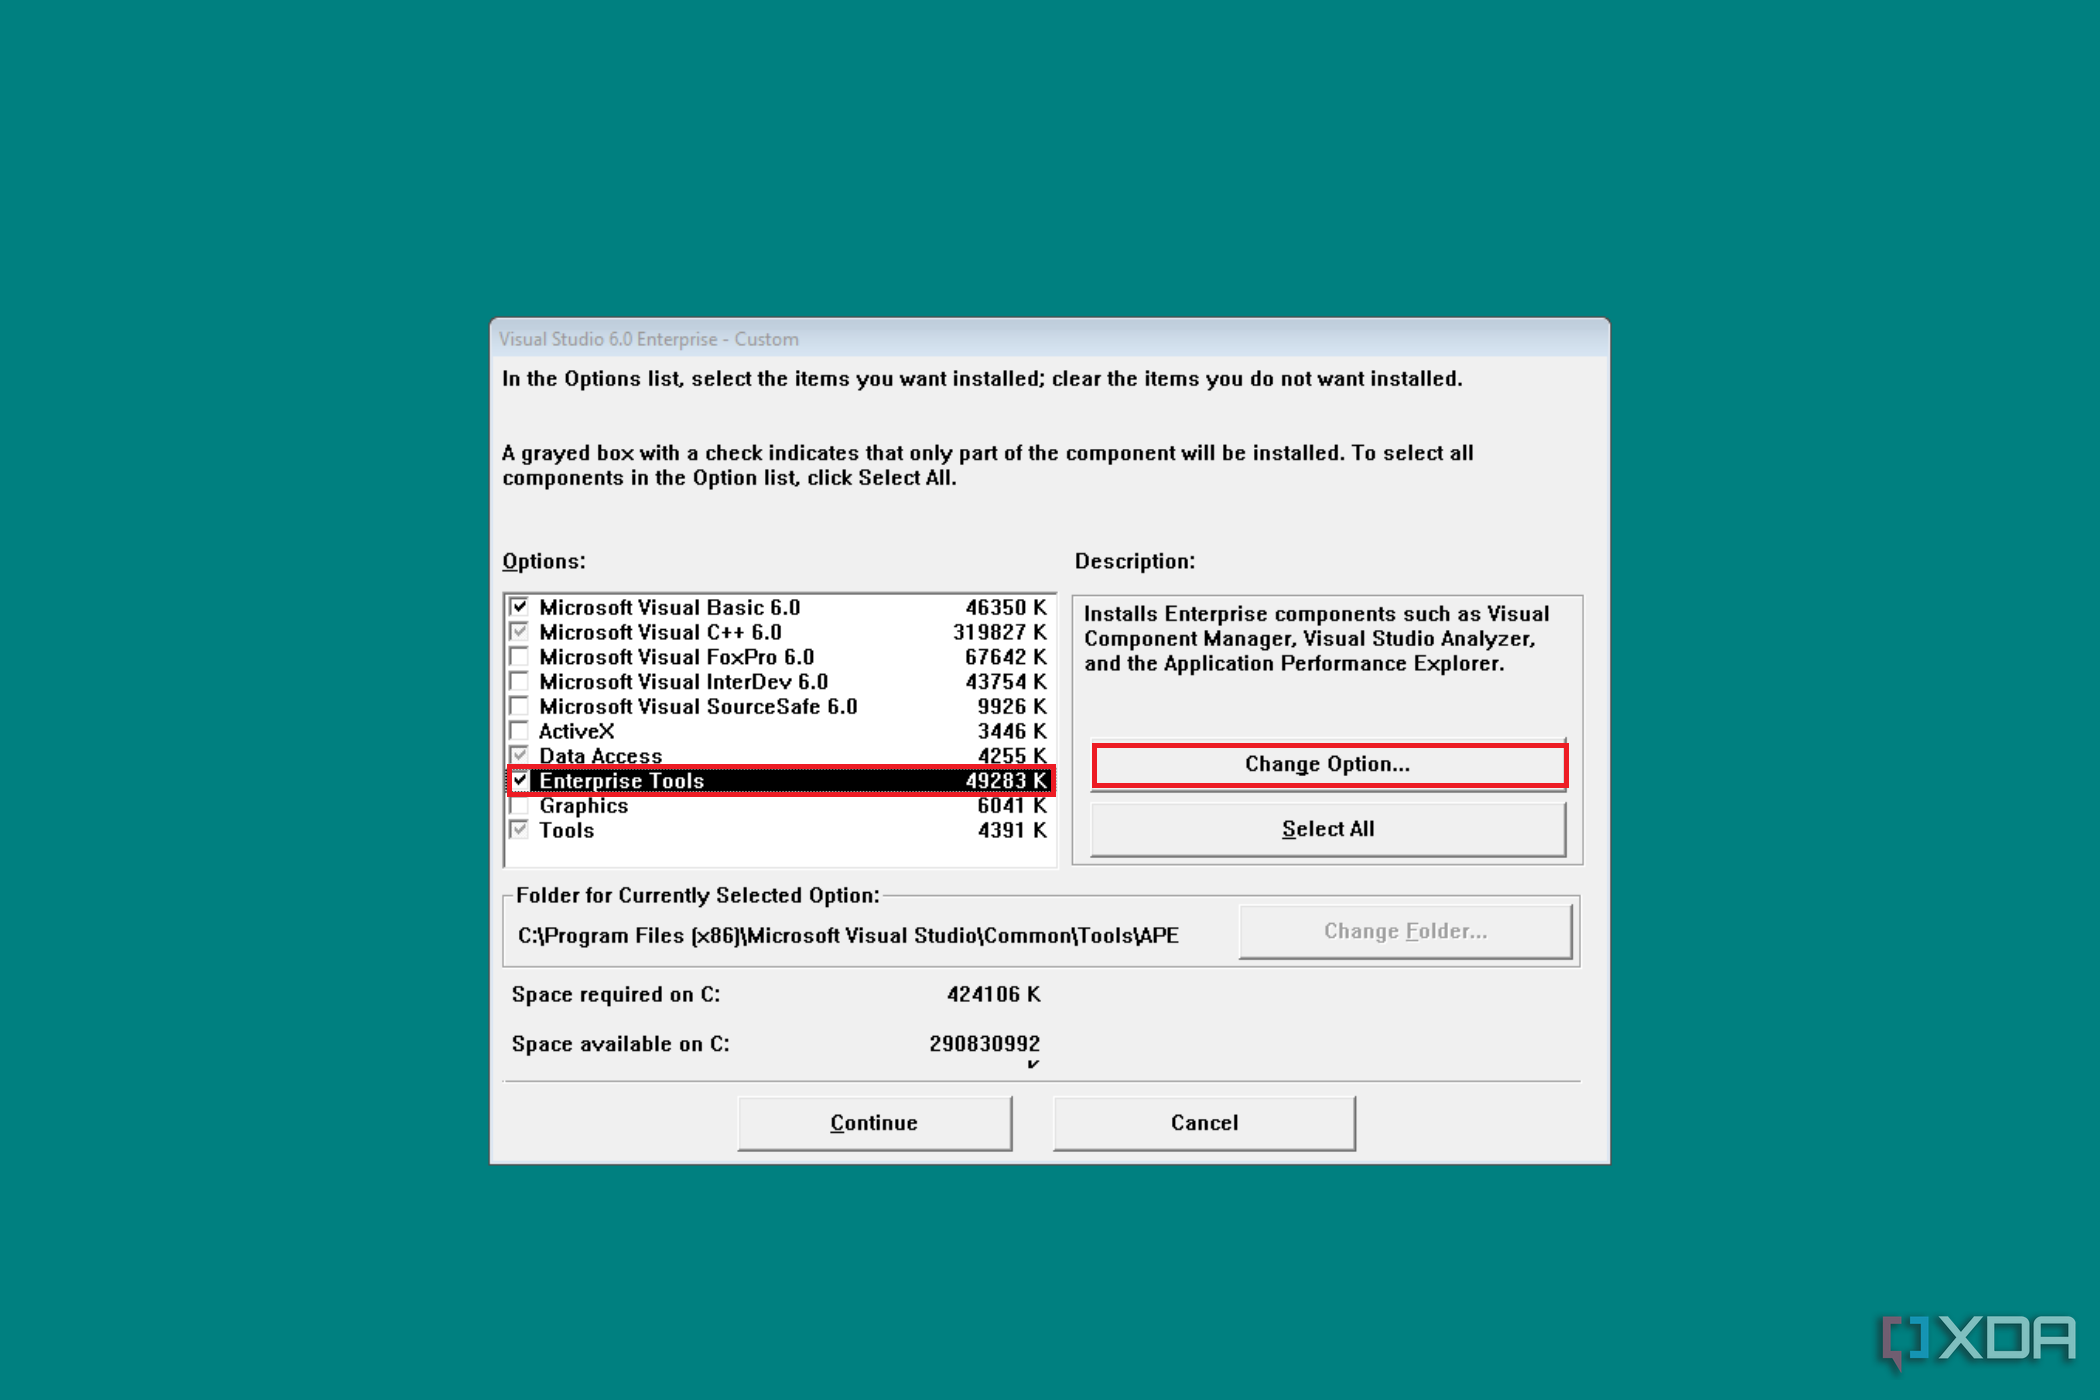
  22. Return to the first screen, select Enterprise Tools, and click on Change Option.

    Screenshot of Visual Studio 6.0 Enterprise installation, with options like Visual Basic 6.0 and C++ 6.0 checked for setup, including directory path, space requirements, and action buttons.

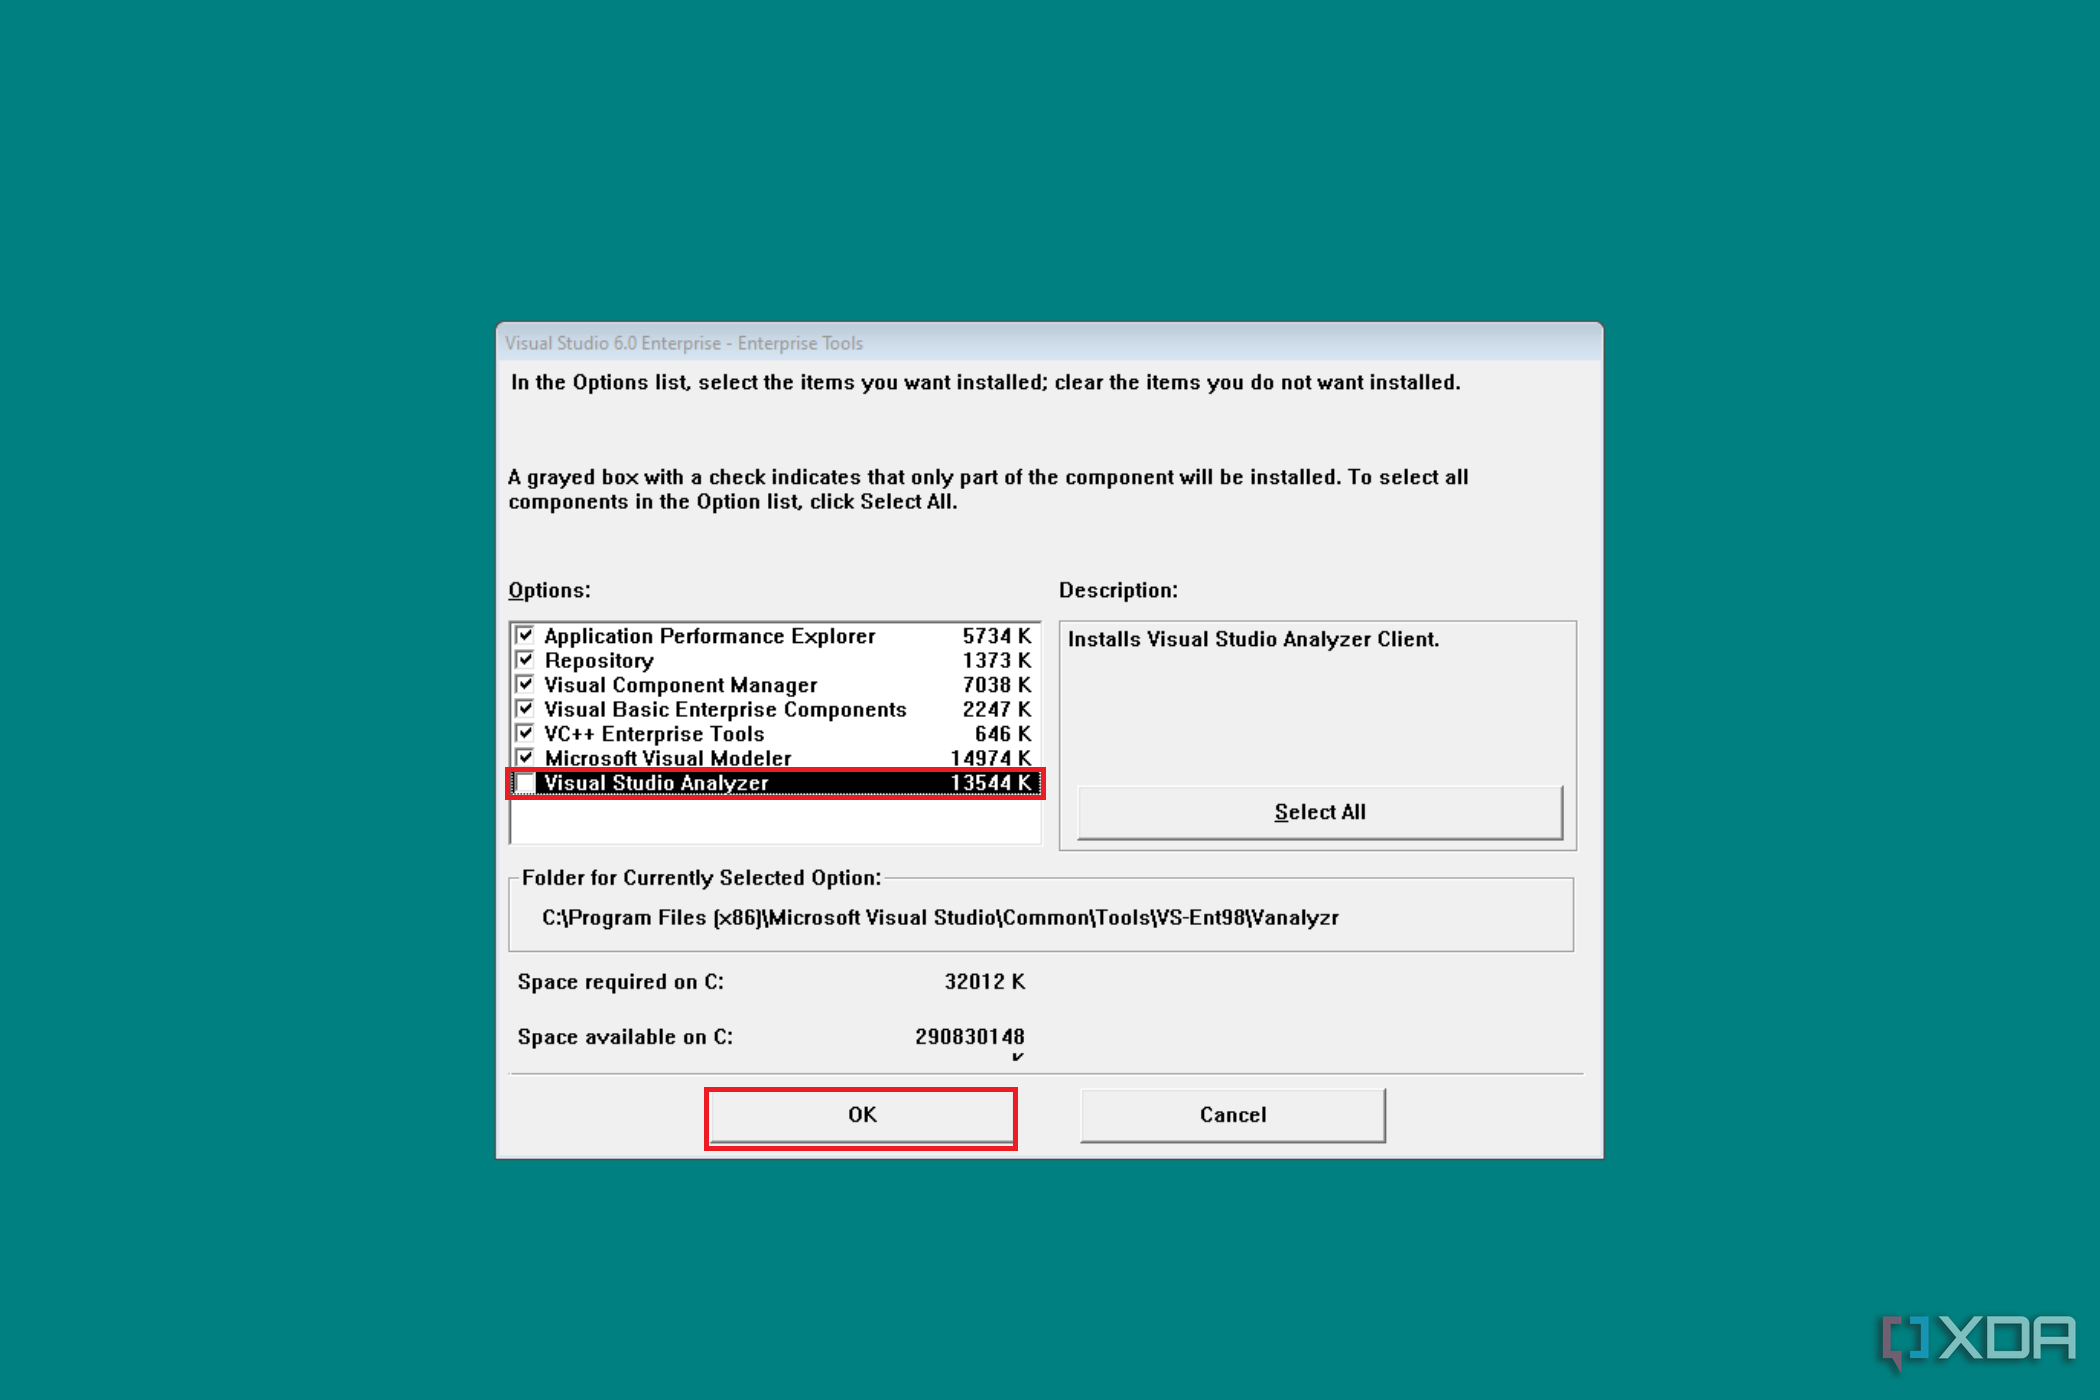
  23. Uncheck Visual Studio Analyzer, click on OK, and return to the first screen.

    Screenshot of Visual Studio 6.0 Enterprise Tools installation options, with items like Application Performance Explorer and Visual Basic Enterprise Components selected, including a description section and disk space requirements.

  24. Click on Continue.

    Screenshot of Visual Studio 6.0 installation settings, showing options for Visual Basic 6.0, C++ 6.0, disk space details, and control buttons.

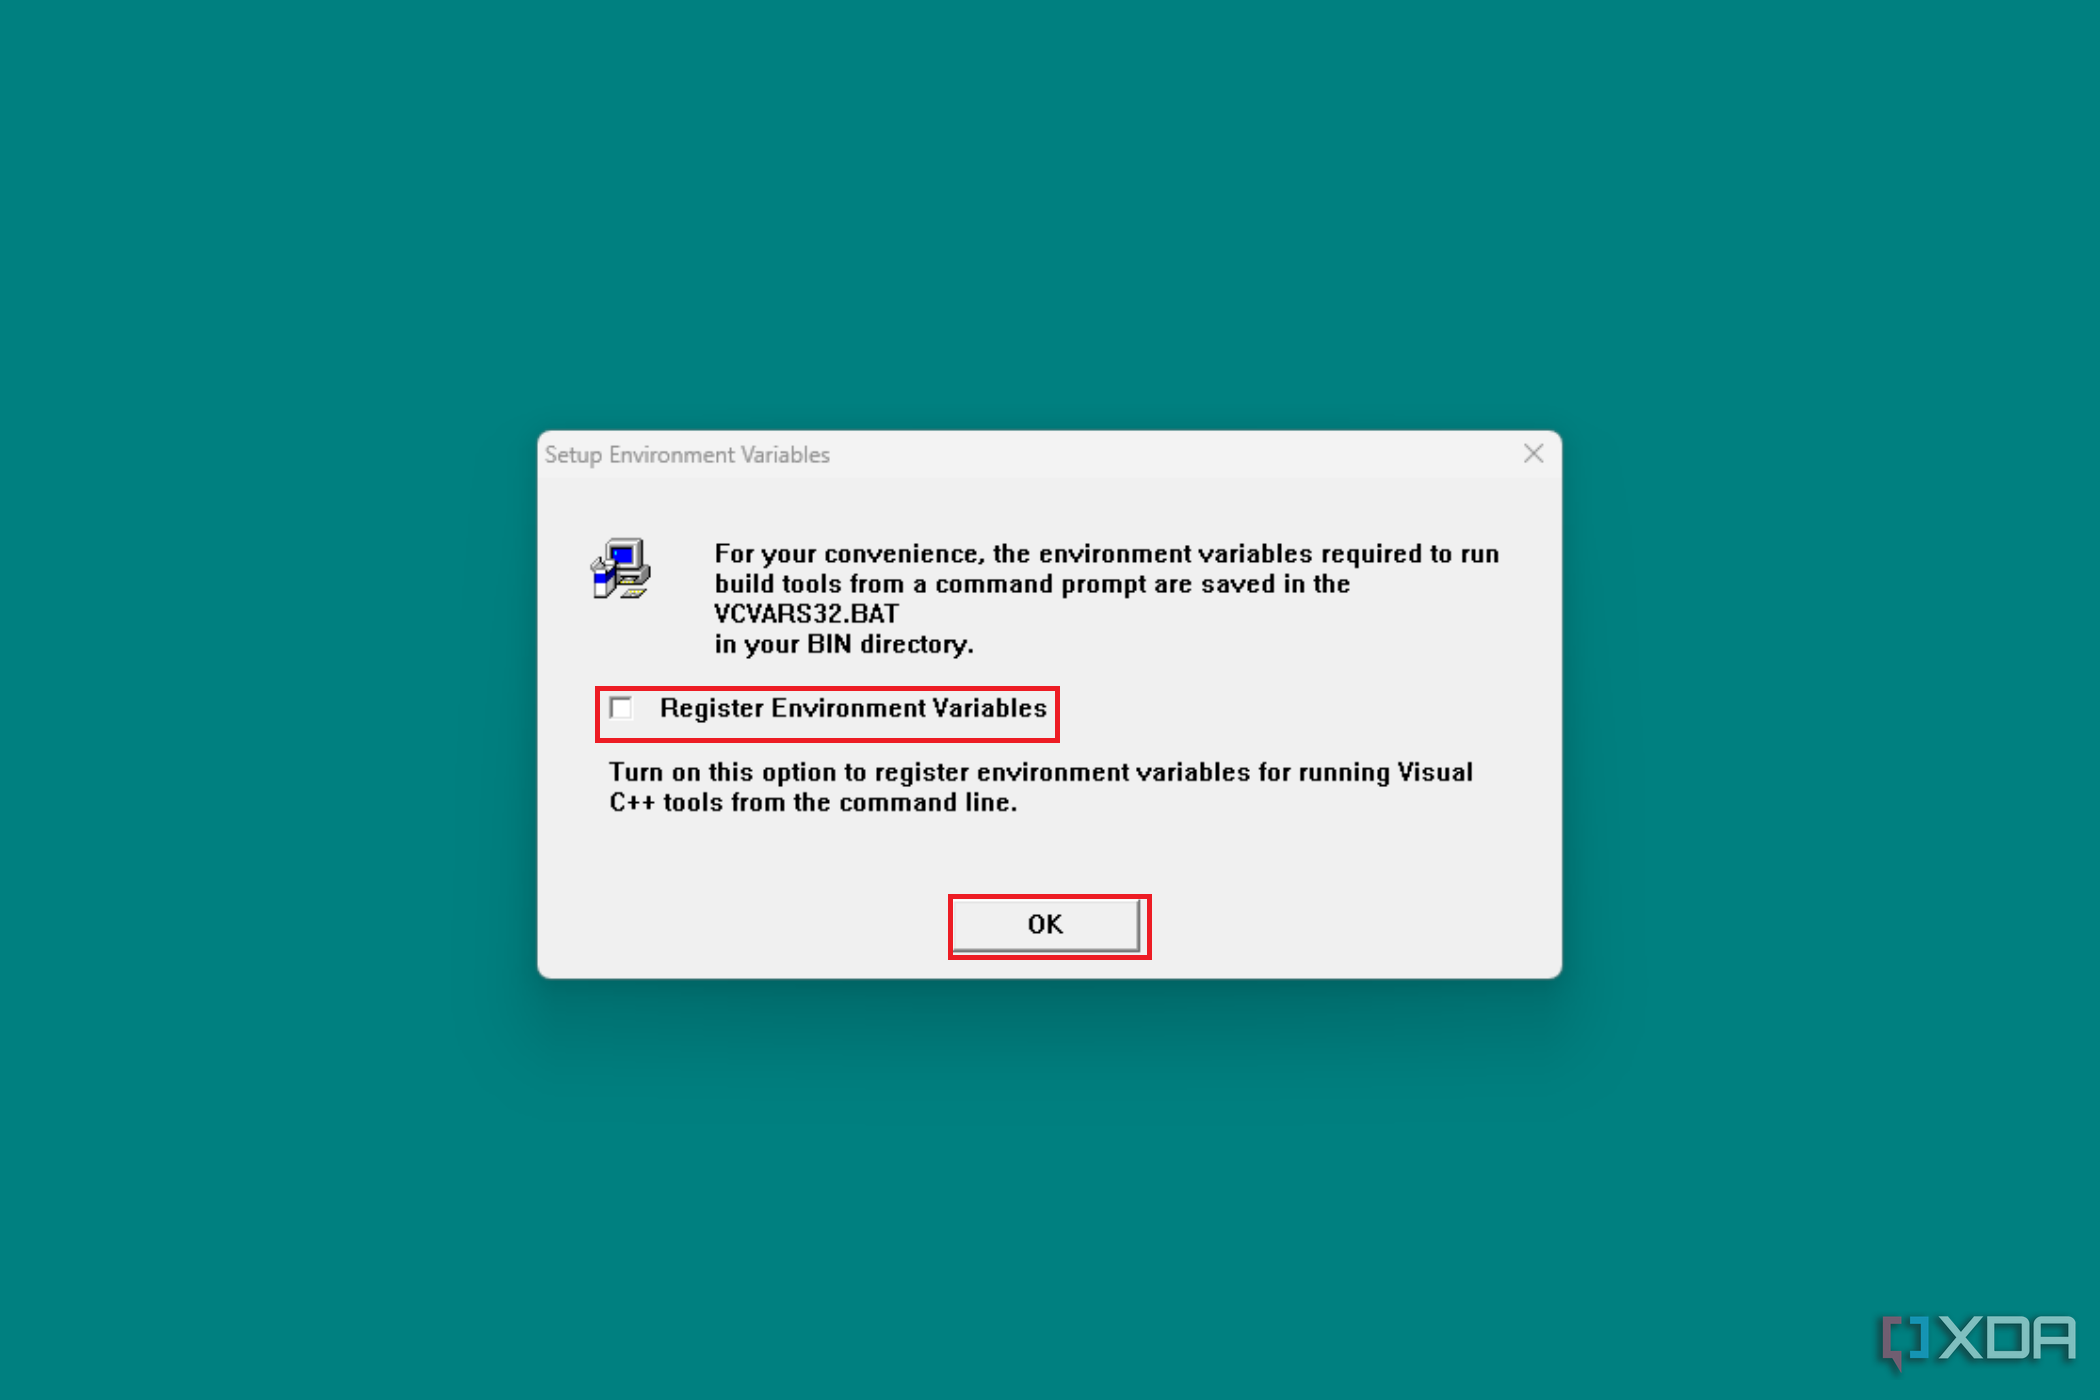
  25. Leave the Register Environment Variables unchecked and click on OK.

    Image of a setup prompt for registering environment variables for Visual C++ tools from the command line, with an option checkbox and an 'OK' button.

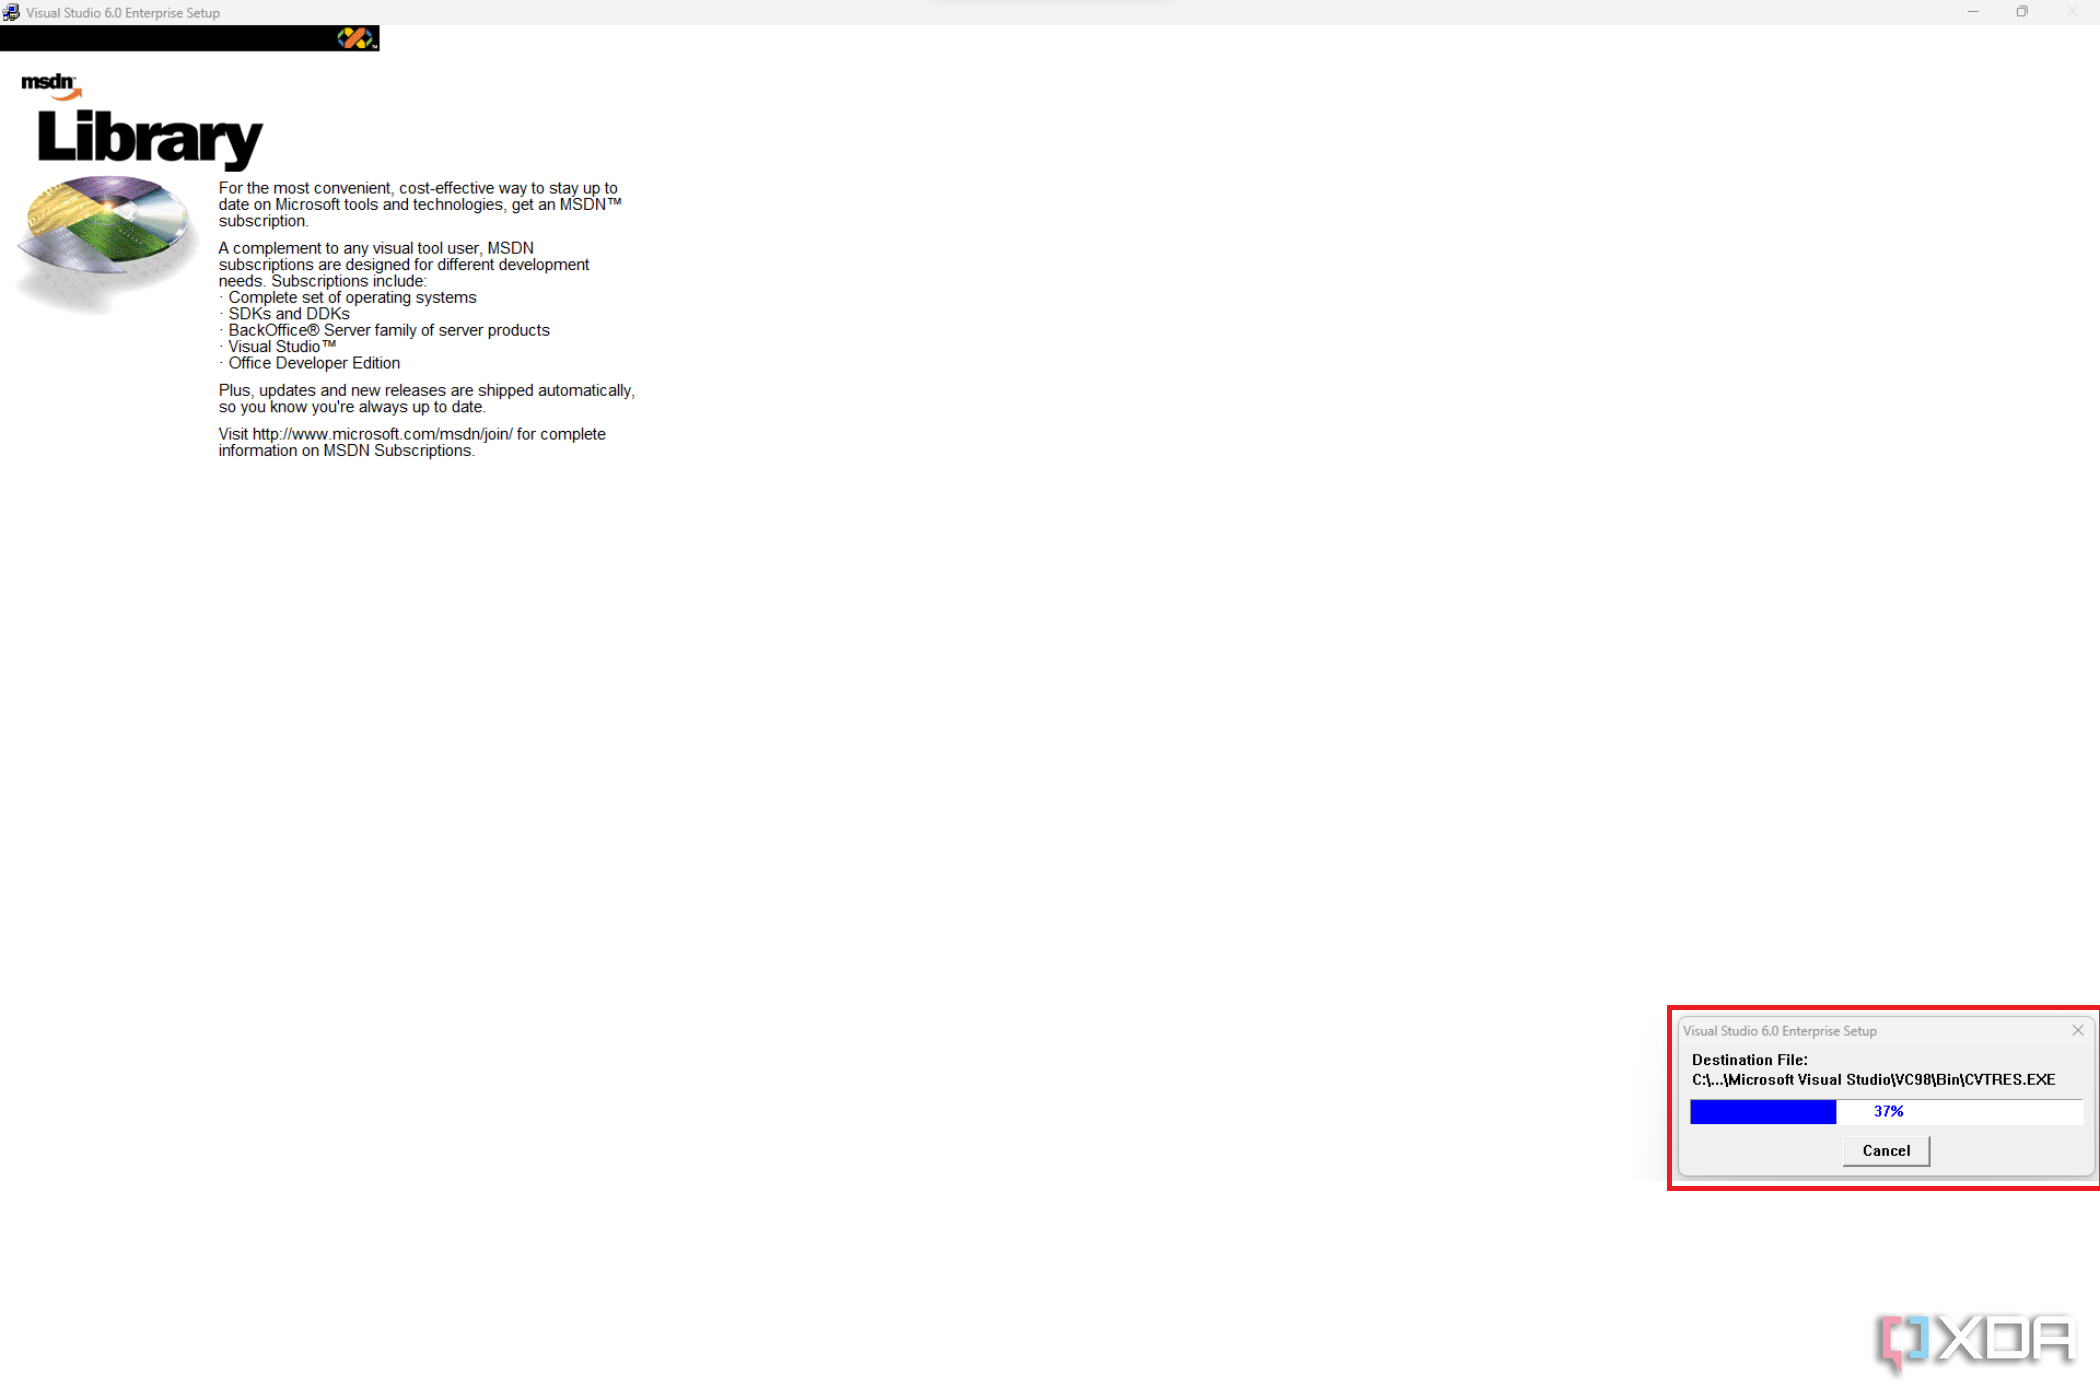
  26. Let the process be completed.
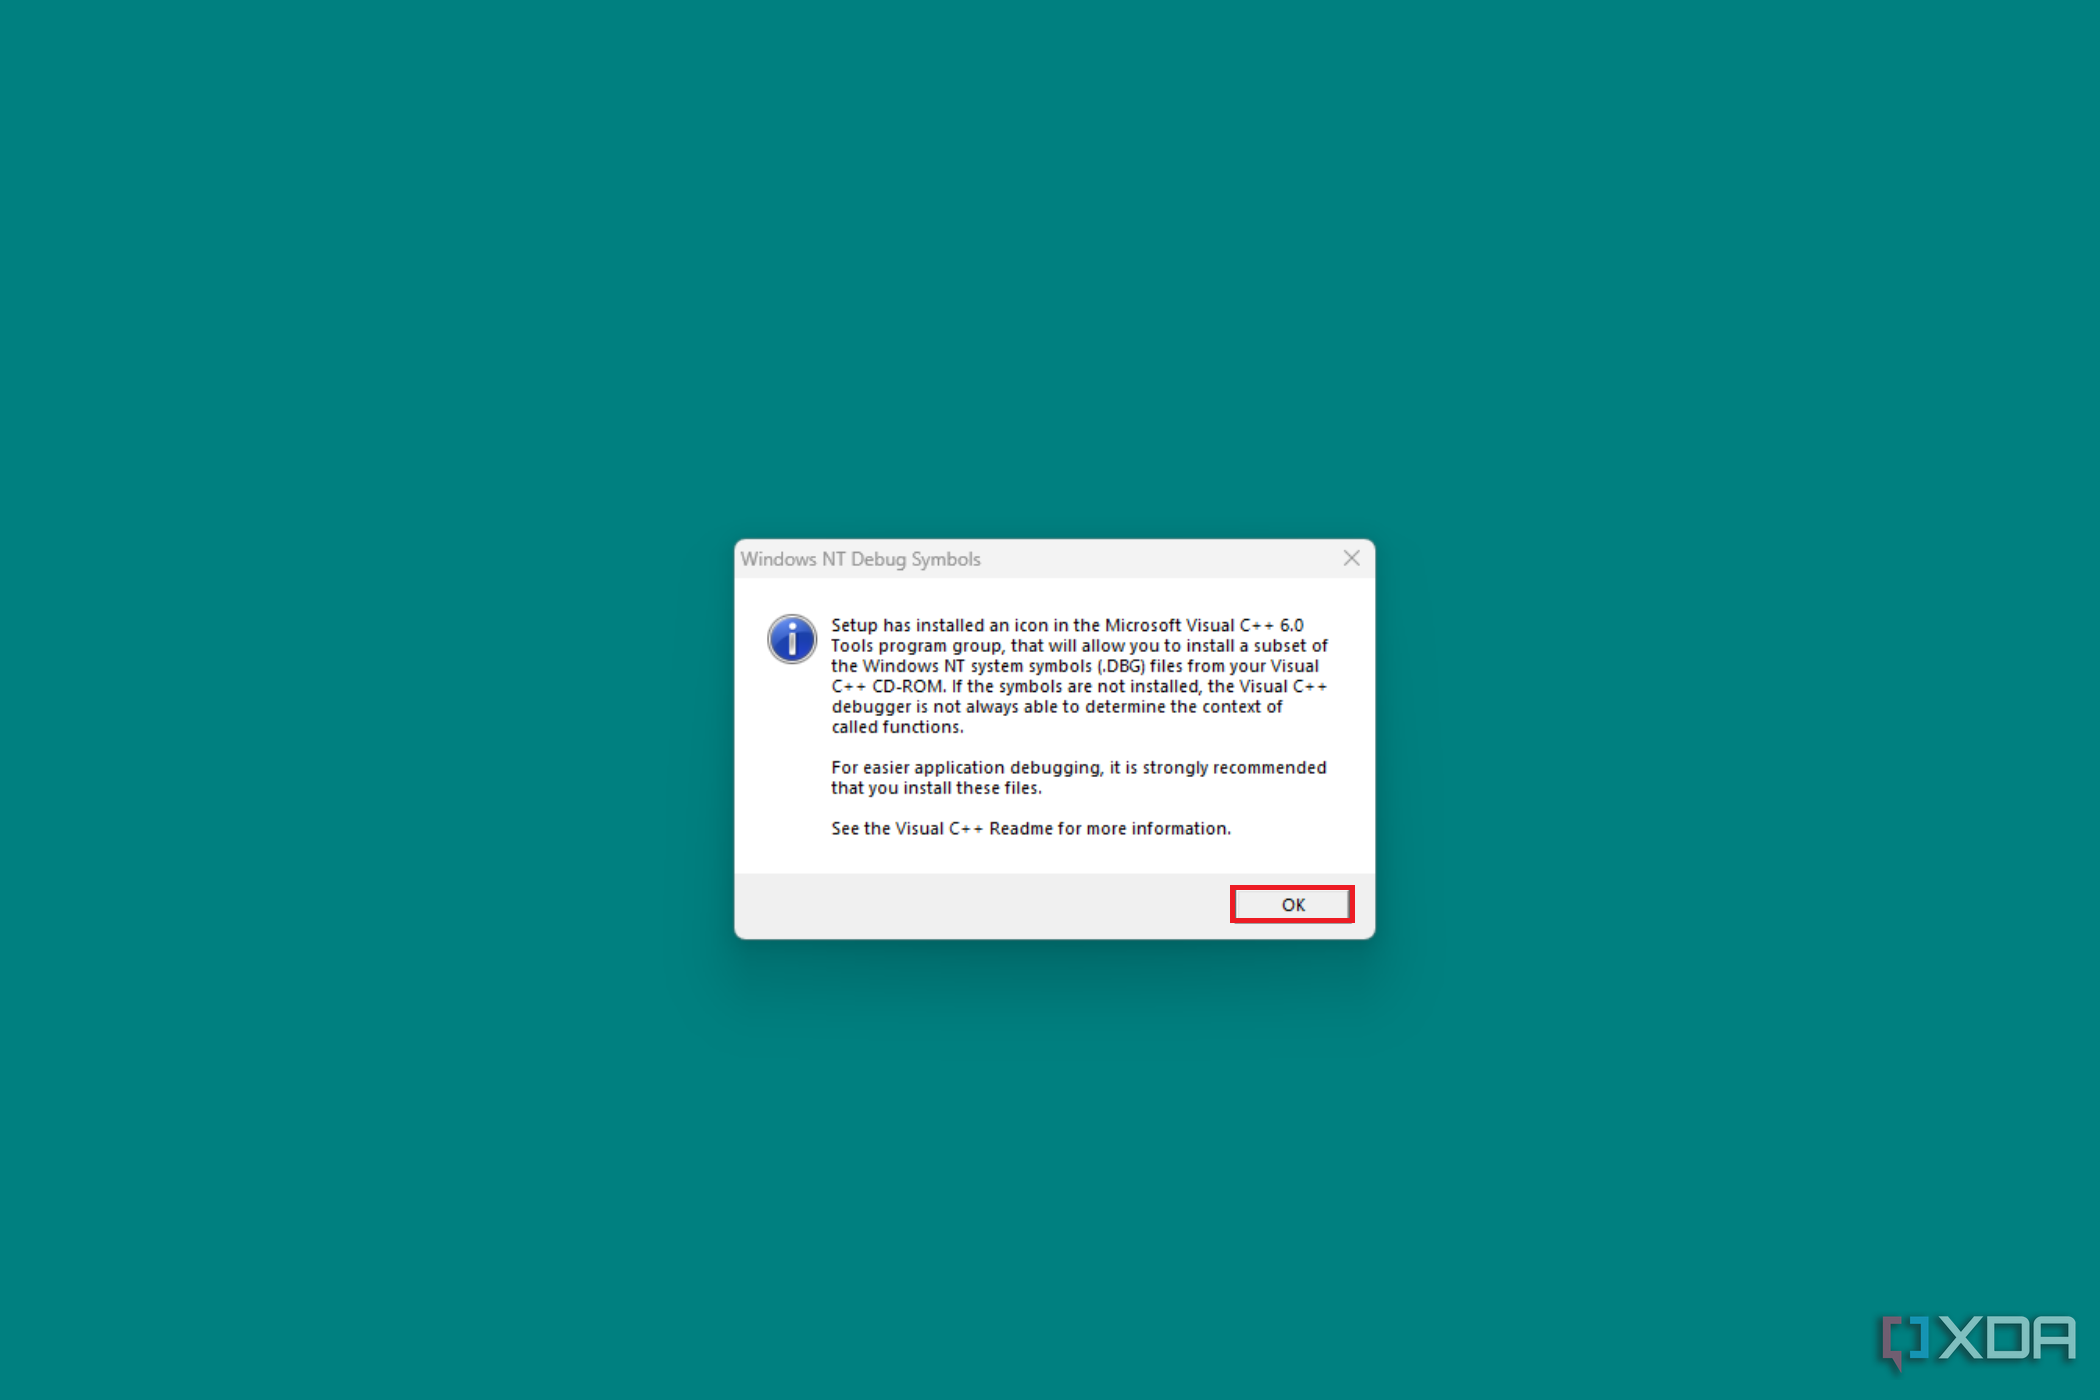
    Image of the MSDN Library setup screen for Visual Studio 6.0 Enterprise with a description of the library's features, accompanied by a small setup progress window indicating 37% completion for a file extraction.

  27. Click OK.

    Image displaying a notification about Windows NT Debug Symbols, indicating that an icon was installed for Visual C++ 6.0 to enable symbol downloading, with a recommendation to install these files for better debugging. An 'OK' button is present to acknowledge the message.

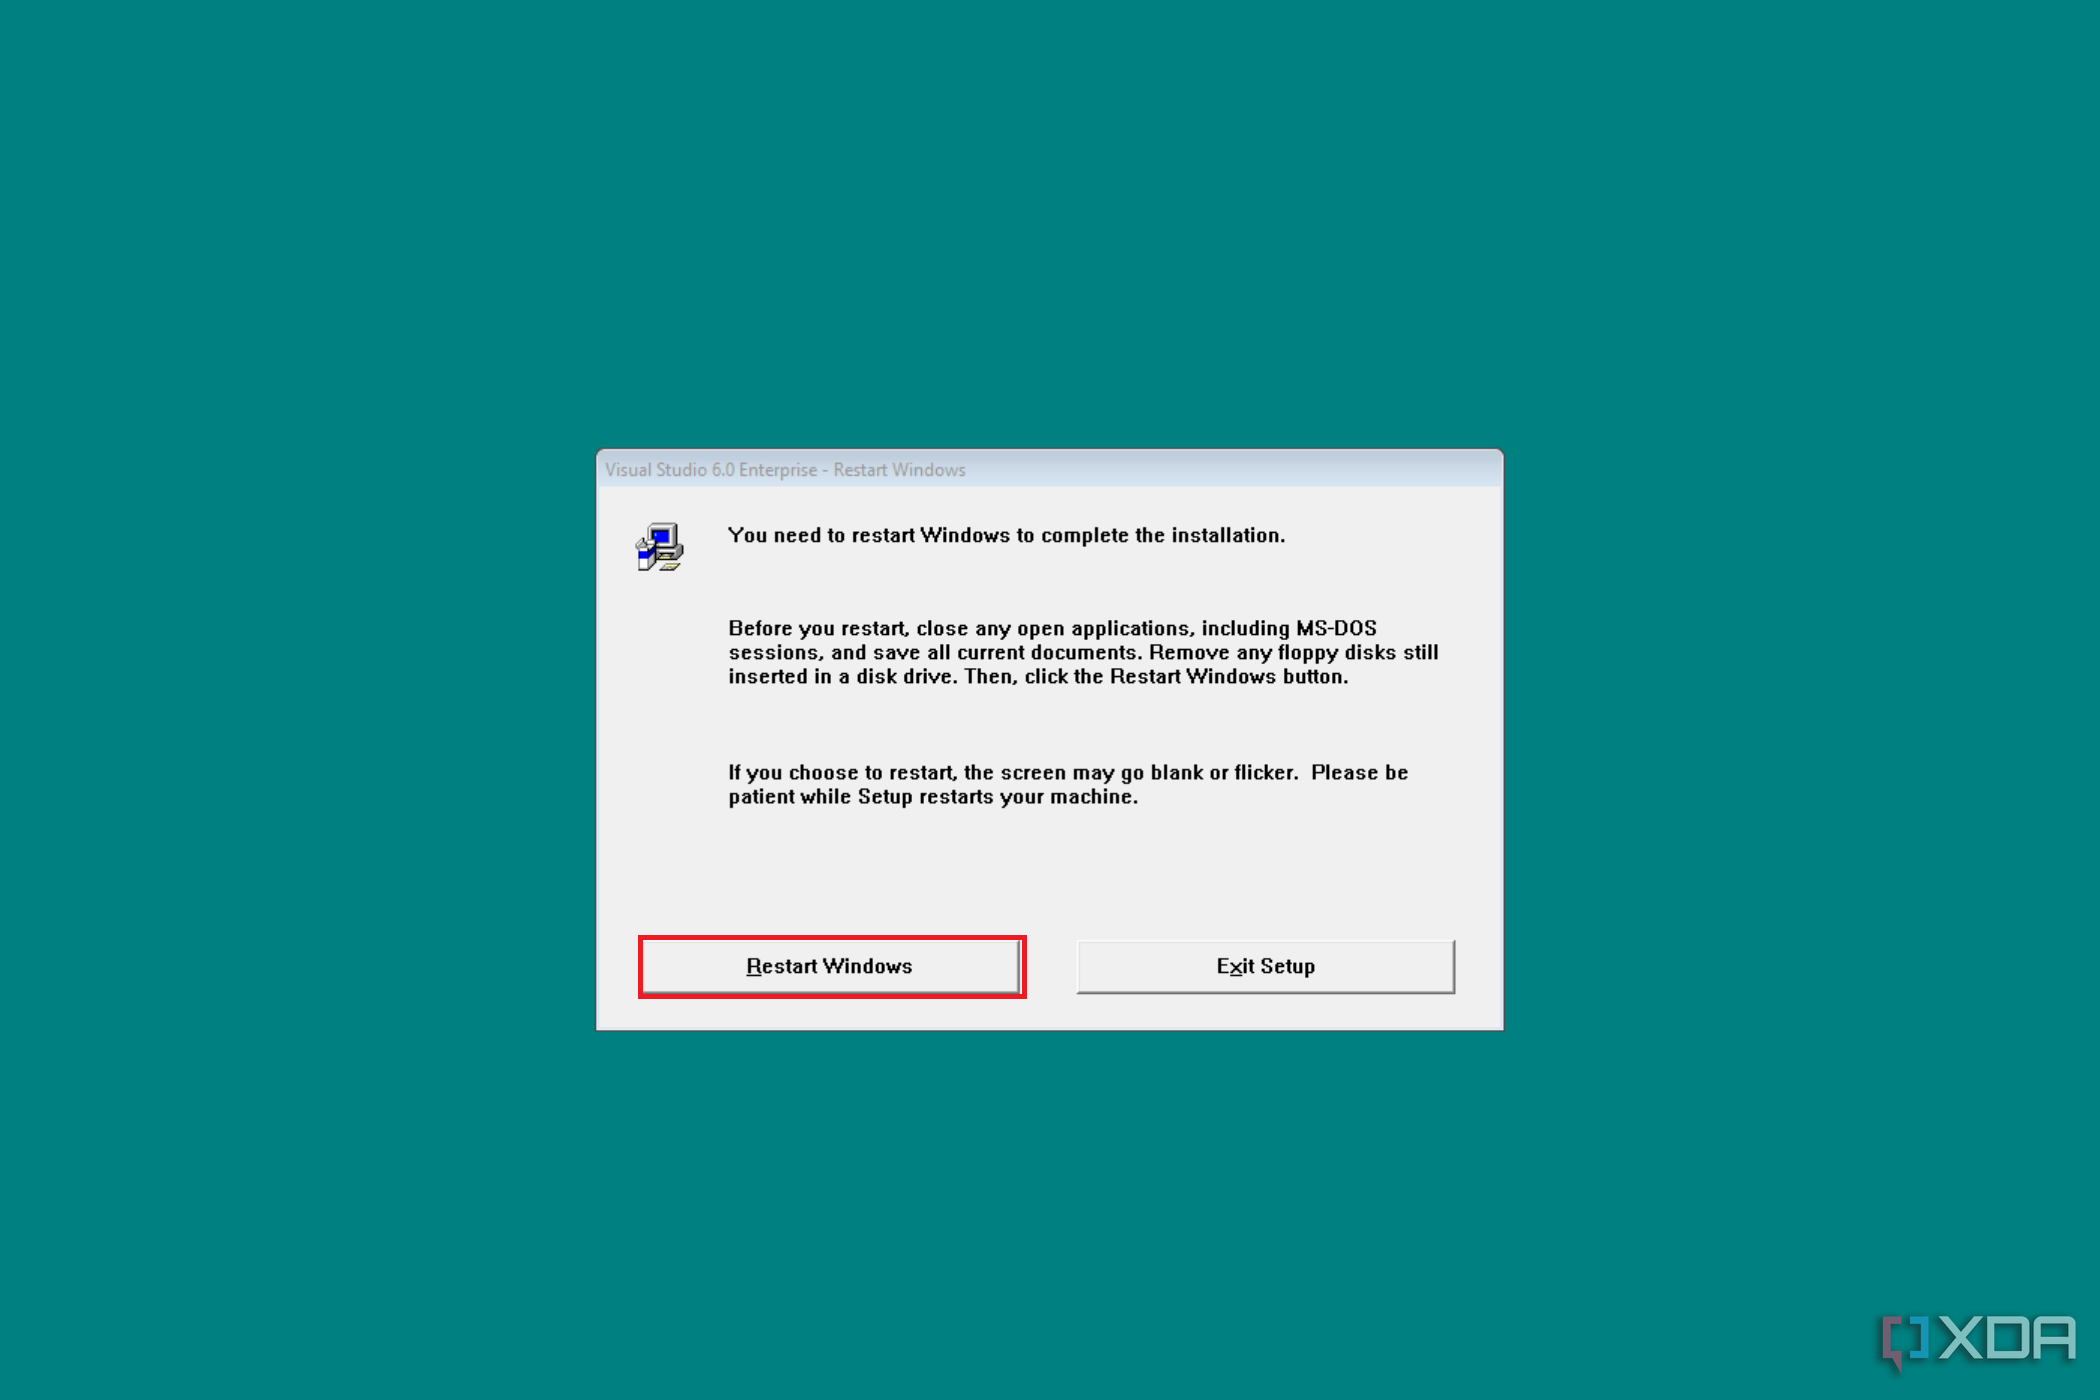
  28. Click on Restart Windows.

     Image displaying a notification from Visual Studio 6.0 Enterprise Setup advising that a restart of Windows is required to complete the installation, with instructions to close any open applications and save all documents, and options to 'Restart Windows' or 'Exit Setup'.

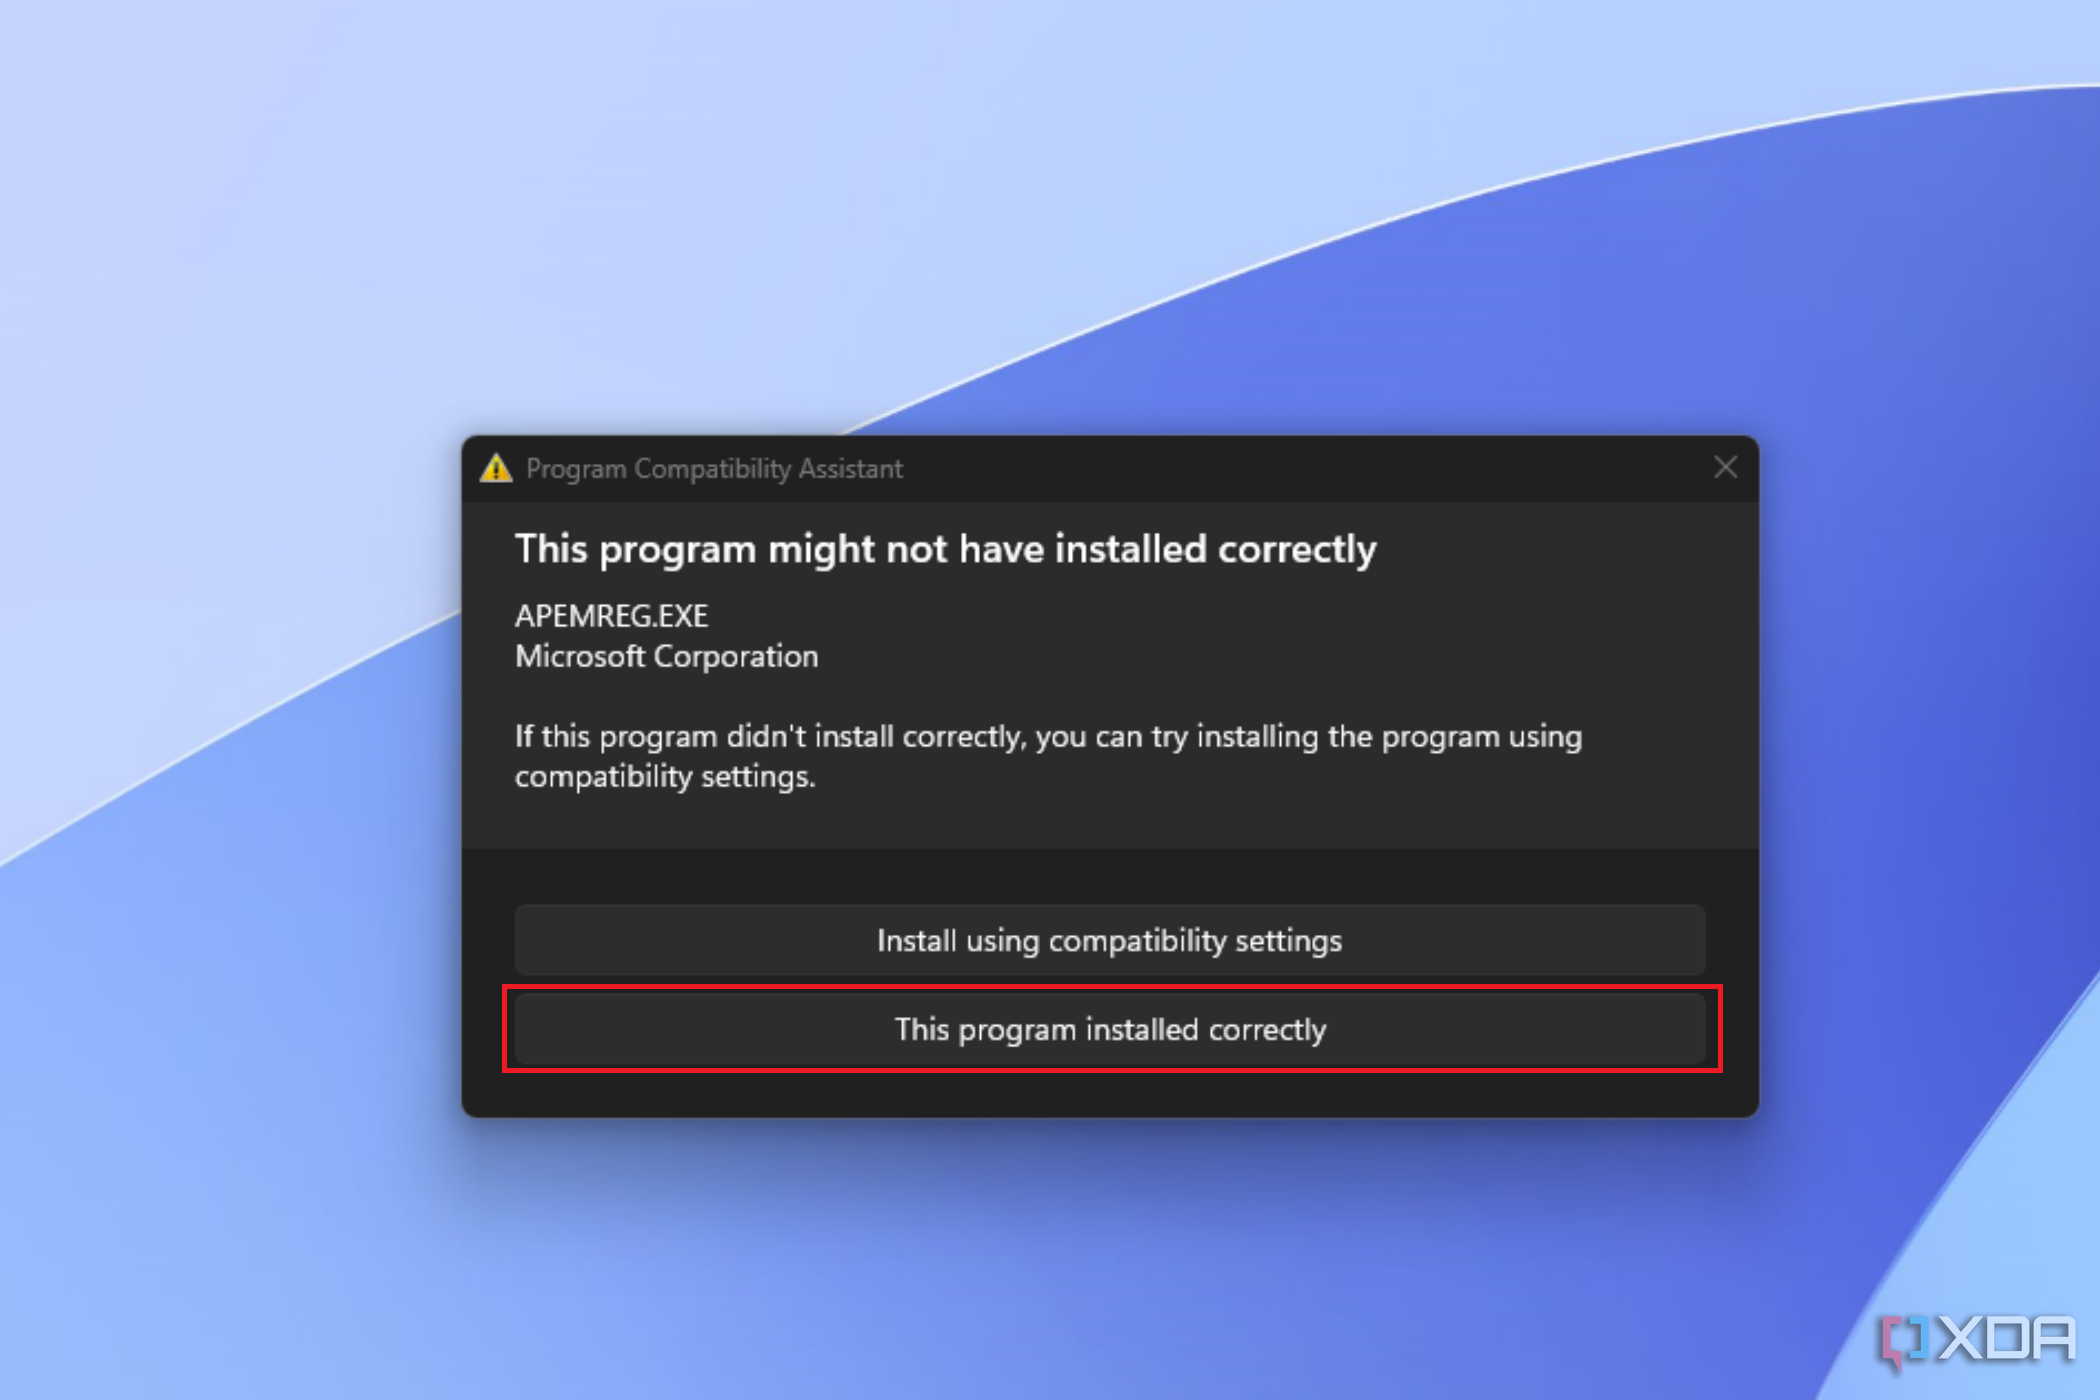
  29. Once your system has booted back on, you will be greeted by an error box stating the program might not have been installed correctly. Stay calm, and click on This program was installed correctly.

    mage showing the Program Compatibility Assistant warning

  30. Browse to Program Files (x86)>Microsoft Visual Studio>Common>MSDev98>Bin.

    Image of a Windows file explorer window displaying the directory structure of Microsoft Visual Studio inside the 'MSDev98' folder,

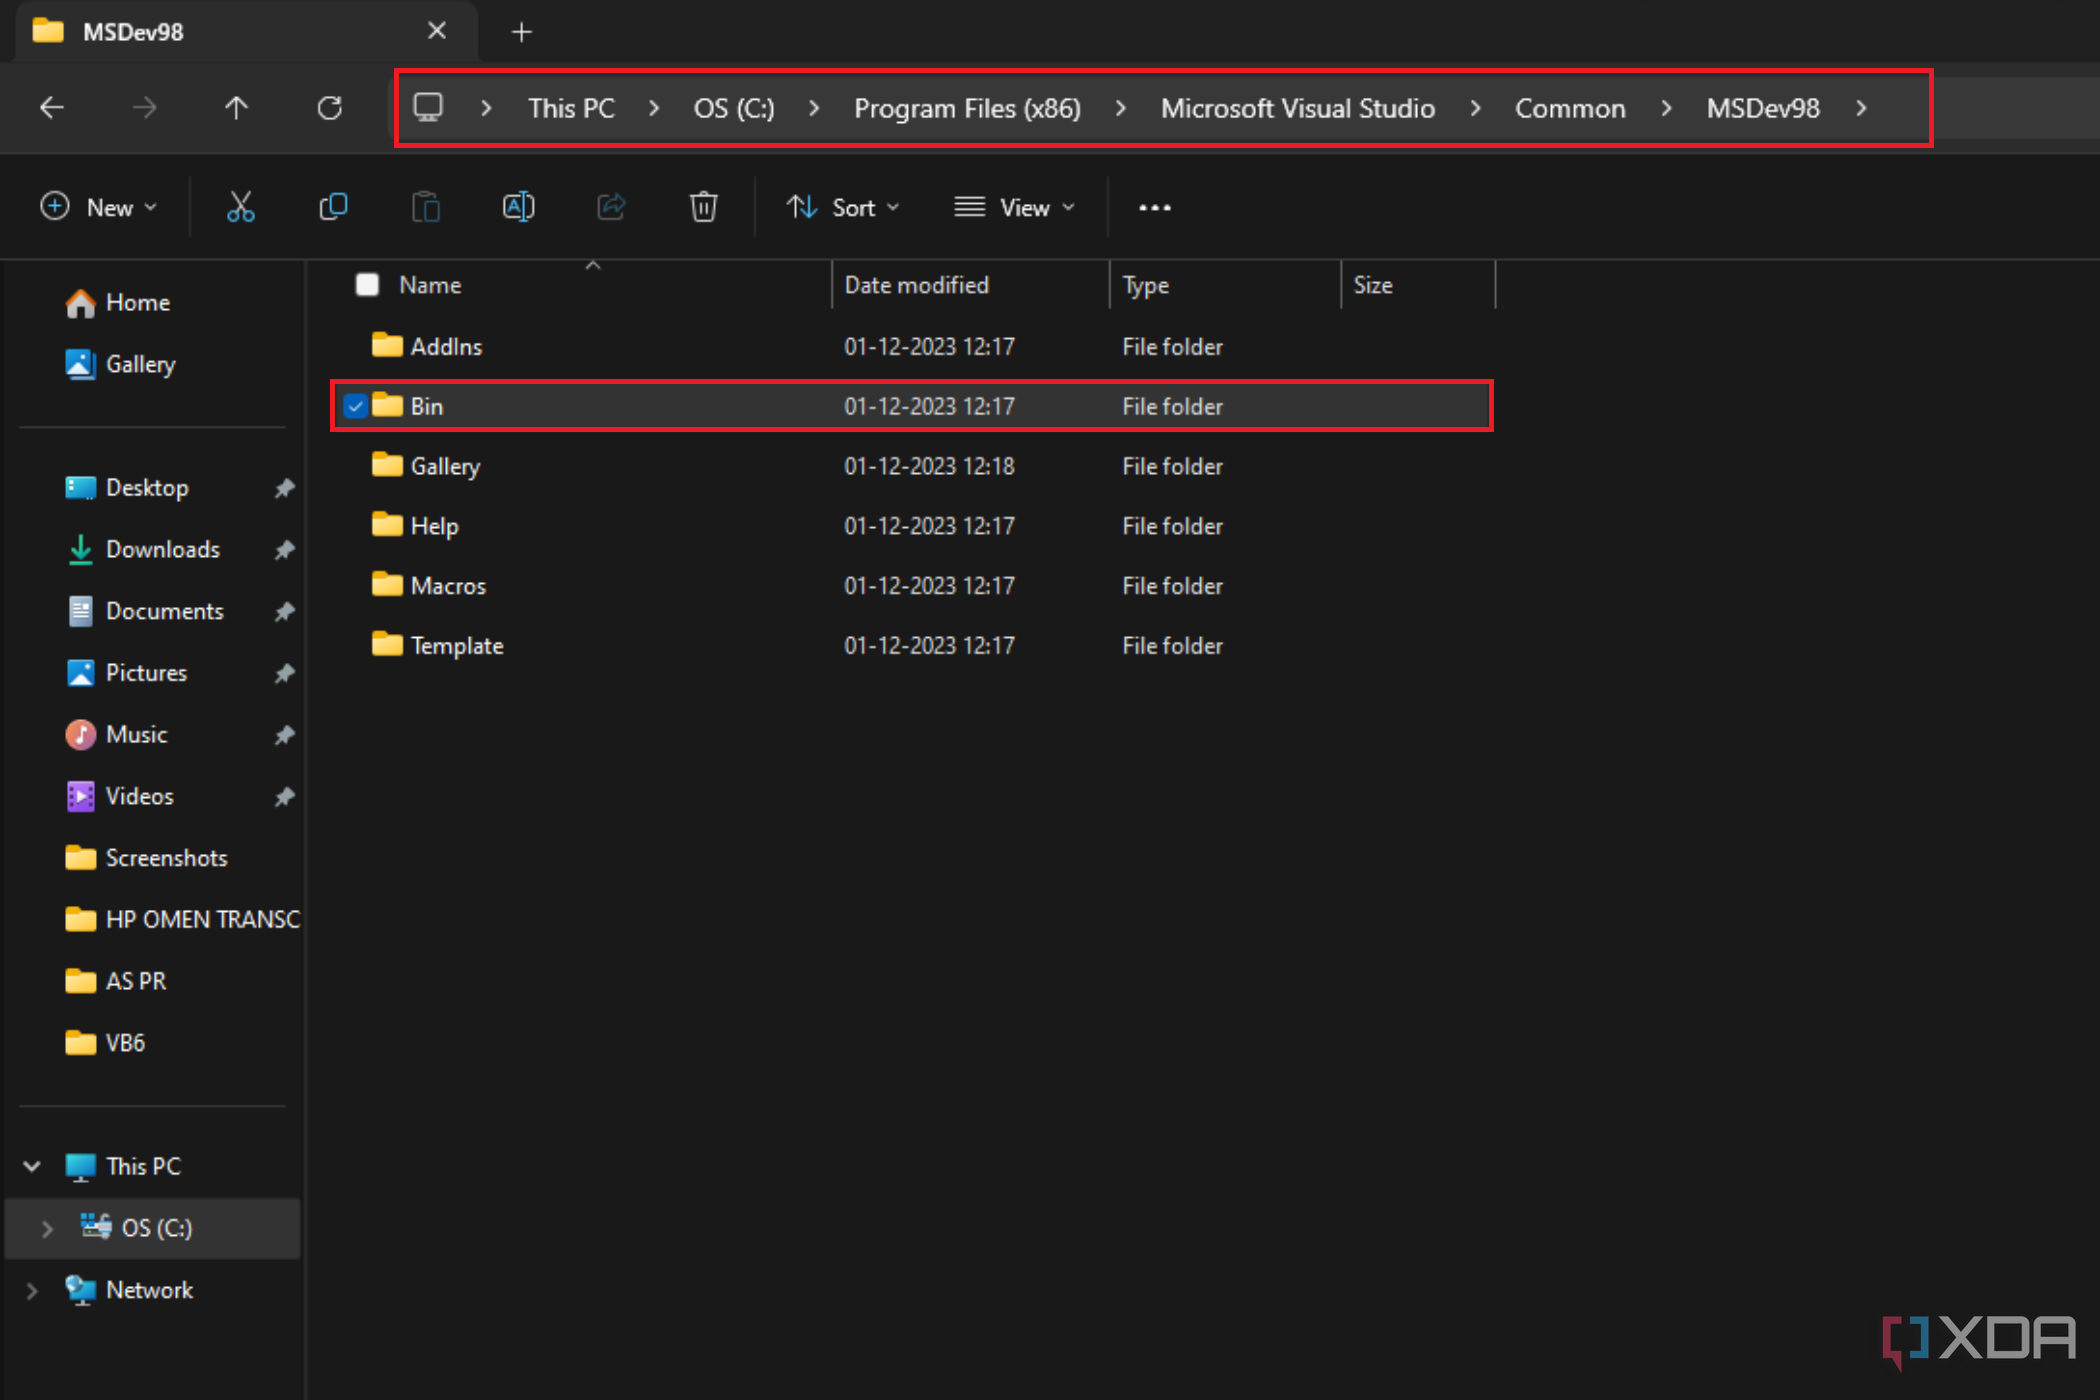
    The file path might be different for you, depending on what you choose while installing Visual Basic.

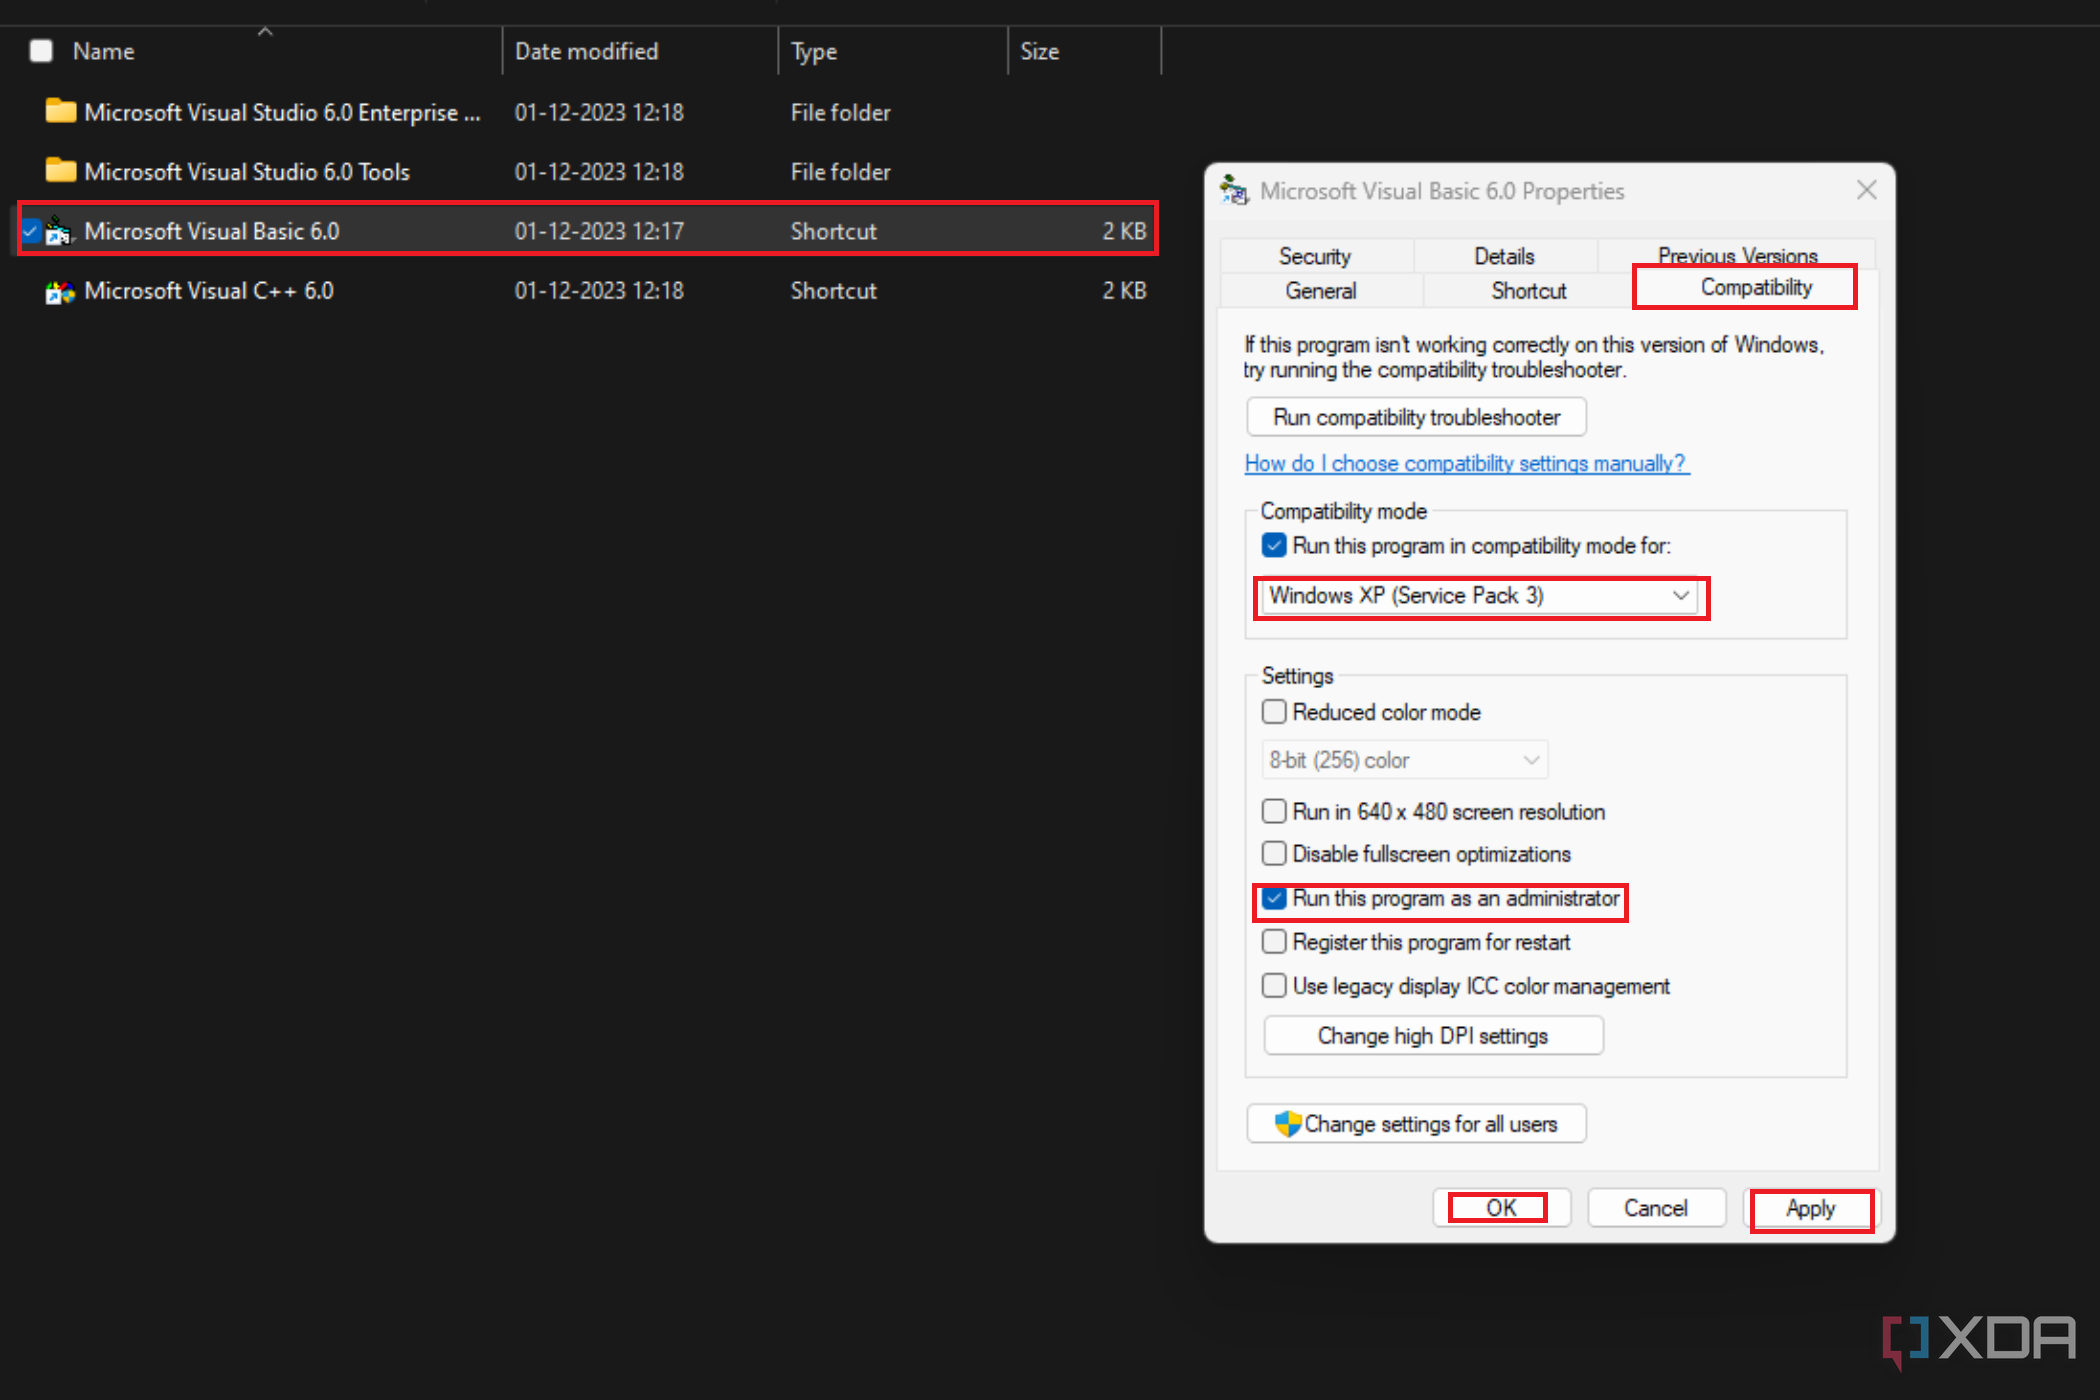
  31. In this step, you will have to alter the compatibility settings of all the .exe files in this folder.

    Image showing Visual Studio application files like 'MSDEV' and DLLs,

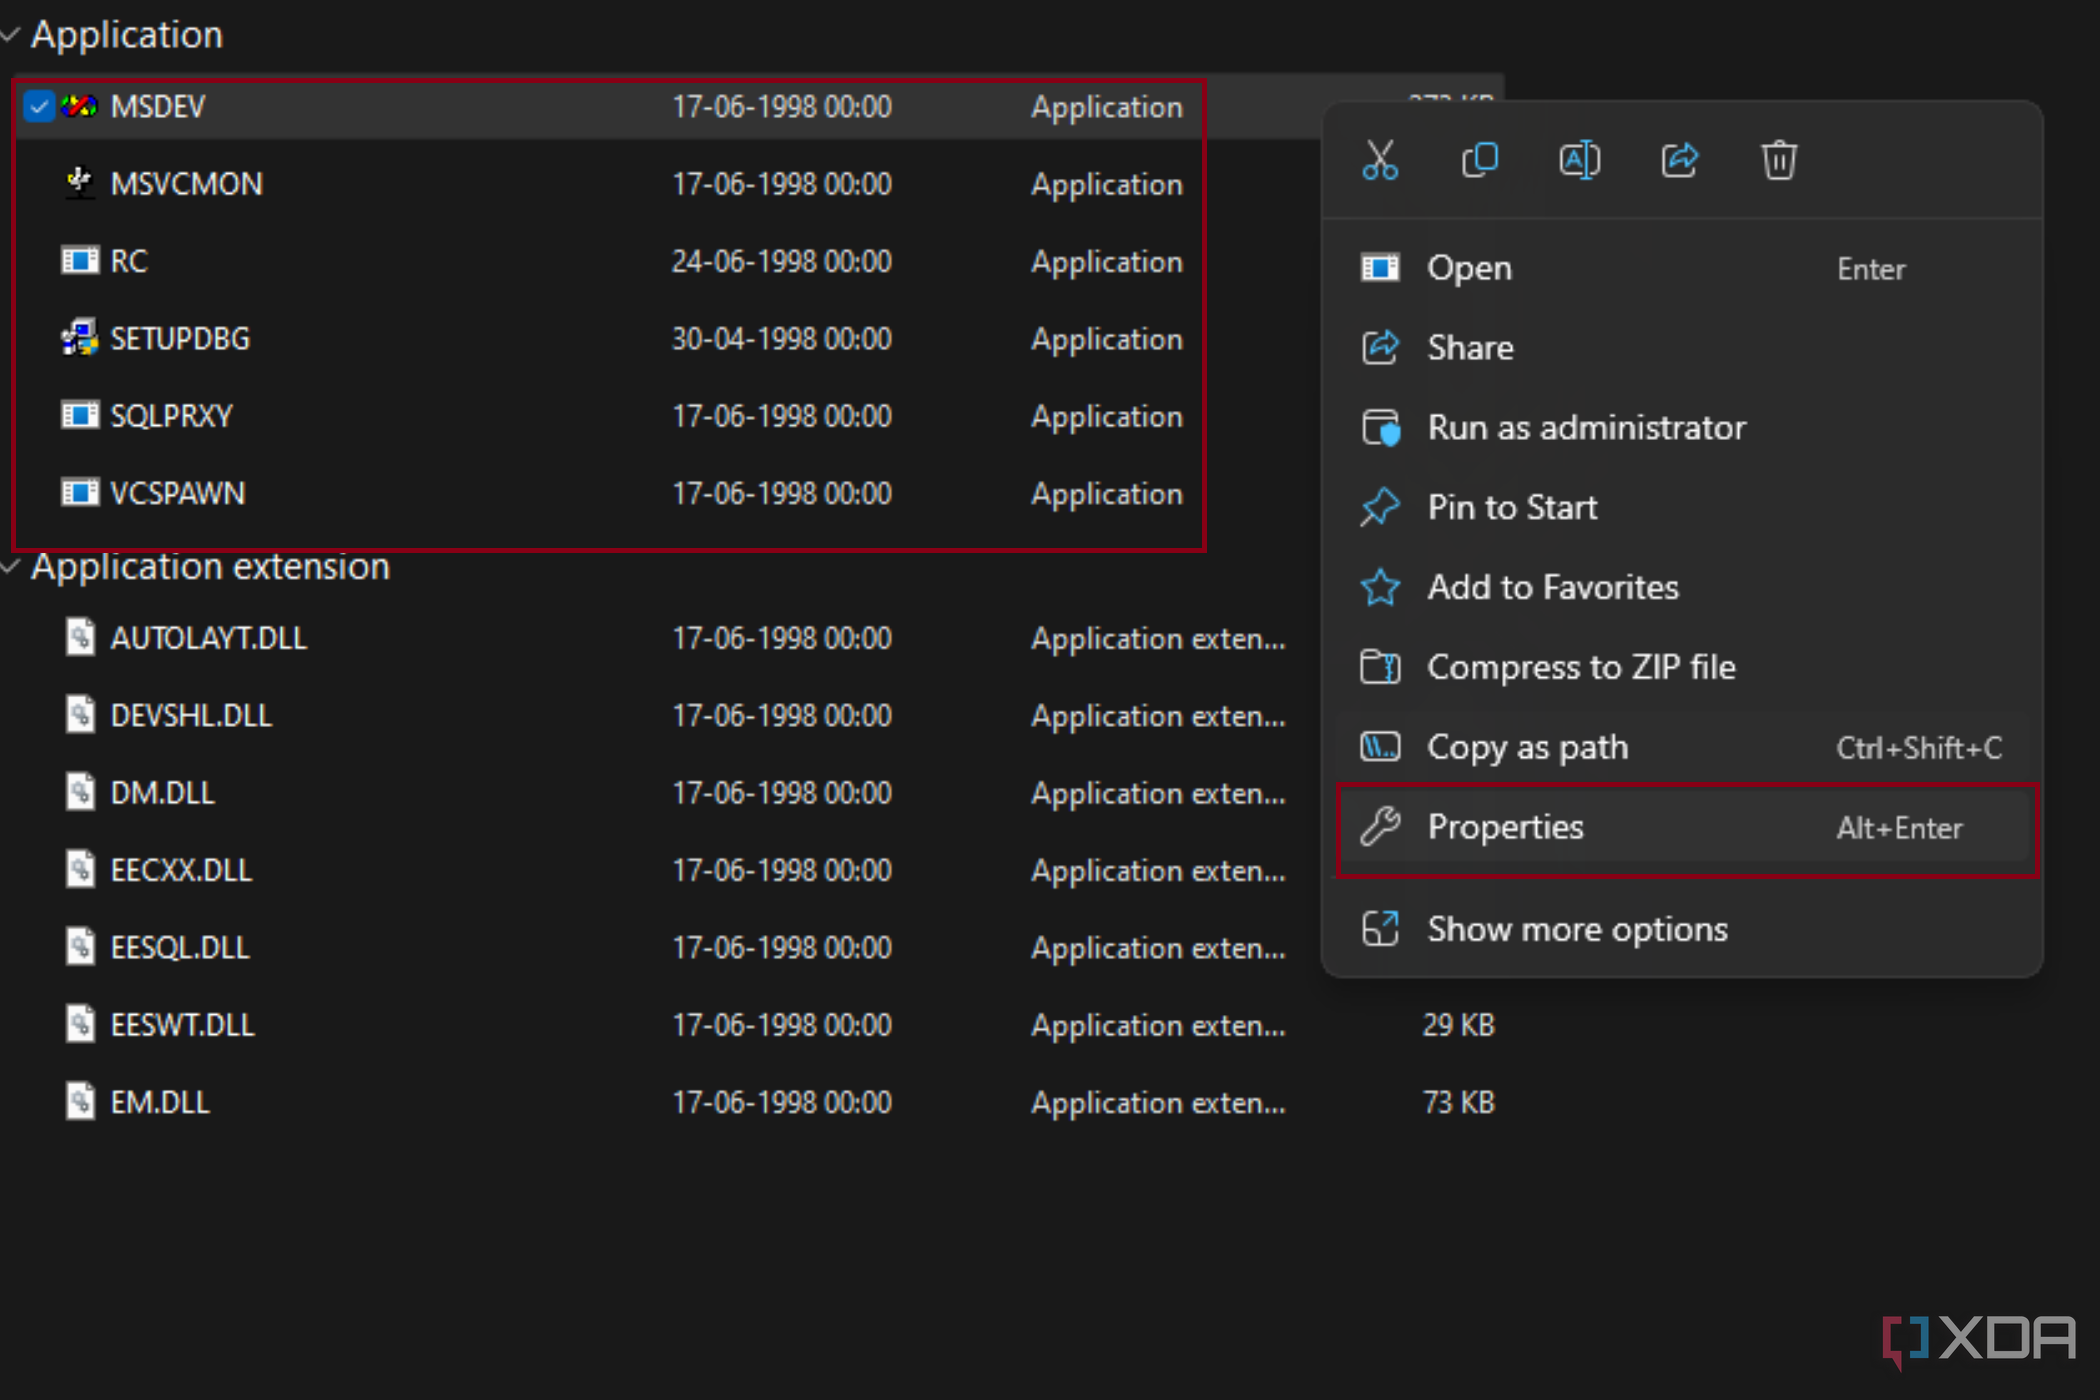
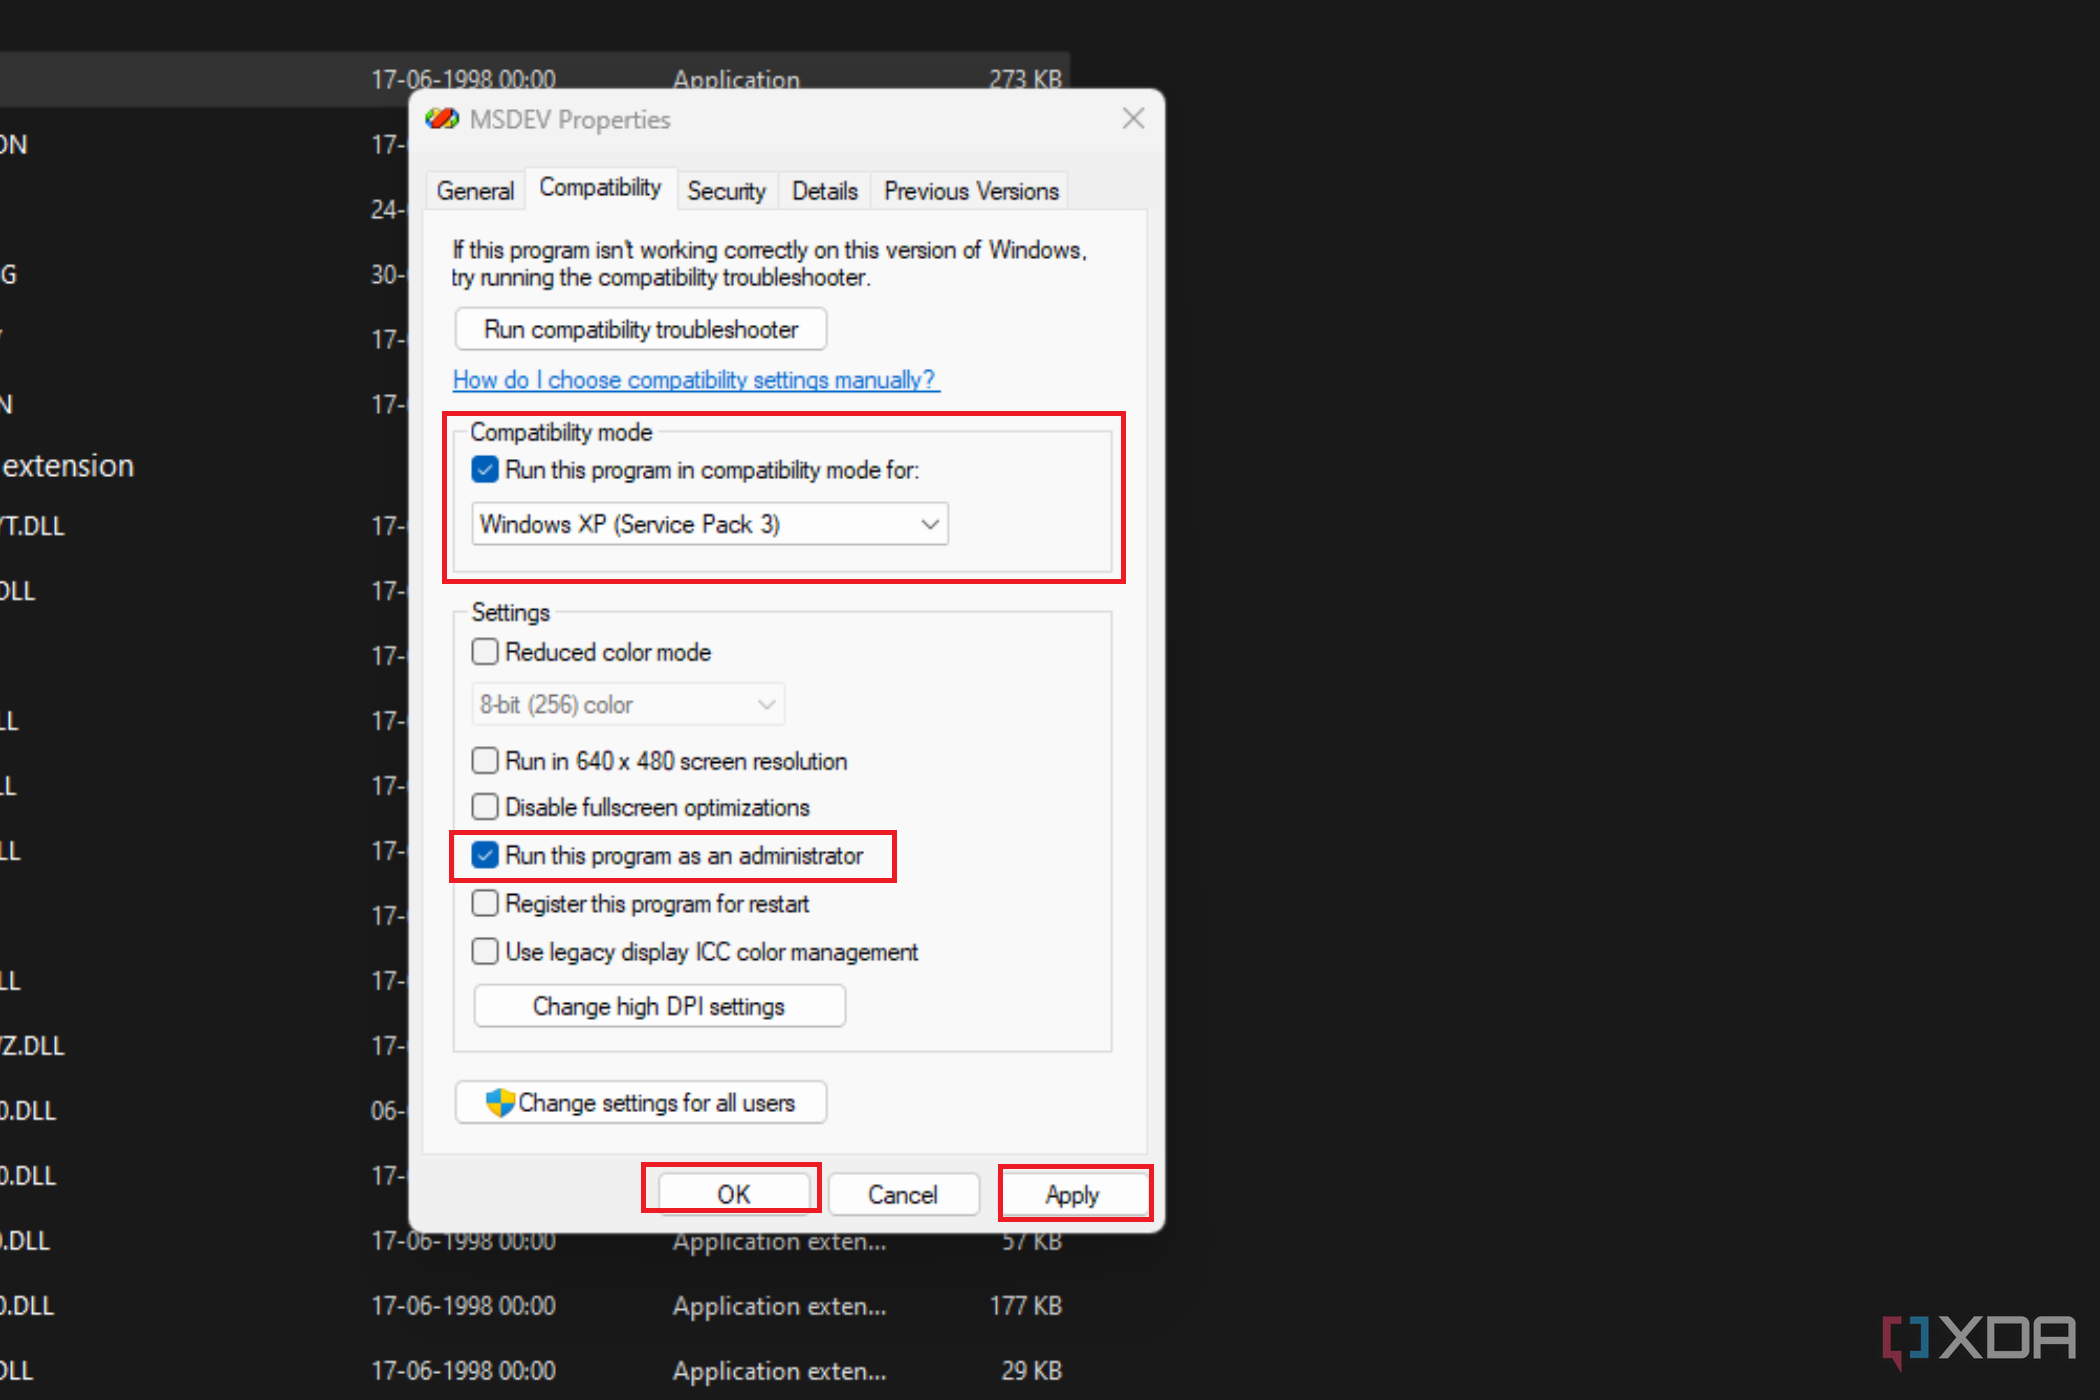
  32. When you finish, click Apply and Okay. Make sure you change the settings as shown for all the applications which have been highlighted.

     Image showing the properties dialog for 'MSDEV' with a compatibility tab open, offering options like running in compatibility mode for Windows XP Service Pack 3.

  33. After these settings have been applied, look for Microsoft Visual Basic 6.0 using the Windows search function and open its file location.

    Visual basic application list with context menu open for file loacation

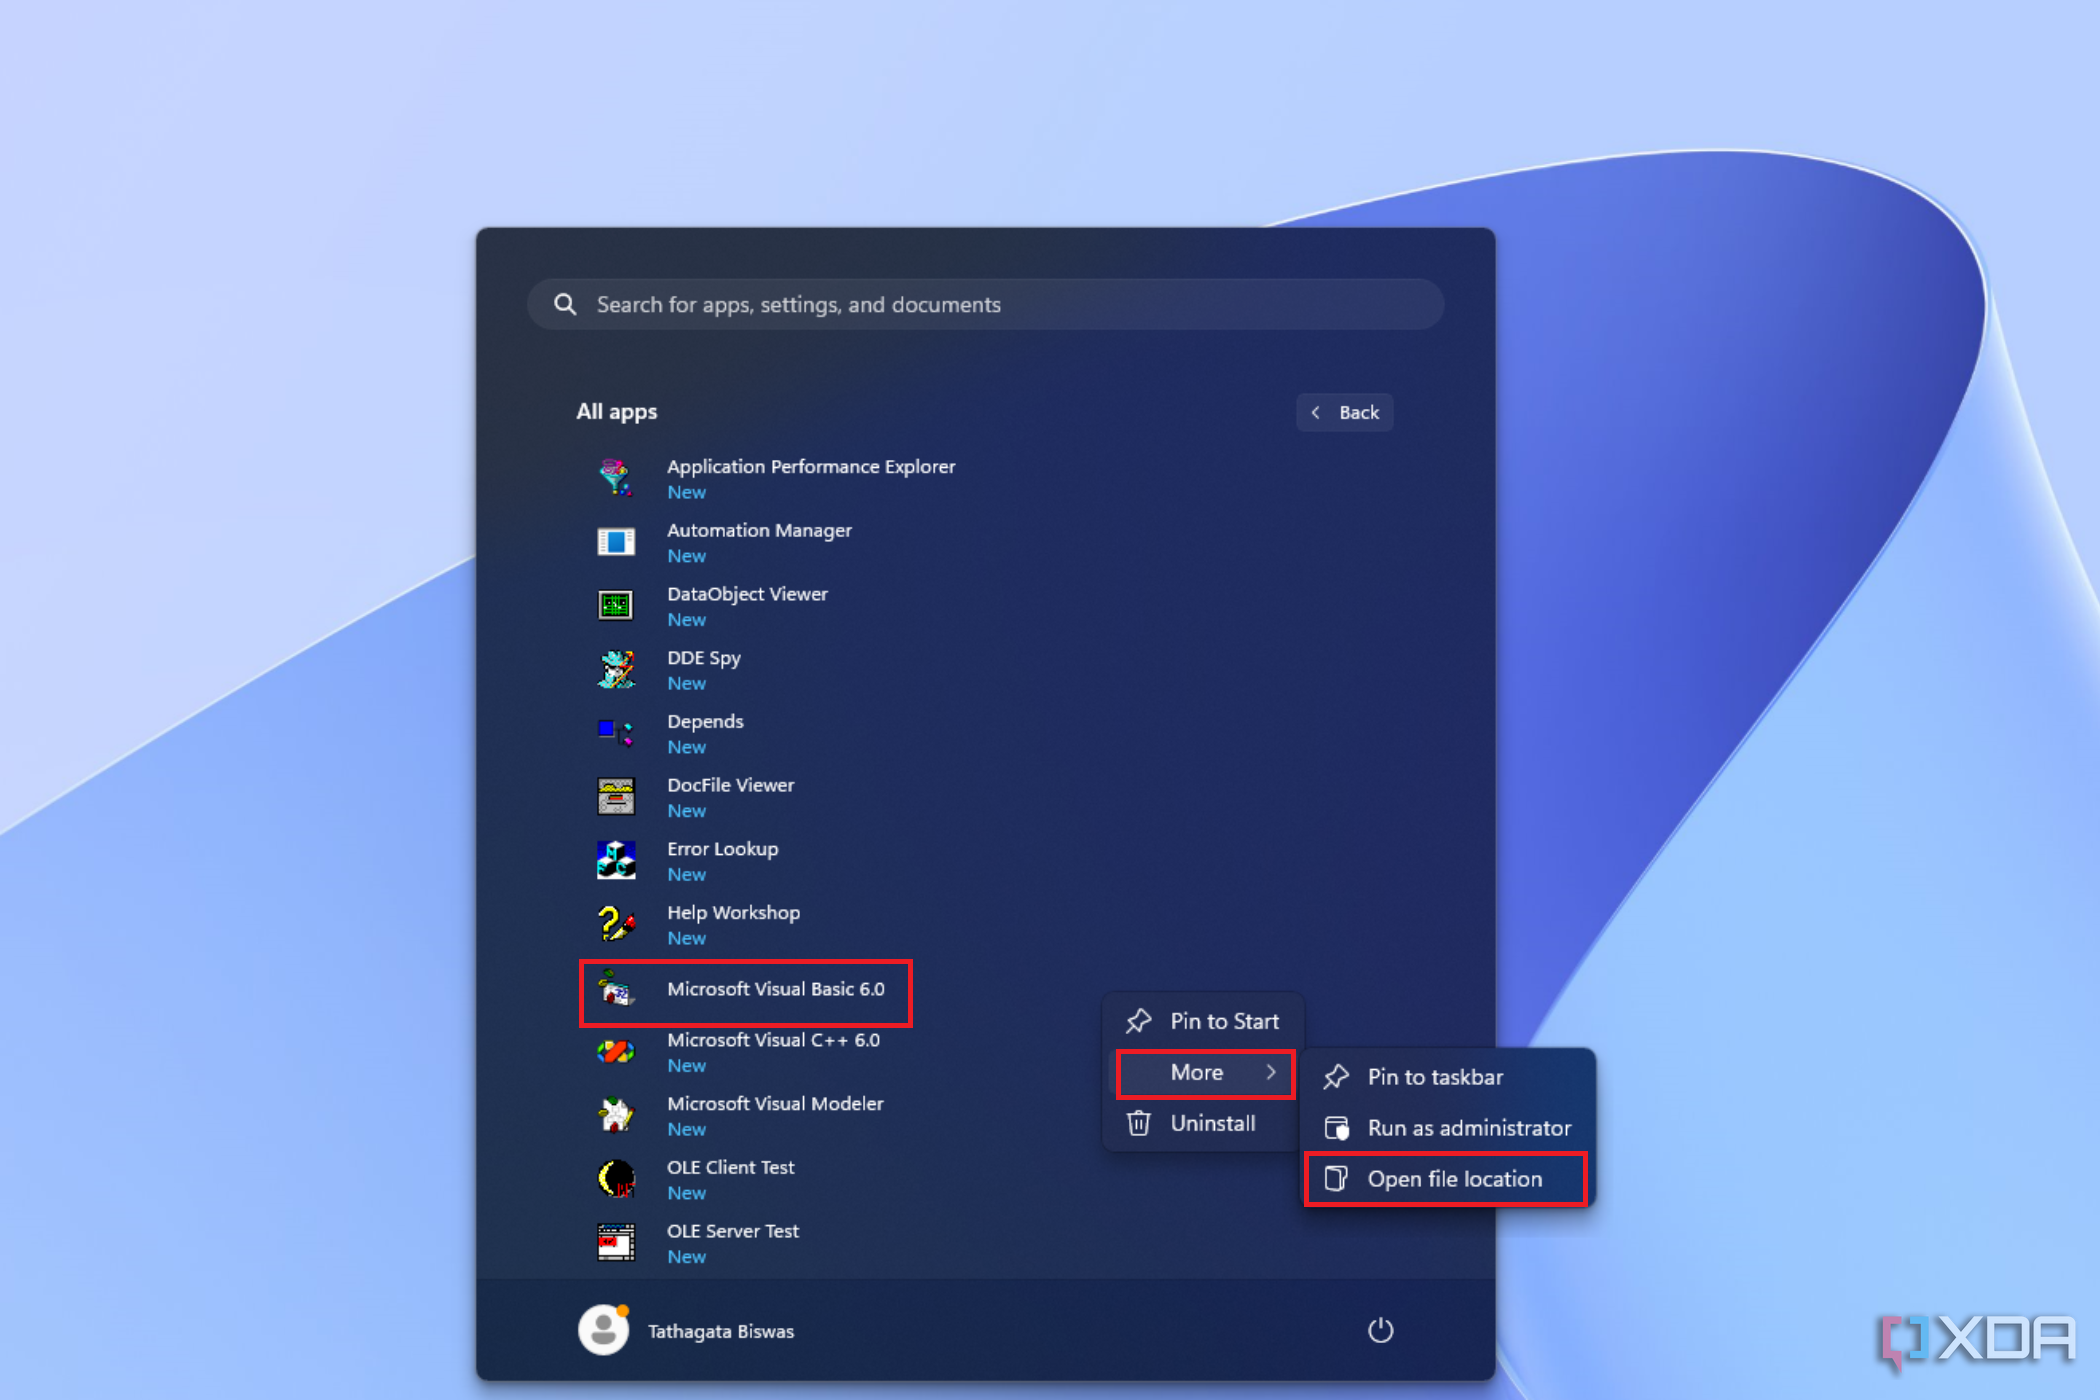
  34. Ensure that the settings are as shown in the picture.

    Image showing the file explorer with Visual Studio folders and the properties window for Microsoft Visual Basic 6.0,

  35. Return to the previous screen and open file location for Microsoft Visual Basic 6.0.

    Image showing context menu open for the Microsoft Visual Basic 6.0 shortcut

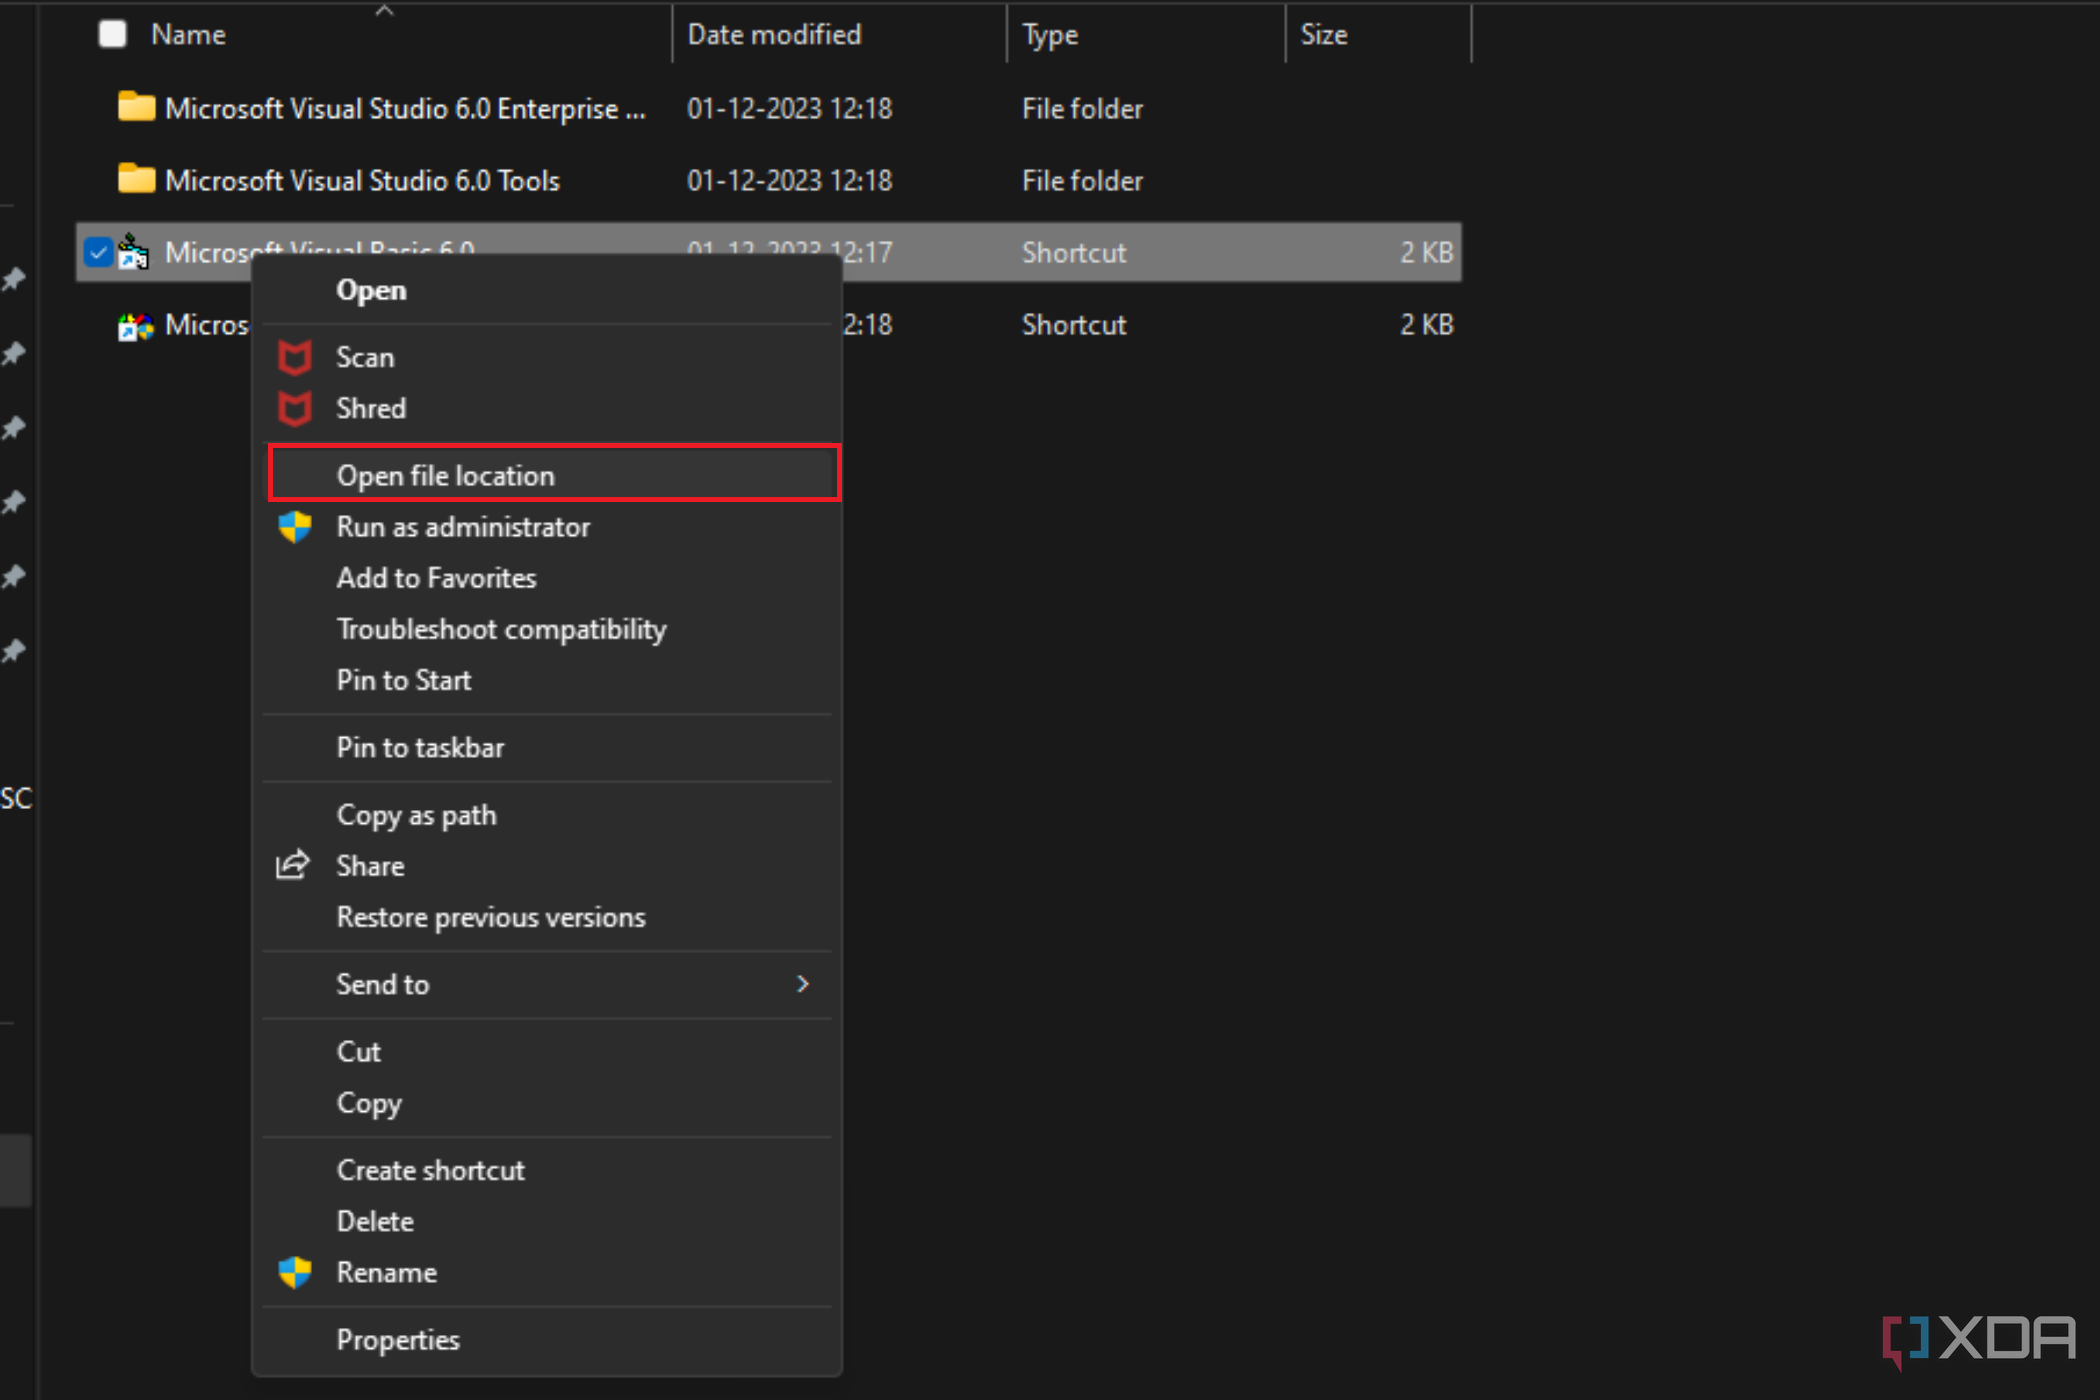
  36. Change compatibility settings for VB6.

    Image showing a file explorer window with Visual Basic 6.0 files and the properties dialog box for VB6, with compatibility options set for Windows XP Service Pack 3 and an option to run the program as an administrator.

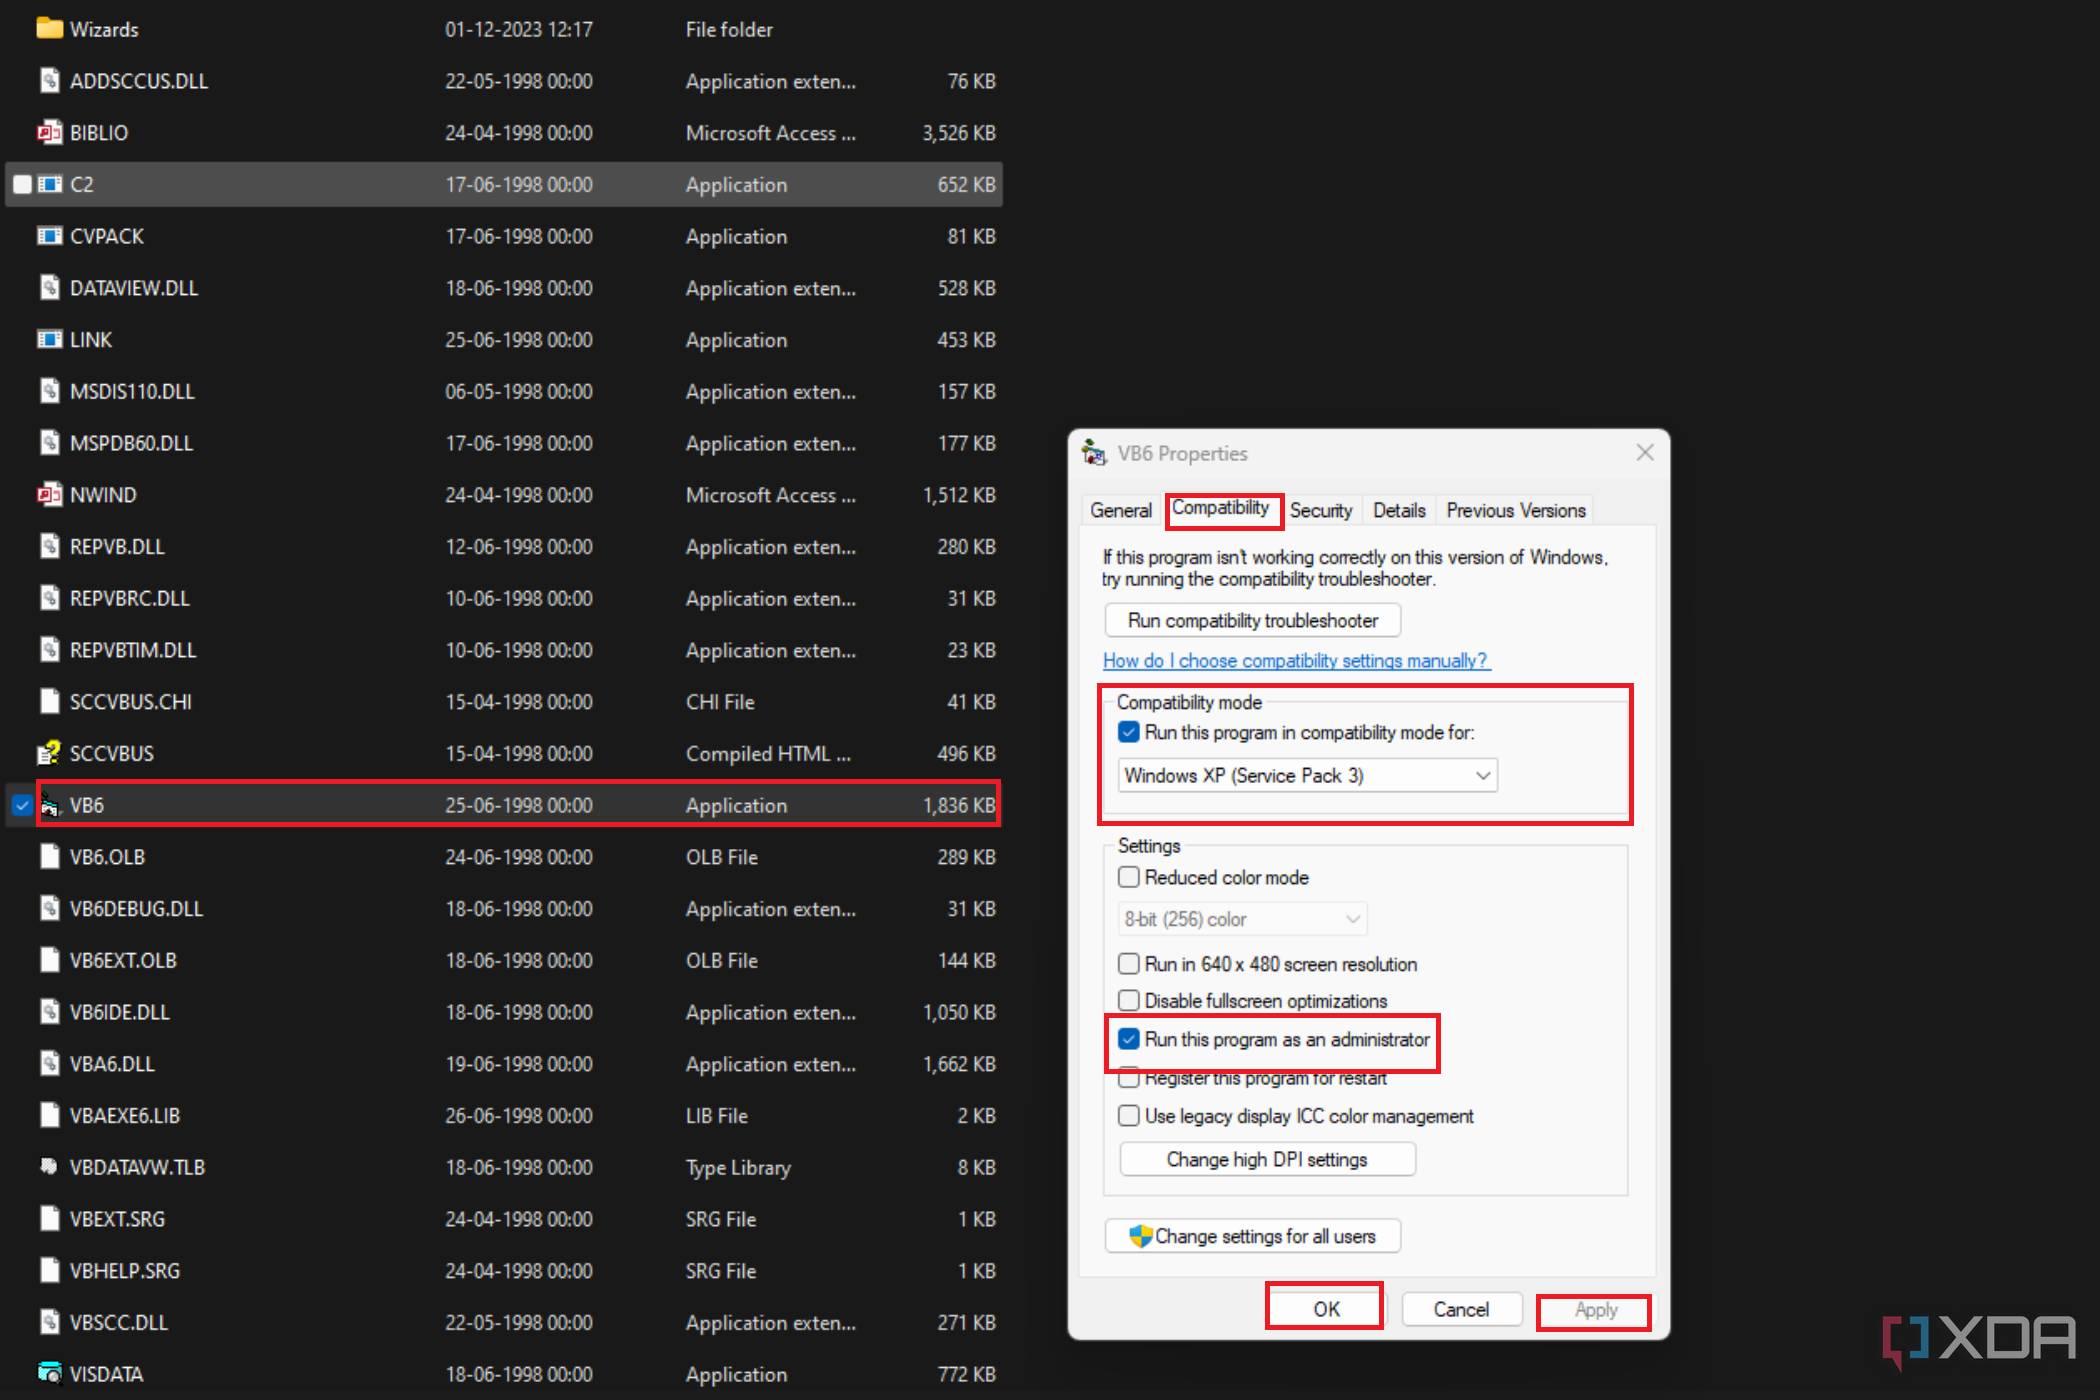
  37. After all these steps, you can now launch Microsoft Visual Basic 6.0.

    Screen shot shwoing a running instance of Visual Basic 6.0

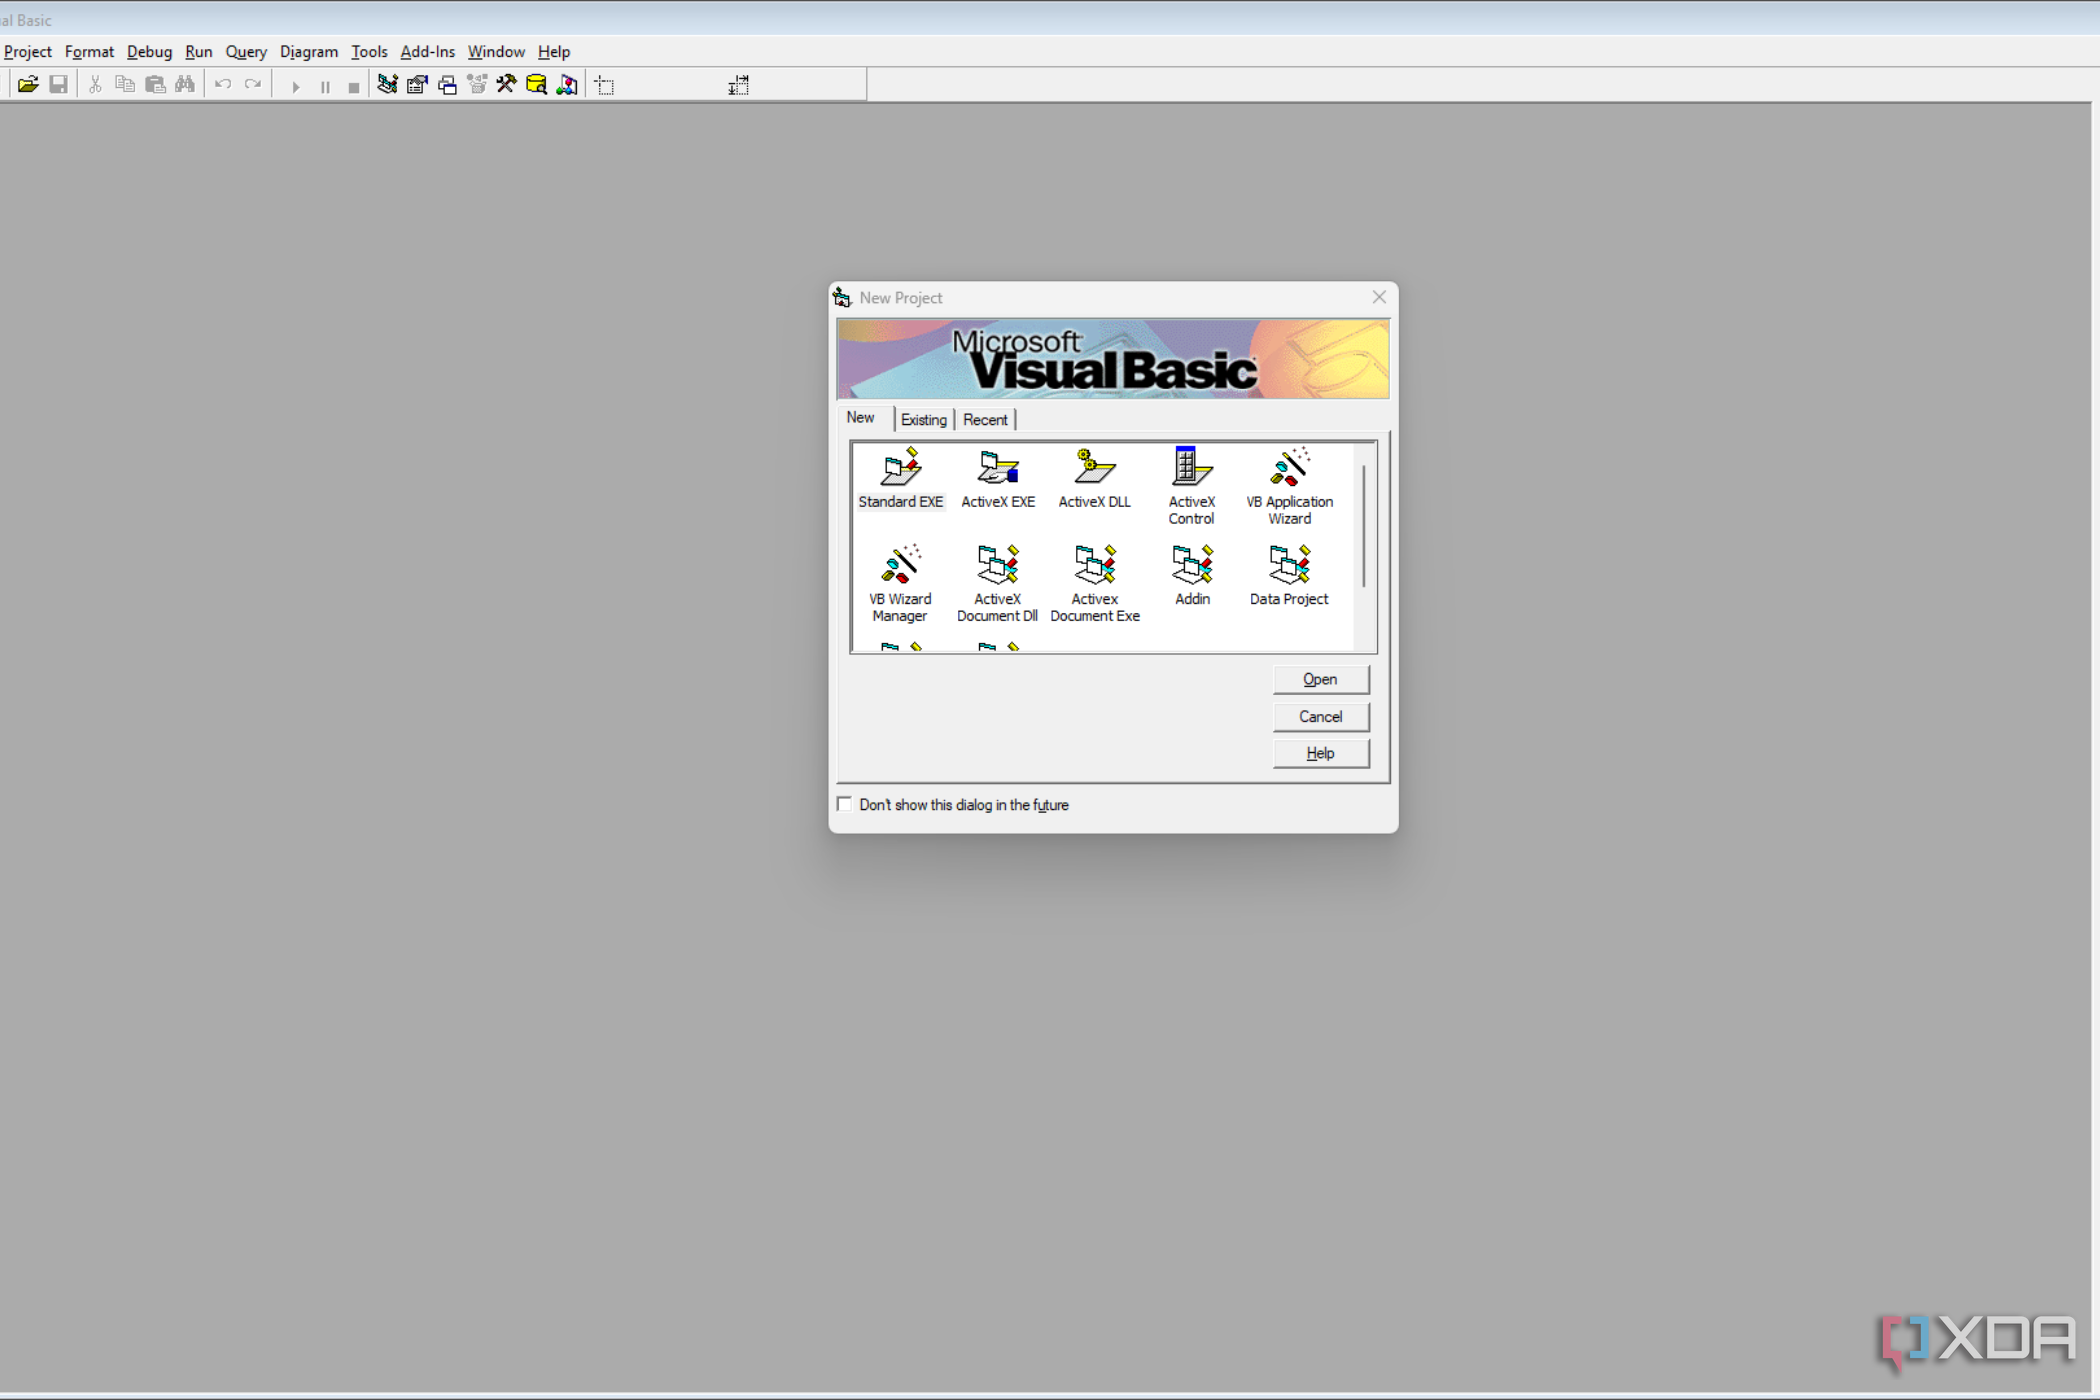
Windows 11’s compatibility with Visual Basic 6

With Visual Basic 6.0 now ready to use on Windows 11, you are well-equipped to manage both contemporary and legacy projects. This successful installation is a testament to Windows 11’s versatility to accommodate a diverse range of software applications. As you embark on this journey, the right hardware can be just as crucial as the right software. For those looking to optimize their programming experience further, consider taking a look at laptops suited for developers.

Source link

Leave a Reply

Your email address will not be published. Required fields are marked *