
I have integrated PayU payment gateway on one of my WordPress websites to accept payments from customers through various online payment modes. Till now my experience of setting up the PayU business account, going through the KYC and account activation was seamless. The entire process from start to finish didn’t take more than 1 week and my website was live and ready to accept payment in no time.
After the account activation I was so excited to make my product page live. I quickly went through the PayU official documentation page to enable payment acceptance in Live Mode. By following the documentation and after a few hiccups of finding the up to date PayU Biz plugin for WordPress, I was able to enter the necessary details in my WooCommerce plugin to activate the checkout and payment process in Production mode. By the way, I have to download the PayU Biz official plugin for my WordPress version from their official GitHub repository. The plugin which was available in the WordPress plugin store was not working for me.
In all the excitement, I forgot that there is a Test Mode available for businesses like us to test the payment gateway before we actually start accepting payment from your customer. It is always recommended to first test different scenarios of successful, failed, on hold or cancelled payment made using whatever payment gateway you have integrated on your website.
I started researching how to make a test payment first using the PayU payment gateway. In order to set your PayU Biz plugin either in Production (Live Mode) or Sandbox (Test Mode), you need 2 mandatory details: a Key (aka Merchant Key) and a Salt (aka Secret Key).
What’s Key and Salt?
- Key: The API key that you must use for all payment requests.
- Salt-32 bit: The Salt v1 is the 32-character string that you must use to generate a hash and further post the hash along with parameters when posting a payment request with PayU.
- Salt-256 bit: The Salt v2 is the 256- character string that you must use to generate a hash and further post the hash along with parameters when posting a payment request with PayU.
Key
- The Merchant Key is a unique identifier assigned to a merchant upon account creation. It is used to identify the merchant during transactions and is crucial for initiating payment requests. This key is generated when you create your merchant account on the PayU platform and can be found in the dashboard under the profile section.
Think of the Merchant Key as your store’s special ID number. Just like how every store has a unique name or registration number, this key helps PayU recognize your business when you process payments. It’s like saying, “Hey, this is me, and I’m the one selling this product!”
Salt
- The Salt is a unique hash value that adds an additional layer of security by ensuring the integrity of the transaction data. It is used in conjunction with the Merchant Key to generate a checksum (or hash) that verifies that the data sent to PayU has not been tampered with during transmission. The Salt value is also generated by PayU and should be kept confidential.
Salt is like a secret ingredient that adds extra security to your transactions. When you make a payment, the Salt helps create a special code that makes sure the information being sent (like how much money is being paid) hasn’t been changed or messed with. It’s like sealing an envelope with wax to ensure that no one can open it without breaking the seal.
Test Mode begin
Before I began, I was surprised to see that one of the mandatory details to setup Test payment in PayU Biz plugin was missing in my merchant account: Salt key. Both Salt-32 and Salt-256 keys were not present in the developer section. Though the Merchant Key was available.
I contacted PayU tech support team on techsupport@payumoney.com through email to enquire about this. Within a few hours I got a reply from the team stating that the salt keys are generated and are now available on the merchant dashboard. I cross checked and now both Salt-32 and Salt-256 bit keys were populated.
Once I have both the Merchant Key and Salt Key with me, I followed below steps to make the test payment enabled on my WordPress website.
I should mention that you can follow below steps to enable live payments on your WordPress site as well. You will just need your Merchant Key and Salt Key from the Live Mode of your PayU merchant account.
How to get your Test and Live Key from PayU Merchant Dashboard?
Both Merchant Key and Salt Key is required from your Test Mode (sandbox) and Live Mode (Production) from your PayU merchant account. Follow below steps get your key combination:
1- Login to your PayU Merchant account dashboard using the link Login to PayU.

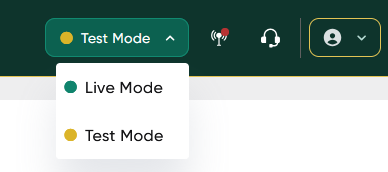
2- Once logged in you will see two options Test Mode and Live mode on the top right corner of the dashboard. This is where you are going to switch between modes. For testing, we will select Test Mode for now. Select Live Mode if you want keys for enabling Live payments.
3- Go to the Developer section. In the developer section your are going to get your Keys combo: Merchant and Salt keys.
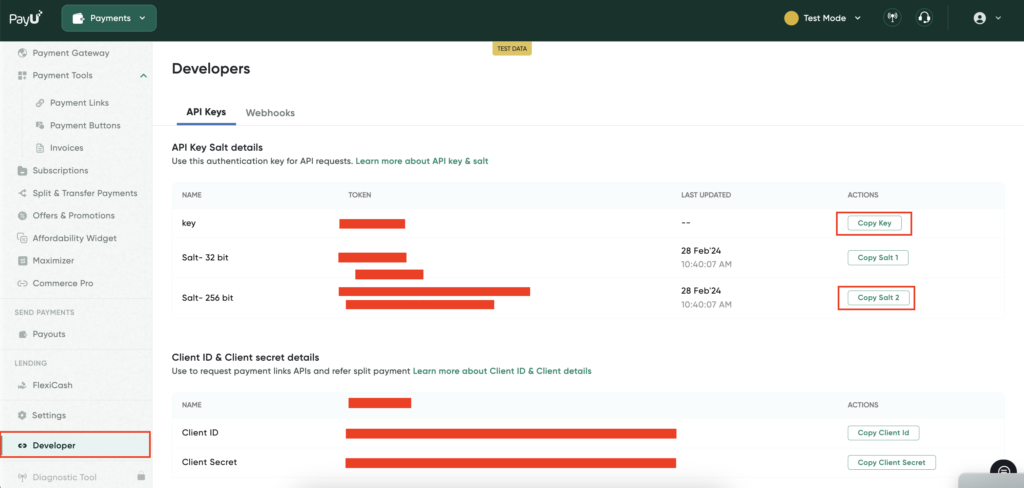
Any one of the salt keys can be used though Salt-256 key is considered to be more secure than Salt-32.
4- Use the Copy Key or Copy Salt button next to each field to copy them to a text file and save them in a confidential location for your perusal. This will avoid any typos with the merchant key.
Steps to make test or live payment enabled on your WordPress Website:
1- Install the required PayU Biz plugin for your WordPress version. I installed it from PayU official GitHub repository. You will get a zip file from the repository. Upload this zip file in the Plugin section of your WordPress dashboard and then activate the plugin.
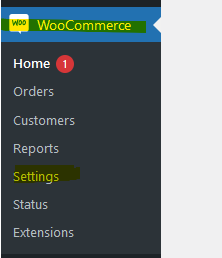
2- Assuming you have already WooCommerce plugin installed and activated, Go to WooCommerce>Settings.
3- Click on Payments Tab then enable PayU Biz payment method from the list of available payment methods. Once activated click the Manage button.

4- On the Manage page, enable PayUBiz by checking the box.
5- Next select Sandbox (for test mode) and Production (for Live mode) from the dropdown available in Gateway mode.
6- Next comes the important parts. Enter your Merchant Key obtained from your PayU merchant dashboard in “PayUBiz Key for Currency 1” field.
7- Next important part is entering your Salt key. Enter either your Salt-32 or Salt-256 bit keys obtained from your PayU merchant dashboard in “PayUBiz Salt for Currency 1” field. Any one of the salt keys can be used though Salt-256 key is considered to be more secure than Salt-32.

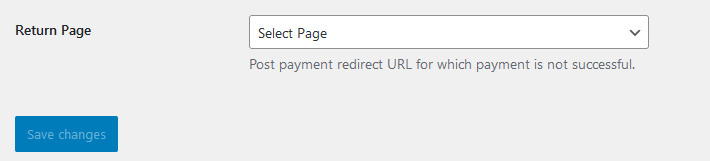
8- After entering the details, scroll down the page and click Save Changes to save your Gateway Mode and Keys entered on manage payment page. You can also select a page in Return Page section to redirect user for any unsuccessful payment.
How to check if the PayU payment gateway integration is successful on my WordPress website?
Once you have correctly entered both the Merchant and Salt keys in PayU Biz payment plugin of your WordPress site, you are now ready to test whether the Payment Gateway is working as expected or not.
1- If you have enabled Production (Live Mode) in plugin settings, then you can either attempt making a real payment for your own product or wait for an actual customer to make a transaction on your website. If all goes well, the transaction made through the payment gateway will be successful. In any case of atransaction, you will get a notification of transaction status with all the necessary details like amount, time, payment mode etc on your PayU Merchant dashboard.
2- If you have enabled Sanbox (Test Mode) in plugin settings, then the question arises what payment mode to select and payment details do we need to enter during checkout? Well I also enquired about the same with PayU Tech support team and got answers as below:
For test payment I used below details:
| Payment Mode | Detail |
|---|---|
| Card Payment | Card Name: Any Name Credit Card Number: 5123456789012346 CVV: 123 for success Expiry: any future date like 04/24 , 05/25 etc. OTP: 123456 |
| UPI Details | BHIM VPA: 9999999999@payu |
I don’t know why but the above card payment information I couldn’t find anywhere over the internet and it worked for me.
The only information related to making test payments using PayU payment gateway available on their official documentation is below:
Test credentials for Net Banking
Use the following credentials to test the Net Banking integration:
Test VPA for UPI
You can use either of the following VPAs to test your UPI-related integration:
❗️Callout
The UPI in-app and UPI intent flow is not available in the Test mode.
Test cards for EMI
You can use the following Debit and Credit cards to test EMI integration.
| Card | Detail |
|---|---|
| Kotak DC EMI | 1. Card Number: 4706-1378-0509-9594 2. Expiry: any future date (mm/yy) 3. CVV: 123 4. OTP: 111111 5. Name: Any name 6. Mobile Number: 9123412345 (mandatory for EMI) |
| AXIS DC EMI | 1. Card Number: 4011-5100-0000-0007 2. Expiry: any future date (mm/yy) 3. CVV: 123 4. OTP: 111111 5. Name: Any name 6. Mobile Number: 9123412345 (mandatory for EMI) |
| HDFC CC EMI | 1. Card Number: 4453-3410-65876437 2. Expiry: any future date (mm/yy) 3. CVV: 123 4. OTP: 111111 5. Name: Any name 6. Mobile Number: 9123412345 (mandatory for EMI) |
| ICICI CC EMI | 1. Card Number: 4453-3410-65876437 2. Expiry: any future date (mm/yy) 3. CVV: 123 4. OTP: 111111 5. Name: Any name 6. Mobile Number: 9123412345 (mandatory for EMI) |
Test Wallets
You can use the following wallets and their corresponding credentials to test wallet integration.
| Wallet | Mobile Number | OTP |
|---|---|---|
| PayTM | 7777777777 | 888888 |
| PhonePe | Use the Phonepe Pre-Prod app for testing purposes as described in the following PhonePe doc. location: https://developer.phonepe.com/v1/docs/setting-up-test-account Download the app and register your mobile number and follow the instructions as described in the above PhonePe docs. | NA |
| AmazonPay | You can test using your original Amazon account details. |
One of the most important factors is thorough testing of your payment gateway before launch. In test mode, you would be able to simulate with ease all the possible scenarios of transactions such that everything stays in order for customers to have a hassle-free experience. You must always have your Merchant Key and Salt safe and sound as they are essential for your transactions to carry integrity.
Using the instructions provided in this article, you will be sure to set up and test your PayU integration confidently, which can lead to a smoothened experience for payments on your site. And so, as you start through this journey, always go through the official documentation of whatever Payment Gateway you are integrating. DO NOT upload random payment plugins to your WordPress site. When in doubt always reach out to the official tech support team.
I hope you have a reliable payment solution that would help create trust and satisfaction in your customers. Good luck with selling!